
Perhaps an over statement. But this isn't the only clutch of multiple tads developing I can see. There are at least four groupings will well over four tads in each. In the past I was used to 1-3 imitator tads. But pumilio have many more, and the parents only bring the best of them to water, leaving the rest where they developed.
Beyond this I have 10 tads that have become juvies in about a month. That's about 60-70 days to develop and now the cycle begins again. I guess come November I'll have another round of juvies. I better get another tank ready. All this and I don't even keep film canisters for depositing.

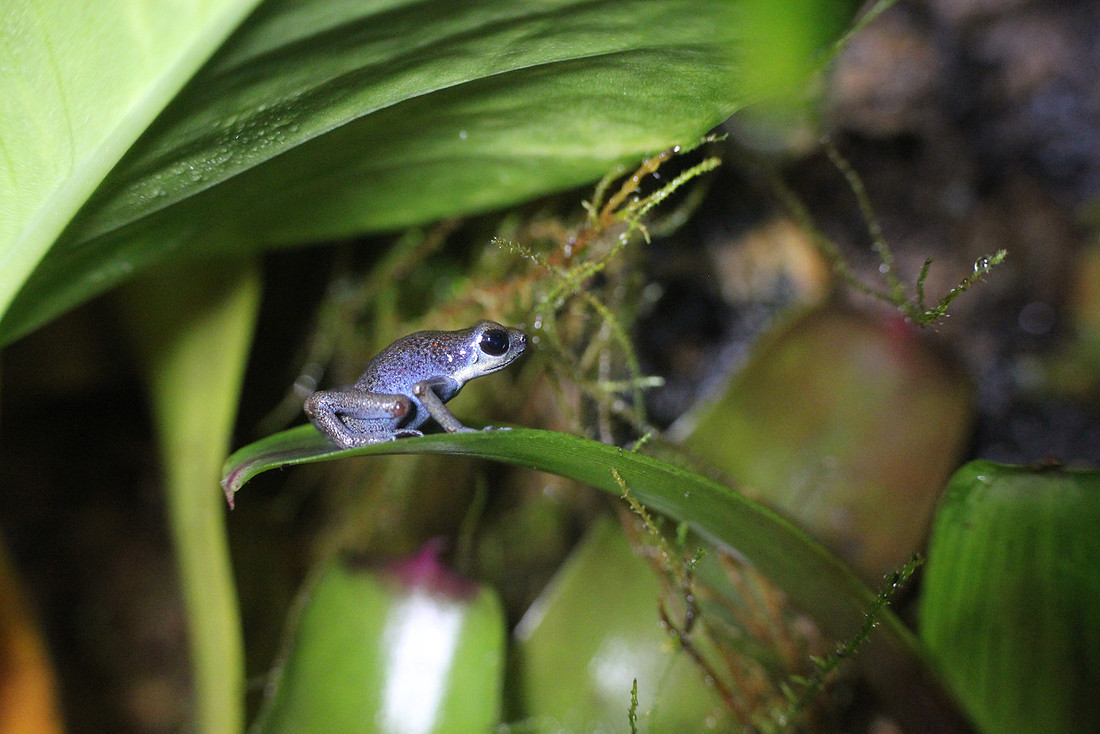
My wife found this little guy out front of the house, got freaked, and decided my frogs got lose and managed to make it up the stairs, and out the front door. I'm not sure about her logic, but I didn't argue when she woke me from a dead sleep screaming to come get this frog from her.

I was working on a few ideas for a 20 gallon long vertical conversion kit. I really think it calls for one door hinged on one side. While contemplating it I decided to make an easier 20 gallon long horizontal conversion kit. Why doesn't anyone make one already? It's easy enough some double strength glass, a marineland perfecto hinge, a couple heyco snap bushings with 100 mesh, and a few magnets.
Maybe some just prefer to enter the tank from the top.

It's a sad day when you find this on your carpet. Poor little dude. He finally started exploring the vivarium. He found he could squeeze between the sliding glass doors, and then jumped from the glass to the floor, dried up, and died.
I'm amazed how many talk about how great sliding glass doors are when their baby frogs can escape so easily using them. They are probably not raising pumilio or thumbnails. This is why I'm not focusing on sliding glass doors. Something with a tight seal is way better.
I'm hoping his brother here has a much longer life.

How do you know who is the male? In the pumilio world it's hard to tell till the male puffs himself up and prepares to call. Of course it's usually the call itself that gives him away. This guy has a trio of females he courts regularly and three kids already out of the water! Sufficied to say he does quite a bit of calling.


It's was only a week later another little juvie made it out of the water and started climbing around the brom. The older sibling finally decided to go check other broms and see where it's more fun to be. Or so I thought. Turns out there was another that went OOTW. And two more for certain on the way!
I took a few photos of some of the micro fauana they like to crawl on besides the broms. Looks like I'm going to have to get a new terrarium up and ready for juvies, soon.


Not the most interesting topic, but still an important thing to know how to do. I don't like to drill drainage holes in the bottom of my tanks. It's just another things that will leak when I'm moving them. While this isn't the fastest way to drain water from a tank, it takes only a few minutes and I've only needed to do it once this year. So no big thing.
I keep worrying I'm missing frogs. So sometimes at night I do a roll call. Usually I can't find them all. Which doesn't means they are gone, but sleeping someone inaccessible to me. Which searching I found this new guys out of the water next to another who looked ready to be out of the water.

In mid May the parents arrived. By August the tads are leaving the water. Nice.

Yeah! After years of cutting glass by hand and hurting my hands in the process, I got myself a Fletcher 3000! I see this in every hardware store where they cut glass. I’ve always wanted one. Now I have it. I rule!
Okay, this one was pretty used, but it works and came with extra parts the guy bought in case other parts broke. So it’s well worn in with extra parts to spare. I guess it’s really time to get FrogCube off the ground. With this baby I can make cubes for frogs, no problem!
Still a work in progress. Actually, it works pretty well. It just needs some minor adjustments and made in ABS plastic. The problem is the system by which I’m printing it. It’s not big enough, and I need a better heating solution. But things are moving slowly in the right direction.


So I got sick of using all my misumi extrusions to keep my lights where they were. I resolved it by taking a 1″x1″ L-bracket and printing mounting clips for my lights.

A much cheaper way to mount!

I was thinking that it would be really cool to build a lattice for plants to grow through that would also hold tad containers that could easily be removed. Or maybe as a skeleton frame for a clay background you could easily cut into shapes. Or maybe as a false bottom. So I started to build a test. But then I ran out of PLA filament. Still, looks pretty cool in a modern art kinda way.
It’s been fifteen days since I got my 3D printer. I’ve made quite a few tweaks, and been through every method of calibration, and then of course ran out of ink, as some might say. Things are slowly moving forward, but at least they are moving.

The Gmax 3D printer has arrived! Took me a while to put together. There were some pieces missing and I broke more in the process during calibration as the tools for this were missing as well. I guess kits are like that. Makes me think of Ikea. It’s got a 16″x16″ build area with a 9″ height. Probably needs a heated bed for my work. I hope it doesn’t take too long for replacement parts to arrive from China. I wanna get started on building Frog Cubes. These will probably be eFrogCubes (elongated) for more height. But I’m psyched to be one step closer.
The last and final edition to my 70-gallon trifecta to add the “Blue” color is a 1.2 group of “Cauchero.” Imported in 2014 by Strictly, and raised by Simply Natural Dart Frogs. I contacted them and made arrangements June 12th. And here on June 13th they have arrived.

I was suprised at how small they were. About as small as the “Loma Partida.” I suspect it’s because all my “San Cristobal” girls have gotten fat and sassy in their tanks. It’s hard to remember back to how skiddish they were the first few days.

My new “Cauchero” group is currently hiding on the floor in some high foliage, in deep discussion about the new state of affairs. But they still allowed me to take some nice photos!

Okay, blue is nice. But specks and spots and racing stripes are better. Perhaps I should have been more bold and gotten what looked sweet and left it at that.

That being said, I paid extra for a 1.3 breeding group, and so far, they look awesome and have delivered what they promised. Tads, tads, tads! I don’t know where they are being transported to. I just think I’m going to need to increase misting and start draining the tanks! I love tads! And with tanks this big, they can live with the parents for quite a while.

Now I admit, the new guys have been here less than 24 hours. So I have to give them a break. Let them eat springtails and get comfortable in their tanks until they feel free to call to their hearts content. It will happen.

Green was next on my list. I decided I wanted to go green or go home. One color, no spots or speckles. I was thinking ‘Punta Laurent,” with a lime green and yellow bellies, but I didn’t want the speckles. So I finally found a nice WC “Loma Partida” pair, imported in 1212 by Strictly and in the care of Patrick Nabors of Saurian Enterprises. I contacted him June 10th. We confirmed June 11th. I have this now June 12th as of 10:30am.

They arrived in little black cups itching to get out. The male was a bit skinny, but seemed very active and ready to see his new home. The female was god sized and a little more content to wait in her cup.
Now when I first told Patrick they were for a 70 gallon tank he said, “What? You’re never going to see them again.” I was a bit taken aback. I mean it’s a good size tank for them to be happy in. There is 4 months of springtail life waiting to be eaten in there so I’m sure they won’t starve. They will do well. But that wasn’t what he meant.

Okay, yes, most of the tank is green. And the plants are green. And it’s pretty much all plants. And they are little thumbnails sized pums. And it’s a 70 gallon tank with a huge branch in the middle that I can’t see behind. And there are many dark places and they are wild caught animals who don’t even wanna sit and hang out on the glass. But seriously, how bad could it be?

Oh. Damn. I’m never going to see these guys again.

Mom wasn’t happy with the film canister. So she decided to take her baby for a stroll around the tank. I’m not sure if she’s coming back, but I emptied the canister and refilled it with water anyway.
The 3D printer is on the horizon, and then it’s back to making cube tanks for frog cube!

I really hate film canisters. They just don’t look pretty. Who really wants to see a canister on a suction cup attached to the side of their tank. It doesn’t look good. And it’s not like the frogs needs it to lay. Although it a nice option for them.
I was looking last night to see if there were any tads lying around the tank. I didn’t even see this till the morning. And you can be sure they were there last night! Eventually a mom will need to break them out of the yoke and take them somewhere with enough water for them to breath a little easier. Which is probably a film canister! Okay, maybe one of my bromeliads will be okay. I’m hoping. But I think the film canisters can hold water just a little better.
These guys don’t move much compared to imitator tads. That’s makes this all a bit harder as a learning process from Thumbs to Pums. But I’m getting there.
Sometimes I think the aesthetics of light and shadow are over looked for simple need and function when trying to create an environment.

I’m not saying such light helps plant grows as well as a bright full spectrum light would. But it does offer some ambiance within the terrarium.

I don’t think lighting concerns this guy when he’s on the prowl.
 \
\

I ordered from Shawn on the 13th. They arrived on the 15th. I heard calling of the male by the 16th. Found frog spawn by the 18th. Nice. Worth paying a little extra for a breeding group.

Male of the 1.3 Oophaga Pumilio ‘San Cristobal’ group confirmed. Why he’s the only one that looks like he’s got mascara on his eyes or something I’ll never know.

I’m waiting for the male to call. I’m not sure which one it is, but I’m pretty sure I paid the price that ensured a 1.3 group of San Cristobal. It was a steep price, more than 2 probable pairs might have cost. But I did it for one reason. Cause they looked good. I always wanted some Strawberry red Pumilio that were speckled, not dotted. I would have preferred all red. But blue hands and feet as opposed to arms and legs worked for me as well. And a mating group ensure the offspring wold have the same look I was interested in. So I did it. And at the same time I bought it from someone who has given me a pair that worked in the past. So why not.
Cause it’s expensive, that’s why! And that makes the choice hard. For a few hundred more I could have gotten 3 pairs of different Pumilio morphs. But I didn’t because I was sure I wasn’t doing to be as happy with what showed up at my door as I would be with these.

That’s pretty much all I have to say. These frogs are awesome. And once the male starts calling and eggs start being laid, I’ll be pretty happy. Until then I’ll just watch, wait, and decide what to put in the other two tanks. But I have no doubt things will start happening by summer.
At 9:30am today via Ship Your Reptiles, my 1.3 group of Oophaga pumilio ‘San Cristobal’ arrived. Imported January 2014 by Strictly Reptiles they were chosen, medicated, and tested by Shawn Harrington: The Frog Whisperer. They arrived in small vials ready and waiting for their new home:

After placing them into the middle tank they were reluctant to move about. They slowly made their way up the background and now are starting to feel comfortable. I took these photos to remember what they looked like when I first got them. Not as red as I thought they would be. I think I need to get some vitamin supplements to redden them up more.


After a winter and spring of work an growth, the trifecta is doing pretty well. It started with the edition of 1/4″ coco fiber backgrounds.

I decided to use it to also cover my substrate of growstones. I didn’t want to deal with a giant hole in the tank, so instead I made a drainage pipe inside each tank to siphon excess water. So far I haven’t needed to use them, as growstones absorb most of the water and disperse it out enough for faster evaporation.

Then I got some cork bark flats and rounds, with some moss to fill up the rounds and between pieces of cork. I used black pond foam sealant to hold the cork in place.

Add some coco husks, moss, and charcoal for top soil, and a few choice plants, and there ya go. Okay, so it wasn’t that easy. But I was just getting started and it was a long winter of trial and error to see what worked and what didn’t.

Eventually I had to move the tanks to a new room, modify the misting system to hit the corners, toss out the fans, and add a few bottom plants and creeping vines.

Here are shots of the individual tanks. Growth has been great for broms. They seem to be having a new pup every months. Ivy is growing slowly, but making great roots all over the cork bark. The vertical planting of moss has been bad, but the rest has been pretty good.


This week will arrive the first inhabitants. A 1.3 group of Oophaga pumilio ‘Cristobal Island’ January 2014 Strictly Reptiles imports from Shawn Harrington: The Frog Whisperer. I’ve been wanting these strawberry dart frogs for a long time. And these are about as red and spotted as they comes. Let the breeding commence!

 I’m still working on new ideas for internal air-circulation. While I’m not trying to make wind, I do think slow air-movement is good in the long run for the health of the terrarium.
My problem is that at high speeds, the vibration from the fan runs through the mount and vibrates the whole top glass, making an even louder racket.
Solutions to come . . .
 Lighting a terrarium has a number of significant issues that need to be considered as the decision depends on the tank size and amount of ventilation. A small tank with little ventilation can heat up quickly. A large vertical may not suffer heating problems, but will have problems getting enough light to the bottom of the tank to support vegetation.
I’m lighting three 72-gallon tanks with very little ventilation, and only two inches of space above the glass. This meant I needed something low profile that put off less heat. Since the tanks are 36” tall, I still needed very bright lights that would allow terrestrial plants to grow. And with a 30” width, I needed to make sure light hit the sides of the tanks.
Low profile means you need to use LEDs. You might be able to get away with florescent High Output T5s. But the ballasts will just add to the heat and space you are trying to decrease. I was very happy to work with LEDs, and I heard CREE produced the most light with the least heat waste, but I didn’t want a complete DIY job where I was guessing how many heat sinks I was going to need to keep the lights working properly. After years of experimenting and research I stumbled across easyLEDlighting.

Tim from easyLEDlighting was doing a kicktarter project to create more eco-friendly energy saving lights to replace florescent tubes. His LED modules immediately got my attention. They used three CREE XT-E LEDs producing around 1260 total lumens. Plus they were directly connected to an aluminum plate designed to act as both a mount and heat sink.
Two modules would give me over 2500 lumens. Bent at a 90 degree angle, the modules could be mounted directly to the cabinets above the tank and take up only a inch of space. I decided to get a total of six modules for my three tanks and asked Tim to bend them at a 75 degree angle to they would point a little to the back of my tanks. Tim shipped them 2-Day USPS and sent me the tracking number.

I received my two 45w kits in a nice neat package, with all modules prewired and ready to attach with double-sided tape. They easily mounted to the bottom of my cabinets and were up and running in minutes. The hardest part of the process was getting a plug to connect to the driver.

First off, these lights are damn bright. I was quite impressed CREE LEDs live up to their reputation. I used to recommend 5050 SMDs. Never again. Not after seeing how bright these lights can get. I would fully recommend this lighting for small or large tanks. Small tanks with an 18” height only need one module.

Second, the mount gets hot. As hot as my HO T5 ballasts, meaning they will melt some plastics. Since I needed something to block some of the light while viewing the tank, I added more aluminum to help act as a heat sink. I don’t think this is necessary, but it makes me feel safe.

While the mounts get hot, the LEDs themselves don’t get off that much heat. Not nearly as much as my T5s. This means you can keep them a little closer to the tanks than you may have with fluorescents. Please keep in mind there is still heat being generated. Just not as much.

My final conclusion is these are great buy for anyone looking for an easy low profile solution for lighting rack of tanks, or one long tank. Not only are they bright and sure to keep all your plants healthy, they are also a nice 5000K white perfect for viewing your terrariums are taking photos of the tenants inside. And if you look at my light readings for the bottom of my tank, you’ll see there is plenty of light to record their activities.

So here I was with a space 95.5” in length, 15.5” in width, and 38” in height for some tanks. To use as much height as I could meant they must be front opening. But a depth of 15.5” ruled out most standard 18” tanks. For this reason any tall Zoo Med and Exo Terra terrariums would not be an option. And I didn’t want a hinged modified tank front. With a possible 36” height, the doors would be huge and easy to break! Fortunately there was MartyMade.
MartyMade, also listed under Vivarium Design Innvations LLC is Marty. And Marty is a one man show out of Warren, Michigan. I’m pretty sure he’s got a warehouse somewhere, but I haven’t personally been there. I was referenced to Marty when asking around on Dendroboard.com about local custom terrariums. Marty’s been in the game for a while, going to the local trade shows, and working with pet stores in the tri-state area.
I reviewed Marty’s website, made a few inquiries to local froggers, and then talked to him over the phone. It took us a few rounds over email before we nailed down the tanks.
Marty doesn’t make the European style tanks with lower vents. He’s more about something sturdy and durable with 6mm glass. This means he uses standard plastic framing and also frames out all the edges so the tanks are completely framed. He sells standard sized tanks, or you can custom order. He also provides some locking mesh tops for the tanks, but we worked out some 5mm glass tops, which I planned to customize more later. Hey, I own diamond drill bits for a reason!
More customization means more expensive. It’s a standard law of economics. And within that are minimum and maximums. Marty works with standard plastic frames. That means 24”, 30”, 36” or 48”. Three 30” frames would come close to maxing out my 95.5” length. And Marty was very interested in cutting down an 18” width to 15.5”, so I agreed. I consider also cutting the length to be 32″, but I had concerns about how the cuts would appear at the front of the tank. Marty standard heights are 13”, 19”, and 25”, but he said he could go as high as 36”. Since I had 38” to work with, I decided to make these suckers as tall as I could.
In the end, we agreed on three 72-gallon tanks, to be hand delivered to my house in two weeks. With the holidays here, Marty was a little backlogged, and builds these all on his own. With such huge tanks, I thought it best to pay a little extra and have them delivered to my door.

A good plan, as two week later Marty arrived on a Friday afternoon, ready to help me carry three tanks to the basement. We unloaded them, and dropped them into place. The tanks were all covered in plastic wrap and other forms of protection. There were signs all over it stating who it was made by along with specific dimension information. Plus, there was even a “made in America” emblem. Marty takes shipping seriously.
All and all a great product that still has the new car smell. I would recommend MartyMade tanks for someone in the midwest interested in a framed out tank as opposed to a frameless.
I’m in the process of starting what may be the only tanks in my house for quite a while. As such I decided it would be in my office, allowing the space to dictate some of the initial decisions. My office in the basement is small with low ceilings. It doesn’t get any natural light, except for windows in the distance. There were a few places I could build, but I decided to go big and focus on building on top of two ikea cabinets.
These cabinets are Ikea Besta cabinets that measure 47.25” in width, 25.25” in height, and 15.5” in depth. Feet add another 3.82” to the height, and since I have two cabinets the total length is 94.5”. It’s a fairly unfortunate length since it limits my options in trying to use up the total space. In other words two 48” tanks was not possible.

I generally prefer keeping fruit flies and other items necessary for my dart frogs in cabinets above the tanks, so I installed secondary shelves. These are only 15” high rather than the 25.25” plus feet on the lower shelves. I left the feet on the shelves as an easy way to mount a lighting bracket.
The space I was left with between the shelves was a little under 38″. It was perfect for sitting and standing while looking into a set of tanks.
The downside was that since the upper and lower cabinets are two units next to each other, they cannot be perfectly aligned. So the right top cabinet it a little lower than the left top cabinet, and the right bottom cabinet is a little higher than the left bottom cabinet. I’ll have to figure out how to shore up the difference. Also since these are Ikea shelves they are basically made of cardboard. While the cabinets are able to hold a couple hundred pounds, it will not stand up to any water leaks that get under the lamination. Something to consider when it comes to draining future tanks.

It’s been a long time since I posted, due to the fact over the summer I moved from California to Michigan. In order to move across the country, I ended up selling all my frogs, giving away all my tanks, and basically having to end my hobby. Or at the very least put it on hiatus for a few months till I was finished with my move. This winter I’m preparing to start again, this time with less of a DIY attitude and a larger focus on making the best damn environment for frogs possible.
While Michigan is a much harsher climate for the husbandry of dart frogs, it does afford a few benefits. One being the huge ass basement I now have to place all my frogs in! Also there are a few useful vendors here in the Midwest, which are more easily accessible for pickup. Now mind you I live about 20 minutes out of Detroit, Michigan. While Detroit itself has nothing to offer your average frogger, there are some great vendors in the surrounding areas. While many of these vendors are online, sometimes it’s just safer and cheaper to go over and pick up what you need.
- http://www.martymade.com/ is a local vendor of custom made tanks who doesn’t sell online due to how hard it would be to ship out his glass behemoths. Made of 6mm glass, they are damn study and completely framed out to be extra safe with sliding fronts.
- http://www.mistking.com/ sells of the best damn misting system money can buy. Located right over the bridge in Windsor, Ontario I have yet to venture there to make a purchase. I don’t know if the trip is worth it, but I’d love to do it anyway! I need some poutine over in Canada!
- http://www.glassboxtropicals.com/ up in Lansing, MI has some great plants listed! Once my backgrounds are complete it’s my first stop in picking up some bromeliads and a few other green and creeping items to make my tanks awesome.
- http://www.joshsfrogs.com/ is well known to most and located up in Owosso, MI. They sell just about anything you need, but I’m interested in them specifically for live animals. While I’ve never been there, I’m going to have to plan a trip. Maybe they will let me shoot some video for YouTube.
Okay. I think I listed out the big ticket items to make an awesome terrarium for Dart Frogs.
- Front opening glass tanks with sliding doors.
- An automated misting system to keep it all in high humidity.
- Tropical plants in multiple varieties.
- And of course, frogs bought locally so you can pick the ones you want and not have to worry about them dying during transport or paying an extra for shipping!

This rack of nine 15 gallon cube tanks is currently lit by three 54w T5 florescent tubes. This doesn’t work all that well. For one, the built-in ballasts and lights themselves create a bunch of heat. This heat doesn’t have anywhere to go, and sitting too close to the top of the tank, or shelf of the tank above it, just adds to the heat inside the tanks.

At the moment the lights are placed 2″ above the tank as to not overheat it. But the heat just get’s sucked into the tank above it because of how close it is to the shelf.

The second issue is that I really can’t mount the ballest to the shelf above or it will be even closer to transmit heat. And to avoid heat transmission I have to put the light on it’s side, which means most of the light is wasted lighting the back wall. Lame.

While you may think that’s bad, take a look at my other rack of six 20 gallon vertical tanks. They are lit by work lamps with 13w CFLs. Talk about wasted space on a rack. But I don’t have much by way of options.
While I’m currently in the process of trying to merge these racks together on one wall, I have been looking into more form fitting options. Specifically LEDs that point in only one direction with no wasted light, and have their own heat sinks to dissipate heat. They also need to give off enough light to keep a bromeliad healthy. That means over 1ooo lumens. And while kicking around on kickstarter I may have found it.

www.easyledlighting.com sells a system they state uses three Cree XT-E LED, rated at 1500mA and output 5.3Watt per chip. They give off a 5000K natural white, which is usually the most pleasing to look at since 6500k tends to be a bit blue to the human eye (although better for plants).
The nice things about these modules is that they can be angled directly to where I need the light, while not taking up too much space between tanks. And the heat sink can be mounted easily with some double-sided foam tape. I think foam tape is best because it tends to be stronger, and the foam will act as a buffer between the heated metal and wooden shelf.

Another idea I have been kicking around is a way to mount the lights above the front of the tanks without it touch anything. That way the entire system is kept air cooled, and perhaps more metal in the equation might help with better heat dissipation.
Ikea has Part #103886. You pop it into the side of a Ivar rack, and it ca be used to hold something in place. So in theory , you could take two of these and place them at the front top of the tank. You would have a 2″ x 15.5″ piece of metal to screw the metal parts onto, and the easy lighting module can adhere to that, for even greater heat dissipation. Plus now there is no connection between the light and a shelving unit.
So it just made sense that if you’re going to drill glass, you’d want at least double strength glass. Or specifically 1/8″ glass. I don’t think single strength is really made for it. Regardless, no one seems to make a plastic lip for this. 3/16″ and 1/4″ sure. I guess that’s because people use these in showers.

Clear Shower Door Bottom Sweep with Drip Rail for 3/16″ Glass – 35 in long - $11.95 + $5.15 shipping

CRL Polycarbonate “h” Jamb with Hard Leg for 180 Degree for 1/4″ Glass – 98 in long - $21.39 + $5.99

CRL Dual Durometer PVC Seal and Wipe for 1/4″ Glass – 32-5/8 in long - $10.95 + Free Shipping
Cutting the H-Profile Extruder Acrylic Bar from taps plastic which was only $1.32 + Tax seems like a better way to go so far. All these other options would coast way more than even $3.00 for a 10″ piece. I guess I’ll have to do better research. Or cut it myself.
 The most highly used aquariums for the use as vertical terrariums is the 10-gallon from either Petco or Petsmart. And since these 2″0 x 12″ x 10″ are turned on their side with the opening facing towards you for viewing, the vertical kit to make this front opening needs to be measured exactly. Most kits out there are made for Petco. Maybe it’s because they have the dollar a gallon sale twice a month. Petco uses Aqueon for their aquarium company with a opening space of 19.5″ Height x 9.75″ Width.
Petsmart is slightly different. Different enough that it’s a big deal. They recently moved to a new company called Great Choice which has a height of 19-7/16″ and a width of 9.5″ Great Choice makes up for this with a deeper tank, but still, this effects the kits greatly.
 Forgetting the specific side of how to cut the glass for a moment, I’ve been first concerned with the width and venting of the glass. And if it should even be glass to begin with. Most people like glass because it doesn’t change color or bend over time. And quite frankly it’s cheaper. I would argue, why not just get the more expensive acrylic that is also thicker and doesn’t bend so much. But I think people like glass over plastic for their own reason. And at the end of the day, it’s just what the custom wants.
So when deciding on glass, the next questions is 3/32″ or 1/8″ glass. junglebox.net uses 3/32″ glass. I think it certainly makes the door lighter. But I’m concerned with how fragile it also makes the door. This glass is often called “single strength.” I think I’d stick to “double strength” which is 1/8″ and generally the same width as what the tank is made of.
 So 1/8″ glass with vents located where? Do I even needs vents? I actually really like the look without vents. Ventless seems like a great idea. More space to view the frogs. However, a panel for vents and attachments such as misters, switches, and anything else needed might be a good idea. Perhaps even keep it as a glass vent.
Maybe I should keep everything glass. Have a 12″ viewing area for the frogs with 3.5″ bottom for the drainage and substrate (adding a drain is also going to be an issue). And a 3.5″ top for vents and holes and perhaps even switches to turn things on and off! I also need an overlap later to keep fruit flies from getting out. Oh, and I’m totally uses magnets to close this sucker.
 I just had this idea. Why not take an “H” profile bar and cut one of the sides off so it’s can be used on the edge of the top to keep the fruit flies in? Actually, they should make this already somewhere as an “h” rather than “H.” Do they? It’s a really hard search to look up. Anyway with a black on at the bottom and a black on a the top (or maybe both clear) you’ll have some nice symmetry. Just an idea. Now I need to find that “h” bar. I think they use them in glass shower doors to keep the water in at the bottom. I just wish I knew the name!
Anyway, Basically like this, but 1/8″ in plastic!


Tonight’s contender is a 10w LED Flood Light that hails from Ebay. I have tested these lights by themselves, and they get damn hot! However this one is encased and on a heat sink using standard 120 voltage. I was psyched because the Ebay ad stated:
|
120V
|
10W
|
DAY LIGHT
|
950 – 1050 LM
|
4 4/8″ x 3 3/8″ X 3.5″
|
I am beginning to wonder how factual these numbers are. Tonight we’ll compare with a 13w or 14w CFL and see what difference we can find. So far I have found that unlike my makeshift lights, I feel very little heat either on the front glass or emitting off the metal itself. It makes me want to test a 20w to see if the same is true. Right now I would agree to dropping this on top of a 10 gallon tanks without any concern of heat issues. I’m quite shocked by this after working with 5050 SMD strip lights and these 10w LED by itself. Perhaps I need to leave lighting to the experts. I just have to make it shine a little to make it look nice on top of the tank.
List of things to sell on website:
- 10 Gallon Vertical Conversion Kit
- 10 Gallon Vertical LED Lighting System
- Internal Circulation System
- 1″ and 2″ Snap-In Ventilation
- 10 gallon slanted cube

My daughter was born last month. So that slowed me down updating the site. But things are happening. My Yuri and Tarapoto are finding partners. Soon they will all be broken up into breeding pairs. Except for Varaderos. Those guys can’t find a single father. How odd. But I have 2 proven Tarapoto pairs and 1 where I’m trying to determine the mother and father. On the other side, I have a proven pair of Yuris. And another where I have to pick which two of the 4 are the breeders. So things are going well.
I have been thinking more about kits. People love to buy 10, 15, 20, 40 gallon tanks. But they want them converted to vertical tanks with low ventilation. And they want it done without having to drill extra holes in the rest of the tanks. I wants a resolutions without the wide vent at the top. I’d rather not restrict the view at all. So what does that leave? Something to be build in a 3d printer I think. But if I can come up with a new system for vertical kits and lighting that matches right, then I think I have something to sell. After that I’ll perfect the slanted cube.
 Okay, so as offspring go, I have a 1.1 Yuri pair that is breeding, 1 Juvi that I put in another tank to help develop. 1 That’s not really an offspring, but a brother to the father (in the photo to the left), and then 7 others, half of which I’m sure are male, but I don’t remember which.


Now I have to admit that the last 5 look a little like my Tarapoto. So let’s review them. Of them I have a possible 1.1 pair which so far are not breeding. Maybe I should put them back with the other. Until I make that decision, here are the 10 others.


So that’s 11 Yuris and 12 Tarapoto. Plus I have 1 Tarapoto in the water and 3 Yuris, one of which is a 3rd generation frog. Sweet!
I need to count my Varadero. I think I kinda lost track of them.
I was checking out some isolation tanks from the great Frograck on Dendroboard.com. I have to say, they were pretty sweet! Okay, they could also be used as grow-out tanks or port-o-tanks. But I like the idea of isolation as they should be a temporary solution. While Joe AKA Frograck has some great info on how he made his, I thought I’d go into more detail.

The tank itself really calls for a plastic storage solution with enough necessary space for a frog not to get stressed out, while at the same time ensuring the frog and it’s food source don’t escape. The Container Store is really the main source I have found for this type of storage. But the company that makes the water tight totes with a gasket around the top to keep the water out is IRIS USA. I have yet to find a different company that does the same thing. Also have 4 clamps on both sides of the tank ensure the top wont snap off if the tank drops. Not that you’re frogs would be happy either way.
 I opted for the 17-3/4″ x 14-1/2″ x 11″ watertight file boxes rather than the larger totes, simply because they fit on my Ikea IVAR shelves more easily. This probably means the tank will hold only 8 gallons, but I’m still happy with it. The largest totes that will hold over 10 gallons and fit nicely on a shelf are 19-3/4″ x 15-3/4″ x 11-7/8″. I’m actually pretty bummed this size won’t fit on my Ikea IVAR shelving, but that’s a whole different story. Whichever you choose I’m sure you’ll be happy, although I’m looking at the top channels of the first for adding lighting.
 Next up are creating vents. I actually think it’s funny as hell to have to make vents in something that is supposed to be water tight. But frogs need air, so what can you do? While 1″ holes keep more humidity in, I think two 2″ holes make more sense. You may notice Joe uses tea balls for this. Ingenious idea! But I have to say make the tanks looks a bit makeshift. My vote would be snap-in grommets. Specifically Heyco 2400 SB-2000-26. I choose these because the opening is 1.640″. This is key because I wanted to use some metal mesh to cover the openings.
 The covering I chose this time was stainless steel mesh. However I didn’t want to cut these out myself. That would be a total pain. So I looked online and found these 1.75″ pre-cut circles by Purolator. I happened to find these by accident. And I’ll be calling the company to see how much they are for regular distribution. My plan is to try to get some IPS Weld-On 2354 and cement some ABS plastic to keep the screens in place. We’ll see if it works out. If it does, I want to just make 100 ready for whenever I need a screen!
 You would actually think someone makes something like this and I wouldn’t need to re-invent the wheel. And there are! They are these things called louvers with aluminum screens, but the screens have more open space and I’m kinda freaked the fruit flies will escape. Plus the way they fit into place may work for plastic, but not for 1/8″ glass. So I’d rather build my own. That way I have vents for multiple needs. Vents for glass tanks, plastic tanks, and even fans! Damn, I wish I could have someone else glue them together for me. I hope there is an easy way.
 The second to last part of this process was trying to get a good substrate for the tank. It’s a portable system so it needs to be light and less prone to sliding when the tank is tilted. That rules out hydroton or growstones. I thought media pads might work, but it’s been hard finding something that works best. I finally settled on a Matala media filter. I’m trying the black, which is a bit more porous than I would like, so I’ll probably switch to the gray in the future. But for my first 3 tanks these will be a great test.
The nice thing is with the tanks I’ve chosen I can cut a half sheet into 4 pieces with very little waste.
Nuff said. Maybe this will make a little more sense for those who wants to make some on their own.

Decided to take a few leftovers from around the house and build me some new fans for the inside my tanks. I just worry the air is getting a bit stagnent with no movement. While there are two 2″ holes for vents on top, there should be a bit more air circulation inside the tank.
 I have a bunch of 2″ Black Snap Bushings from HEYCO. Model SB-2000-26 for those who care. Got a pack of 100 on Amazon and so far I’ve used maybe 40. As you can guess I use them for the vents on my tanks, along with some No-See-Um Netting. I thought perhaps I could use these to make some 50mm Computer Fans more frog friendly.
Generally I’d just drill a hole in glass, Let the netting be pressed into place by the bushing, and then pull the netting till it’s taut. But in place of glass, I decided I needed something rubber.So I got me some Danco #39 O-Rings to keep the netting in place and wrapped some ponytail bands for good measure.

To clean up the edges I cut off the extra netting and then burned off the fray. Some glue under the ponytail band would probably be best. But for now I’m making it easy to remove the netting if necessary.
The adhesive I’m using at the time is Professional Welder which is just what I happen to have around the house and seems to work pretty well with different types of plastics, but melts rubber. As you can probably guess I used the adhesive to put two of these bushings on either side of the fan. Since the fan is 2″ and the bushings are 2″, it’s works great!


Of course you need a way to attach it to an arm. And for that I got this Orbit 1/2 in. x 6 in. Cut-Off Riser. Just cut off the piece you need, then slice a groove in the top to hook the edge of your fan. The adhesive actually works great for this if you apply it liberally. I kept the riser in place with a rubber band and by the next day it was hard as a rock!
I have a few more steps to go to get these mounted to the tank, but so far these are looking pretty good. I was considering wrapping these in coco-fiber and trying to grow moss on them. But I’m not sure it it’s worth it.

 I’ve been sorta busy over the holidays so I have not really been paying attention to my frogs. I thought it would be nice to see what’s been going on. As you can see, even with my inattention, my frogs are still propagating, as I discovered when doing a body count of my yuri and tarapoto offspring. That’s 11 of each with two possible pairs. I just hope I kept them in the correct pairs, but one pair of yuris had spawned a tadpole, and one pair of tarapoto was laying eggs. So with any luck, this summer will be my proof I can actually produce offspring that will produce more offspring. I was a bit concerned about it. This photo is from my tarapoto breeding pair. This is their most recent offspring. I have never let them bring any tadpole all the way to OOTW (out of the water) before. So this is their first. I’ll probably wait until he’s able to eat on his own before I move him in with his siblings.
The wall of tanks I had to move to a different wall to make room for a futon. Such is life. It caused a big reduction in total tanks. I already tossed out three of the tanks. I still have four ready for the trash. If you live around San Jose you’re welcome to a free 15 gallon tank! Until there, here’s a video of the room right now.

I hate math. It’s really no fun. But when setting up LED lighting you just have to do it. What a a pain. Sometimes I just write hear to sort out my thoughts.
Okay, so my 65G tank has a 225 LED board and a 132 LED strip. Each so the board is 4.5 amps, and strip 2.54 amps. Just to be safe I’ll drop a 12v 6a adapter on the board, and a 12v 4a adapter on the strip. That ensures I’m not maxing out the adapters and only getting close by 80%. Do I need a 20% gap? Probably better not to burn my house down.
Testing for me has concluded 63 LEDs should be enough to light up a 15.5″x cube. That’s 1.26 amps.
The top elongated cube will have only 42 LEDs in the strip, but 45 LEDs as G4 spot lights, totaling 87, making 1.74 amps.
I’m assuming I’ll be dropping these on separate 12v 6a adapters, with a maximum of 4.8 amps on each.
2 cubes and 1 elongated cube will be 4.26 amps. That’s got a pretty good safty gap to 6a, needing 6 12v adapters
Above all the tanks I plan to take some of my 6500K LEDs and leave them there for plant lighting. Each one is 96 LEDs. So 1.92 amps. Augh. At the moment not sure I even want to bother.

My LED lights and AC Adapters arrived in the mail, and now I’m finally ready to finish up my frog rack. Each item had to come from a different vendor off Ebay or Amazon. It’s funny how these places have become the leaders of online commerce.
Here is a test of a 225 light panel and 132 strip of lights around the from. They are 5050 DMD @ 5000-5500K LEDs.
So on the rack I have 18 tanks. I plan to use 12″ strips of 21 LEDs each. I have 60 strips to work with plus 18 G4 lights. I’m still working on how all these will connect. The blue lights will be moved to the top to help grow more plants.

If you crunch the numbers, your auxiliary items that exist outside or in connection to your tanks can have a high price tag. I mean racks, lights, misting, and drainage.
Misting means a pump that can support all your tanks, the hose and connectors, as well as the misting assembly and drilling them into the tank. For 20 tanks, I’m looking at over $450 in costs.
To be a little more on the cheap with drainage, used a three dollar drain with a fifty cent right angle. Add hoses, diamond drill bit, and a place to drain, and you’re looking at about $100.
My Ikea IVAR shelving will cost at least $500 in parts, and I may need to go back for more. I admit however a couple wire racks will cost you less than have that price, but won’t look at nice.
 And last but not least is the lighting. While there are a ton of choices, I went with waterproof 5050 LED strip lights. There are 300 LEDs in 5 meters. I chose these because all other types of lights would get way too hot between tanks. And with their placement right next to vents, they would only make it even hotter in the tanks (I’m looking at some fan solutions to help resolve this). LEDs seemed the best choice, and the brightest ones that did not require a heatsink are 5050′s.
At first I chose the cheapest LED strips. They were 6500K and ended up having RGB connections making it a pain in the ass to solder. So for my next strip I made sure they were 2 pin. In both cases 6500K light seem a bit dim. You can see them on the bottom tank. There are 96 of them. The top tank has 84 LEDs with 5500K. They are much brighter, and the more preferred color. Maybe not better for the plants, but better for your viewing, and the plants will still do better under them.
I cut the 300 LED strip into 21 LED segments. This gives me 14 segments. I use 4 segments for each cube. Meaning 2 strips will make 7 cubes. So 6 strips will make 21 cubes of light. A strip costs $26 so $156 total, plus wiring and solder, not to mention adapters for power, and a 30 amp 12 volt adapter. So maybe $250.
Wow, $1300, and that’s not including all my mistakes and testing of equipment, or even the tanks themselves. I hope this is helpful to someone. Be careful what lights you end up buying! It’s not the most expensive part, but the costs can add up.
 When I first started raising dart frogs I misted by hang. Every morning I’d go in and mist my tanks, and every evening when I walked in the door. Hand misting is a pain. You can never be sure you misted enough, and you may find it hard to do when you’re late for work, or late for dinner.
At first my solution was a water feature. I thought the humidity would stay high and the light splashing on plants would be a solution. Not really. And when your dealing with arboreal frogs like thumbnails who do everything up high, it doesn’t work at all. Plus re-circulation of dirty water only leads to more bacteria, and a high level of water at the bottom of your tank that smells. Don’t get me wrong. I love waterfalls. They are just more high maintenance then you would expect. I’m not even going to get into what happens when your pump goes dead.
A great solution is a misting system. And if you have more than one tank, it makes even more sense. Not all misting systems are equal. And not all misting parts work the same. I’ve tried to make them from different parts from different vendors, and I’ve been to reptile shows and seen vendors selling parts that are a bit too large for the size of my tanks. After all my research I went with MistKing. My current cube rack build with a total of 16 tanks will be using a Misking T Value Assembly in each tank.
 Oddly enough this build was actually inspired by a blog by the owner of MistKing. You can see his 1o tanks in the photo, not to mention the rack itself. I won’t go into how amazing it is since you can read that blog yourself, but it totally is. My is nowhere near as beautiful and thought out. But I’m sure mine cost nowhere near as much. And looking at the misting system he build at the start, you can see why he worked hard to develop one that worked even better, and was more aesthetically pleasing. I like the assembly because it’s black, and matches the black vents, and the black hinge for the glass front. If you don’t know what I’m talking about, watch the video!
One more thing I want to say about the mister itself. It’s great to be able to move it around into different angles. At it’s heart, that’s what makes it so great. You may drill the perfect hole, but then you are not sure how you want to angle it. Then you add a back a background, and think a new angle is better. Then you add plants and you fix the angle again. This is why it’s necessary to have a mister that you can reposition. Because you will.
Relating to the Mistking website, I do have to complain there are no diamond head drill bits for sale. I would think if you bought any system, you’d probably want to drill your tank for it. There should be glass and acrylic bits available to by. So my vote is to buy the bit from lightedwinebottlemaking.com. An odd place to get a 5/8″ diamond head drill but. But $8 with shipping is a pretty damn good price. And in America!
Oddly, while I have been making videos recording my progress making a wall of cube tanks, I have not been adding them to my blog. So here they are. This video starts with me testing to see if my tank hold water with a drain added. It luckily does.
Here I’m verifying my lighting. While I’m not in love with the blue, it is easier to place above the tank is such a small area available to work with.
This was yesterday, which the fronts finished and the tank planted.
More to come!
So last week I was a about trying to get the proper LED strip lights, misting, and drainage for my cubes. In the process I ended up going to my local hydroponics store where I usually pick up hydroton, and found the best little drain fitting that worked great with a 1″ hole. Today while doing more research into all the internals for the frogs cubes, I realized that wasn’t all they had.
 All week I had come to the conclusion I wasn’t going to get the cocofiber mats I wanted, so I should use landscaping foam. Landscaping foam is actually pretty sweet. Unlike Great Stuff, it’s black so it looks like rock. As a background, it looks cool, and you can spray on ledges which are great for your frogs to chill on. Great Stuff and Touch ‘n Foam are two kinds you can buy, but both shrink after a couple days. Waterfall and Pond Foam doesn’t shrink, but it’s a bit more expensive. Recently however I got turned on to Handi-Foam, which I have so far found doesn’t shrink, and a 12 oz can expands after a day to make a perfect 15.5″x15.5″ background.
 Anyway I was planning to try and get something different for the substrate and while doing some searching it occurred to me I aught to see what my local hydroponics store had to offer. I usually get hydroton there. It’s $24.95 for a 50L, 40lbs bag. What I didn’t know is they also sold Growrocks, Higromite, and DynaRok! All three of these look more like rocks and less like man made crap. I does cost a bit more, so I’ll have to do a little more search into the cost effective nature, and I try to keep the price down on everything. But I’m pretty psyched to have found these options. I guess it comes down to the fast that I should be asking the potheads behind the counter.
 I might as well also mention the store also sell the cocotek coco mat that are 4′x4′x1″, which looks pretty awesome to use for the back and sides of all the tanks. with a 1″ thickness, a 4′x4′ can be easily cut into nine 16″x16″ cubes, filling 3 tanks with the sides included, or just 9 backs.
I’m a bit mad I didn’t find this first, before I decided to go with the foam, but perhaps this gives me the opportunity to test both options.

Conceptually the idea is simple. You need to get rid of excess dirty water in your vivarium. So you need to drill a hole to let any water over a certain level out (always good to keep a little water in to increase humidity levels). The second problem is being able to attach a hose to that hole to send the water somewhere else, preferable downward so gravity does all the work. The third problem is ensuring that water doesn’t leak somewhere other than where the hose sends it, and the forth problem is making sure something large doesn’t cover the hole and stop water from going where it needs.
My solution was the $2.95 Bulkhead Fitting found online as FILL / DRAIN FITTING ADAPTER. You can use a 1″ drill bit to drill the glass, and it fits perfectly. Fits a 1/2″ hose. Fits tights and I feel safe there will be no leaks. Plus it comes with a filter to keep big things from blocking the hole. I happen to be lucky enough to live around a bunch of medical cannabis collectives, which means I also have a couple of hydroponics stores close by for those who like to grow their own.
For a couple bucks more I was going to go with a black plastic spigot on the front, but I didn’t really want to drain the water myself, or have my son accidentally let the water out. And I had 5 inches of space behind the tanks to bend the hose. I hope to complete 6 of the 24 tanks with fixtures by the end of the week, and post them.
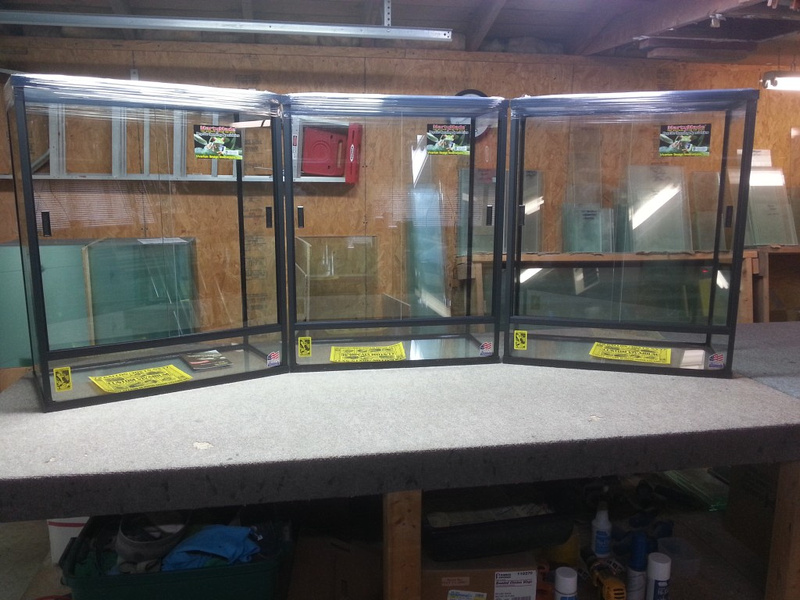
 Let the glass cutting begin! Bad photo I know, but I just wanted to show some of my main implements of cutting when dealing with these 1/8″ pieces of glass 20″ x 20″. I ended up taking a square table and adding some 1″x4″ pieces of wood to the sides in order to keep the glass in position. The t-square turned out to be a piece of crap, but I placed the pieces of wood in such a way, I can still use the t-square to help me cut. The glass is being cut 15-7/16″. I added an extra 1/16. Not sure if I should have done that. Anyway I’m planning to cut a bunch of pieces this size so the width of all my tanks are 15-7/16″ and the height is 15-11/16″. The depth will also probably be 15-11/16. I was going for 20″, but then I decided I wanted cubes, and that was that.
Okay, the main thing I wanted to mention here was that hang glass seamer. Totally awesome. I run that 3-4 times against the sides after I cut them, to sand down the edge so I don’t cut my hand open. Easy to use on 1/8″ to 1/4″ glass and total life saver. If you plan to work with glass quite a bit, this is way better than sand paper.
 To make this process easier, I’m putting this together, back first. So the back is on the bottom, then one side and top is placed, then the other side and bottom. The top and bottom are pressed against the edges of the sides, so that way the top sits on the sides. I figure this way when I drill a drain in the back, the glass will sit on all 4 sides, and when I drill the top, it will be resting on the two sides.
I think I’ll also mention in the glass is put together with GE Silicone II Clear and blue painters tape. That type of silicone drys in a couple hours, but I’d still give it 48 hours to cure. Also the tape holds strong, but comes off easy with no sticky residue. Right now I’m just doing the sides and the back. Not the front. At least not until I figure out the distances for three tanks in a column. Working on that now.
 So yeah, I got the big pine ikea ivar rack with 16 tanks at the moment to stare at from my comfy chair. It’s all a bit unfinished, and every tank you see will be destroyed and replaced with a cube tank. I’m thinking I’m going to get some 15″ wide crates to place at the bottom just to store my junk until I can really move forward. However I just got 5 tads who have popped their front legs, so I need to get moving soon before I have no place to put them all.
 So my rack plans moved over to the Ikea Ivar so the sake of convenience. Meaning my wife wanted it up now and for me to get all my tanks on it. Each shelf holds 66 lbs and my average tank is about 50 lbs, so it all works out. Except I plan to replace this will newly designed Height 15-3/8″, Width 15-3/8″, Depth 15-3/8″ cubes. The problem is right now the tanks don’t fit and everything is kinda naked. Just a wood frame really. So doors, shelves, and cabinets will be need be installed.

So here’s the down side. Ikea stopped selling the shelves, cabinets, and doors in 2008 for the thinner width. I guess they were not a big seller. This could change, but who knows! Until them I’m looking for alternate solutions that visually match. Maybe a box on wheels at the bottom rather than drawers. And fronts for the tops just to hide what’s inside.
 Building custom shelves is expensive! Okay, I should have known this already. But I’m finally sitting now and crunching the numbers for 3/4″ plywood. Ouch! I’m looking at around $80 per level, so paying out $240 wouldn’t be unexpected. Guess it’s back the the IKEA builds.
Yeah, I hate to say that. But honestly I don’t have the equipment for working with wood, and I honestly hate the metal shelving. Ir’s 48″ wide and doesn’t bends under the pressure of 3 or 4 tanks. Because of this, most suggest adding a plank to place underneath. But I don’t wanna do that either!
Now these IVAR wood racks have shelves 16 1/2 ” x 19 5/8 ” x 3/4 ” and will hold a Max. load of 66 lbs.
Right now I’m thinking 3 levels of 8 with a total of 24 tanks. Still gotta drop $440 + Tax. I’ll keep ya all updated.
 Trying to conceive and build a rack is a bit harder than I expected. But I’d like to build one that actually allows me to keep many tanks with an ample amount of room for all frogs. The area on my den at home had a width of 9’5″, or 113.” But that number doesn’t include the molding, so my guess it 112″. This design is 112″ total, broken into 4 pieces. It used my idea that the front should be 12.5″x20.25″x12.5.” However, since you can only see the tanks from the front, I’m wondering if I shouldn’t use the entire 20″x20″ to make the sides of the tank. Is it worth is for my own personal raising of frogs? Guess it’s back to google sketch for me.
 In the process of learning google sketch, I thought I’d take a break from my slanted cube, and focus on the elongated cube, call a vertical tank by many. I personally believe while an slanted cube has it’s own aesthetics to consider, the requirements for an elongated cube are entirely different.
Consider for example that a standard 10 gallon tank is 20″x12″x10.” These numbers are not based not on a perfect aesthetic, but cutting a standard pane of glass with little waste. I however, want to use the golden ratio. Which really comes down to spacing object using a mathematical formula of about 1.61803399.
So in this example you see, since I have 20″x20″x1/8″ panes of glass (which I need to run out and snag more of), placing one pane on the top and bottom gives me a total height of 20.25″. Using the golden ratio, I can determine by width needs to be about 12.5″. I chose to make this be the same on all sides, thus making it an elongated square. The total volume then become 13 gallons.
In the visual, since I couldn’t continue the golden ratio into the opening of the tank, chose to use a square. However, in retrospect, I’m wondering if I should make space for lighting. Adding an ABS top that adds 2-1/8″ would also require a change to the width. With a total height then of 22.375″, the width should then be 13.83″. Alternatively, I could just make it an even 14″, and increase the height of the light to about 2.4″. Oh the fun that is math!
 These are Bromeliads. I believe they are Neoregelia ‘Zoe.’ I get a big pitcher of them for about $35 from the store down the street. I’ve been meaning to get Neoregelia ‘Fireball’ for about two or three times the cost, but I’m not sure if it’s worth it. Right now I’m thinking about trying to grow a ton of these outside the house in a system where I could attach misters to keep them humid enough to do okay. At least that’s the plan. Not sure how well it will succeed. The ones above are sitting on some driftwood in a tank at my office. The skylight above provides enough light to keep them happy.
As I started in a different, I’m hesitant to continue adding broms to tanks. The frogs love them and use them for hiding and lounging and laying eggs and dropping tadpoles. But the last part makes my life difficult, because getting a tadpole out of a brom is a pain. However, after thinking about this for a while, I realized I don’t plan on removing tads in the future. So why not let the froggies enjoy the broms. Well two reasons. 1) Of all the plants in the tank, these need the most light. So you can’t have these in a tank with low light conditions. 2) They are the only big plants that are mounted to the sides of the tank, and tend to grow with pups and block all the other light from reaching the bottom. So something to consider.
If you do decide to use broms, I do suggest at least a 1000 lux light. if your broms are near the top of the tank, a 13w CFL will do. But if they block the light for the broms below, those broms at the bottom will dies. Before planting I highly suggest disinfecting all plants. Otherwise you’ll get slugs and snails and all sorts of thing you don’t want in your tank. I have that problem right now and am working on a solution to resolve it (called dry ice for half an hour to remove oxygen). To disinfect, soak the broms in soapy bleach water. Take a 5 gal bucket. Add two gallons of water, a few tablespoons of Lemon Fresh Joy, and maybe 12 oz. of plain Chlorox bleach. Soak them for around 15 minutes, then rinse those guys good in fresh water. You don’t want any soap or bleach left on the brom. Give them a day to relax before planting them.

I believe this is the male Tarapoto of this particular vivarium. One of my first offspring from last year. While I have been told I overpaid for his parents, they did produce quite a few eggs until very recently, when I thought adding more coco fiber to their vivarium might be a good idea. It wasn’t. I’m hoping this little guy’s mate will be ready to lay eggs soon, with more progeny forthcoming.
At the moment while my Tarapoto are slowing down in their breeding, The Varadero and Yuri are speeding up. So much so I’m sure to have over 10 of each, assuming they make it as juveniles. Only time will tell.
So I thought I’d take some time to reflect on my imitator dart frog experiences over the last year and a half. This is what I know:
- FRUIT FLIES: Wingless fruit flies are better than flightless fruit flies. And never mix them together unless you want to give flight to the flightless. Good fruit fly nutrition will trickle down to the frogs. So vitamins for everyone! And always make sure you culture enough fruit flies! Put a nice group of 30 or so fruit flies in a 32 ounce deli cup. Make two cups, twice a week. And the tops designed with vents do make things easier in the long run.
- SPRINGTAILS: Seed your tanks with them, and as long as you have ample food they will never go away. Great alternative for dinner.
- FEEDING: Keep a slice of banana around to keep the fruit flies from wanting to wander. It also makes a nice feeding area. Dust the fruit flies with vitamins before tossing the on the bananas, Or pump some into the misting system.
More later.
 Sometimes it’s hard to visualize my designs, so it’s great to put them down on the computer so I can see how three-dimensional objects connect. In this case, someone suggested that free 20″x20″x1/8″ should be put together without cutting. Sure, the front would need to be cut with a way to get into the tank, but the other five sides could be slapped together with silicone. I wasn’t sure how this would play out, but looking at this photo I can see how the top and bottom lip on the front would stick out. My main concern is that the top glass has nothing but silicone to keep it from falling. The again, if the bottom can handle all the weight, so should the top.
Eh, I’m just going to cut things down with a glass cutter. It’s not that hard. In fact there a 20″x20″ tile and glass cutter on sale with shipping for $35 online.
 Every now and then I’ll see a little Varadero hoping around with a tadpole on his back and think, “When the hell did this happen? Why wasn’t I notified!” A few weeks ago I went into his tank and found eggs, then about 5 tads all in different locations. Today I can’t seem to find any eggs or other tads in the tank. I don’t even know how this little one showed up. I think the proud father has had the tad on his back for a couple days. Now, after dropping an water filled canister in the tank, the transaction is complete and I have successfully removed said tadpole and placed him with the other tads.
 At least this time the male ran around the tank and let me know a tad existed. As you can see he even let me pick him up and show him off to the camera. The problem is generally he’ll find a bromeliad fulled with water from the mister to drop the tadpole in. Then I’ll have to take the bromeliad out, often destroying the root structure in the process, and then find a way to get the tadpole to leave it’s nest in exchange for a plastic cup with a little java moss inside. Some trade!
This is why most experienced froggers prefer keeping a ton of film canisters stuck to the walls inside the tank with suction cups. So the dart frogs can lay eggs and even drop tadpoles in a place that’s easy to access and replace. My problem is that is just make the tank look bad. Eh, I hate compromises. Maybe I should just buy some fake plastic bromeliads. That or just leave the tads in the tank for the parents to raise.
 While R. imitators have always been my focus, I do have one tank with a couple Leucs which never breed! It’s so annoying since I really would love for little tads to appear in the water to see how my leucs work out in the long term. Maybe I need to buy more. Who knows.
 I don’t generally spend quite a bit of time concerning myself with the eggs, tads, and new morphs. I’ve been thinking I aught to record the process, but I haven’t yet built the automated system to do so. Building is usually my gig, but I do get pleasure in seeing new frogs come to be. It let’s me know I’ve done something right.
Inside this film canister you can see three eggs just starting to become tadpoles. I’ll put them in the water maybe next week. Below them there are two more in that canister, making it a total of five. These tads come from my paid of Yuri. I’ve been slow to breed them, but now I have 2 morphing and 3 more tads in the water.  If these five make it into the water, I’ll have a total of 10 offspring from my two Yuri who were doing nothing for a very long time. I’m pretty psyched.
I’m really enjoying the lines and yellow with Yuri. I have a nice pair from different parents. At the start the offspring were getting SLS. But it looks like the parents have figured out all the kinks and now the eggs are finally getting fertilized and becoming tadpoles that properly morph. That is, depending on how this one does. I have high hopes for him and his brother.
I was a little worried about this pair, so it’s nice to see that everything is resolved. I’ve been really worried these Yuri would never breed properly. As it is now, the male yuri’s brother is still waiting for a female to come around.

If you don’t know what craigslist is you may just be living under a rock. While there are many uses, such as finding some locals to play Halo with on the weekend, it’s also a great tool for finding other people’s crap at ridiculous prices. I usually just post stuff under the free section. Within an hour whatever I post is off my front lawn and in someone’s pickup truck. Sweet.
Every now and then you find a sweet gem. Like these 15 x 15 x 36 Black Lucite Pedestals that appear online about a half hour after I left work. With any luck I can pick them up tomorrow. Perfect for displaying my slanted cubes. And any plants my wife feels needs to be raised far above where my son can reach.
Use it! I’m lucky to be in the Bay Area where the company is located. People use it here more than garage sales. Those in my home of Detroit are not so lucky. Bummer.
I love being on the bleeding edge of technology! There’s just so much you can do with stuff once it becomes commercially available. Take the SDK for the xbox kinect. Brilliant! Okay, so I don’t personally have much use for it right now, but its usefulness doesn’t relate to this hobby. 3D printers do. Oh yeah. Have you seen the Solidoodle for $499?
Not sure if I want to build with ABS or PLA. Really depends on what is best for the frogs. But I can totally imagine constructing backgrounds that have planter areas, hiding spots for dart frogs to sleep or lay eggs, removable areas if they do lay eggs, and a ton of branches to make the space more useful for mobility.
As I was envisioning this, I assumed I’d need to coat a layer of coco fiber on it. But what if you could build everything out of wood? Apparently you’d be a 3D power-based printer using inkjet technology.
Okay, it’s still being developed, but look at the potential to make things out of wood flour!
http://open3dp.me.washington.edu/2011/04/woodnt-you-know-it-3dp-in-wood/
I guess I’m going to have to wait for that one. But I see some great potential in the future. Until then I think I’ll look into this Solidoodle using PLA. I hear it can stick to acrylic very easily and is made from corn starch.
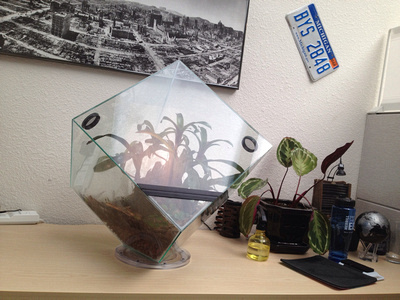
This is my 15″ slanted cube that sits on my desk at work. I spray it every few days. It gets filtered sunlight where I sit, and it must be enough to keep the plants happy, because so far they are doing much better than they ever are under artificial light. At the very least this was a test to see if 15″ was the ideal size for a tank that sits at my desk in the office. Today I’m thinking 16.” And if I’m going to ever sell them, they simply can’t be glass. Without a frame, glass is too easily broken during transport. It’s also pretty heavy.
is 16″ or 40cm the best size? Part of me says to fall to the 18x18x18 standard most believe in. But I honestly don’t what measurements to view those numbers in. For the crazy crowd who love gallon measurements for non-aquatic creatures, but forget company specifications don’t always equate exact internal measurements, that’s 25.25 gallons. Now for the rest of us sensical people, that’s 2.25 square feet of terrestrial space. That’s .25 more than a 20 gallon aquarium. So how do I measure terrestrial space in a slanted cube?
The fact is, I wish I was better at trigonometry. Because it all comes down to triangles. if we were talking squares, I’d say a 15x15x15 slanted cube has more usable space than a 18x18x18 standard because there are three terrestrial sides useful. Each side gives us 1.5625 square feet x 3 for a total of 4.6875 square feet. More than double! But the problem with accepting this equation is how the land actually gets created in such a container, since the bottom gets filled with substrate until there is created a flat surface. My simple calculation for this (1.5625 / 2)4 since I’m assuming I’m losing about half of each side, but also gaining the space between those halves, for a multiple of four. So about 3.125 square feet. Maybe 3.5 square feet if I’m lucky. So by my calculation a 15x15x15 slanted cube still has more terrestrial space than a standard 20 gallon or 18 inch cube.
 Arboreal presents a different argument. Like this little Varadero here who just decided to try out dry land yesterday. I won’t compare with a 20 gallon or 18 inch, because most arboreal species are small as a thumbnail, so they are generally kept in 10 gallon tanks. That means 20x12x10. Cut the bottom 4 inches at least off for substrate, and the sides of the tank produce 4.8 square feet of glass to crawl over. Since these small frogs can actually climb a backwards slant of 45 degrees, this also means they have 4.6875 square feet of climbing space to work with. Pretty damn close. And way more terrestrial space.
What none of these calculations take into considerations is how the objects inside the cube allow for more movement than these numbers demonstrate. plant leaves, stalks, sticks, branches and vines really create a environment for mobility, and a way to hide. Simply put, it’s all in the design, not just the container itself. I’m still thinking 16″ slanted cubes made with 3/16″ acrylic are a pretty good idea. Or basically 40cm x 40 cm x 40cm made with 5mm acrylic. More on the new designs with a storage base as they happen.
Today called for a little Barenaked Ladies. A reminder that I got into this hobby because I thought frogs were cool and so were the places they lived in. This song is a way better choice for frog lover than “It’s not easy being green.” Yea to my generation!
At the moment I have 25 imitators, 17 tads in the water, 5 leucs, and 1 vent. While the tads are cool, I am a little worried what I’m going to do once they all morph. If they all morph. Right now my focus in my imitators. I’m currently breeding Yuris, Varadero, and Tarapoto. I also have some Chazuta I’m working with. I wouldn’t mind adding Banded Internedius into the mix, should they ever find them in the wild so I can get some location specific. I really hate the name.
My Leucs are not breeding. I don’t know why. I’ve pretty much given up. Maybe I need a new batch at least they are cheap, active, and beautiful.
Not sure how else to describe it. I was down in the frog room watching TV, when I looked over and saw that one of my Varadero in the slanted cube was crawling to the top of the tank. Which I thought was impossible, because many of the nay-sayers on dendroboard told me it wasn’t possible. Just proves those guys no nothing! Sometimes it’s best to stick to your own council.
I watched the little dude start off on a brom. He hopped into the glass, and from a backwards 45 degree angle managed to climb to the top where he perched on the mister. I’ve recently noticed most of my frogs like to sit and hang on the mister. I guess this means I need to utilize more of the three dimensional space. Would more branches be better? At least a larger piece of Malaysian drift wood. I’m excited at the possibilities.
Way back I came up with this design I called the “Thunderbolt Rainmaker” because it was really really loud when it was running. I suppose it could be used by frogs that need a rainy situation to breed. A rain chamber as it’s called. But I don’t have any frogs like that, and I’m wondering if the noise would scare them too much to breed.
Anyway it occurred to me I should use this terrarium for tadpoles. It would be a great way to change the water! This was the result.
Decided my last test of the slanted frog cube should be as fully planted as possible. So I added clay to all possible floorspace and planted broms everywhere I could. I also added a few extras on this slanted frog cube. Right now it’s going to house a few Varadero until I find room somewhere else.
I honestly hate things controlled by temperature and humidity. While these are important to monitor, I don’t want changes to be made based on what they report. This is mainly because sensors can fail and that’s a big concern for me because systems might keep running due to a faulty chip set. So I prefer buttons and timers.
I have to say the Zilla 24/7 Digital Timer Power Center is pretty awesome. It’s the only dual timer I have ever found that’s also a power strip. Made for day and night functionality, 2 plug use the first timer functions that work down to the second, and 2 other plugs use the second timer functions which also work down to the second. The 4 non-color coded plugs are just on all the time.
My plan it to plug day lighting into Timer 1, and misting into Timer 2. While I’m still debating between CFLs or LEDs for lighting, they will run about 12-15 hours each day. While they don’t need a big timer for this, it’s just nice to have. Misting is a different story. I’d like my mister to run 10 seconds 3 or 4 times a day. Maybe leave it off at night. This really needs a power controller to make it happen.
 Night lighting and air circulation are a different story. While timed control is a great idea, I prefer the option of regulation. And the fact is fan controllers for your PC are easy to come by. Just hook them up to a 12 volt system and lets those knobs regulate voltage. This will ensure that your long blue night light is dim enough not to bother your frogs, but you can turn it up if you happen to be looking for something in the tank without needing to turn on the main lights.
And why not use a fan controller to actually control fans! Have a fan to pull air into your tank and one you pull it out. Keep the fans as slow as you can unless something happens and you need to air out your system. But two fan will ensure proper airflow and less concerns on bacteria build up. Now this may also lower your humidity, so why not even toss a fan inside for internal air circulation? The more fans the merrier!
- Timer 1: 12-15hr Lighting
- Timer 2: 10 seconds every 4 hours Mister
- Controller 1: Low level LED Blue Night lighting
- Controller 2: Mid level Air Intake Fan
- Controller 3: Mid level Air Exaust Fan
- Controller 4: High level Circulation Fan
Best I could do with the tools I had. I just wanted to know if I could create the proper amount of pressure with a CO2 bike to make mist. Looks like I can. Now the next step is tricking this out for a 15 gallon vivarium.
 These are the main parts I’m in the processing of acquiring to create my pressure system. Buying them as a package wasn’t an option since I think most systems that would didn’t have the pressure requirements I do, which would be at least 30psi. I’d like the system to be able to handle 150psi if necessary.
The entire system centers around the CO2 cartridge which will create the pressure necessary to make a reservoir of water into mist. In this case we’re talking about a 12 or 16 gram threaded CO2 cartridge. The next step was controlling the amount of pressure allowed to leave the cartridge. For a cheap solution I decided to use a bike pump as the regulator valve. The down side of this was the thread for the connection to tubing was made for a bicycle wheel. However, there are amazingly enough adapter out there made specifically to go from this type of connections used by refrigerators. From the adapter, this screws into the same pneumatic push-to-connect fitting you would fine for the assembly of the misting nozzle. But rather than the nozzle, you have the adapter. Alternatively, this could be screwed directly into a solenoid valve. More on that once I get all these parts!
In my attempt to have an automated misting system for 15 gallon vivariums, I’ve been looking at options that don’t require a giant pump attached. No pump, no loud noises, no big piece of equipment to hide, no large power adapter.
I knew the answer would revolve around water pressure. Basically creating a constantly pressurized reservoir of water that would be released when necessary to mist the vivarium. And to build water pressure, it seemed only natural to use air pressure. Like a CO2 cartridge. These cartridges I’ve used mainly for air guns, but I’ve looked into them for other things, and most recently I have seen them being used by aquarium enthusiasts to make sure their plants were happy.

For them the idea is simple. Turn the regulator valve to control pressure. Let the gas come out through a hose and get diffused into the water. They also added in a bubble counter so you can see how much gas is really coming out of the cartridge before it hits the diffuser.
As I looked at the bubble counter, I thought perhaps this could be used as my pressurized water reservoir. I’d use the CO2 to pressurize the water, controlling the pressure with the regulator valve. Switching the hose positions on the bubble counter water would be released rather than gas. That water could go out straight to a misting head, but I’d probably place a solenoid valve in between. This way the valve stops the water from moving forward until activated.
Still just a concept. But it would simplify my misting and the solenoid valve probably can run on 12v like everything else.
So I’ve been having fun with my slanted display cube concept. These are my 15″ and 14″ cubes that I have developed in glass over the past few weeks.
I’m still in the process of working on design. For example the issue of where to place vents. Right now I’m thinking about 2″ holes on all three sides rather than right at the top. This will give very open airflow through the entire tank, while not blocking viewing by anyone looking down.
Until I have a chance to get the right drill and clear snap bushing (or is black fine?), I’ve been focusing on the opening to the tank. Does it need to open in the front? What’s the easiest way to open where you won’t accidentally drop the cover and shatter the entire system? And if I’m allowing rotation of the system, how to I play misting and drainage? Perhaps a small or large display stand?
 So I decided to go for a front opening tank. I imagine a hinge on the front as you can see in the pic. I’ve just finished putting it together with silicone. It didn’t go as well as I planned, since the cut were not precise enough. A good glass cutter using machines would probably have more precision than my ability, but this glass tank is a good learning process. I’ll probably take it to work when I’m done and maybe keep one or two of my imitators in it to see how they handle living at the office. I think my desk will get enough light from skylights in the summer to keeps the plants alive. Plus my office usually stays around 72 degrees.
All of this did make me wonder if I could make the same system in acrylic. To be safe I’d use 3/16″ acrylic so there is plenty of edge for the front to sit on. I’d use 1/4″, but I don’t know where to get hinges for that thick.
So let’s talk 10 gallon acrylic tank. I’m thinking 14″ cube this time. 3/16″ acrylic means the inside of the tank is 13.625″x13.625″x13.625″. That’s 10.95 gallons. If we remove a corner well looking at about 10 to 10.5 gallons.
I made the mistake last time on guessing 3 different sizes due to my experience with standard front loading cubes. I won’t do that again. This time we’re looking at:
- Top/Bottom = 14″x14″
- 4 Sides = 13-5/8″x13-13/16″
This way the cutters can cut 13-5/8″ for all 4 sides first, then repeat 13-13/16″ for the other edge. I can then connect the sides together to make an open box, and verify a total 14″ width. Then they can cut the top and bottom, verifying a perfect fit. Cutting off a triangle on 2 sides a the top is a different matter. Something I’d need to talk to them about in advance. The acrylic will run $54.31 for the 6 sides. Good information to start with.
 So last night after a bad movie I decide that before I pay $200 to someone to make me a awesome cube, I should do a test first. Of course I don’t really have any way to test this, except to actually build it. So I started cutting out all the glass, and then made my very bad attempt to cut a corner off 3 of the pieces so I’d make the space for the bottom of the tank. The actual triangle that makes the bottom I couldn’t cut. Maybe I’ll be able to do it tonight. But I’m considering just placing this on a heavier platform rather than trying to make an exact cut. I’m just not that great with glass!
So these are pieces of glass I had to first cut. All the glass is 1/8″ thick.
- Front: 15″x15″
- Back: 15″x15″, corner cut off 5″x 5″ from edge.
- Top-Right: 14.75″x15″, vents will be placed here.
- Bottom-Left: 14.75×15″, corner cut off 5″x 5″ from edge.
- Top-Left: 14.75″x14.75″, vents will be placed here.
- Bottom-Right: 14.75″x14.75″, corner cut off 5″x 5″ from edge.
I have a nice 1/4″ piece of glass to silicone this to as a bottom pedestal. So maybe I’ll try this before anything else. That way I can see if I can sand the whole flat, and just silicone it on.
While the vents are not a problem, I still don’t know how to handle the front of the tank. I realize a lip is actually impossible, because the weight of the lip will be on the strength of the glass. Whatever I do I’d prefer not to encumber the viewing area.
It’s been a while since I posted a tutorial. I generally don’t because tutorials take time and I don’t have much time or help to make any tutorials. However, I’ve been wanting to show for a while how to make vents for terrariums. I’ve noticed that many use screen frame to do this. While it’s a nice way to go, it’s hard to glue a frame into an opening in glass. ABS plastic, sure, but not glass.
This is how I add circular vents to terrariums I build out of glass. The glass in this example is 1/8″ thick. I’m using a standard drill I got from Home Depot with a 1″ diamond drill bit off Amazon. I put very light pressure on the glass, if any. I mainly just starting drilling at a angle to get the drill going and make a divit to keep the drill bit from skidding away. Then I start rotating the head, increasing speed, and adding water when necessary as not to overheat and add lubrication.
Once the hole is drilled and cleaned, I wrap a 1″ snap grommet with no-see-um mosquito mesh and put it in the hole. I tighten the mesh around the grommet, then rip off the extra. The glass usually is sharp enough to rip the mesh, and also helps plug the hole to secure the grommet in place.
That’s pretty much it. Oh, and I drilling on mouse pads if you’re wondering. I have a box of 800 of them my work was going to toss out. They are great for drilling on, putting under tanks, and cutting glass on top of.

It’s not often I surf the net and find an idea on how I want to design a cube for maintaining frogs. But this was it. From Score + Solder who make some nice tanks, none of which were designed to hold dart frogs. But this singular cube sitting on one corner like it was sunk in the ground was exactly what I wanted. But how do you extend such terrariums to be used for imitator dart frogs? Certainly at this angle you have opportunities for width and height. The floor space is gone, but leaves quite a bit of room for arboreal frogs,
 My first questions was if a frame was necessary. Could the entire system be held together with just silicone? Or was a frame important? I admit the iron frame looks nice, but what would it look like without a frame? The second question was how the front would be kept hinged in place. The last questions was how big did it need to be for 10 gallons.
10 gallons is the dumbest way to measure a tank for arboreal poison dart frogs, but that’s what’s used and so that’s what you do. Although I’m quite interested in working on cube walls for breeding, this singular cube idea appeals to the artist in me. So for the tank to be 10 gallons, it make sense the smallest it could be was 13.5×13.5×13.5. That’s a starting point as good as any.
I really like this concept, because at the end of the day, what you have at your desk is not only a work of art, but a terrarium complete with frogs going through the cycle of life.
Okay, I gonna go buy one if I can.
 MistKing has some great products! For those starting out I generally recommend getting a system from them. The value of the pumps, timers, and misting assemblies is well worth it. I can’t say it enough. In fact I think I have said this before in other blog posts. I said this because quite frankly a pump is going to run you at least $60, a timer $20, a power adapter $10, the hose $10, and the single mist assembly $15. And those number do not include shipping from multiple vendors. Better to buy a Value Misting System for $99.99 plus shipping. If you’re lucky, you may order at a time when Marty is actually waving shipping fees.
I find that building your own misting nozzles is a different story. If you need a dozen, building them yourself might not be a bad option. For example the straight misting nozzle you see shown is $14.99. Now we should note this misting nozzle is their high quality standard so it’s hard to know if we’re using the same materials.
 Cloudtop selling the correct misting nozzles that are very high pressure and low flow. You can buy in bulk for about $1.49 each. RED or WHITE. Both work depending on the angel of misting you want. I chose the one with a narrower spread. As it states on the web page “Produces a full cone spray pattern. 1/8 MPT.” So now we need a female 1/8″ end.
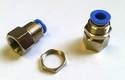 In my search found the perfect Bulkhead, I found these Pneumatic Push-In Bulkhead Female Fittings 1/4″ OD-1/8″ NPT. In bulk the pricing of these was $1.97 each. Again, there is shipping and perhaps tax to think about. But these are also made from nickle plated brass, just like the premium fitting.
 I couldn’t find a stem tee no matter how hard I looked, and I really prefer buying from the same distributor to avoid more shipping fees. So Pneumatic Push-In Fittings Tee Union 1/4″ OD worked just fine for me. Only $1.24 when buying in bulk, and easy enough to cut a small piece of 1/4″ hose to place between the two. Plus these are handy to connect all your hose together for a zip drip system!
In the end the three parts cost $4.70 rather than $14.99. Big difference on a straight mister. The same can’t be said of more adjustable misting assemblies unless you are doing a comparison with their premium line.
 Frog Cube was re-designed under the simple principle that poison dart frogs were never meant to be stuck in a jar. They need the space that jars do now allow for. And in my research, I’ve found that while it’s possible to get that dream jar if you have enough cash, it’s simply not practical. Many other limits involving space and containment come into play. A jar may be a great system for display to showcase a species. But it’s not very modular.
So Frog Cube was created. Would it be possible to create a self-contained systems within a cube? How would the cube be designed to meet the needs of frog? What if the cube was one of many cubes on a rack used for the care and breeding of dart frogs? How would it all look as a rack of tanks on a wall.
 My answer is that a frog rack looks rather tacky. Generally speaking it’s just a metal wire rack with three tanks max on each level. You’ll see the wiring for everything hanging out the back, and it stands to reason as you look at it, there should be a more elegant way to display your breeding frogs.
There is. But you need to begin somewhere. I began with the rack. It’s unsightly and fits better in a basement or a dorm. I keep my in the lowest room in the house, which might as well be the basement.
Why not have a rack of breeder frogs that you could put in the livingroom without your wife complaining? Possible? Well it all starts with a good shelving system.
 This is the IKEA EXPEDIT Shelving unit. It’s made up of 16 cubes with an area of 13.125″x13.125″x15.25″ each. The system itself is:
- Width: 58 5/8 “
- Depth: 15 3/8 “
- Height: 58 5/8 “
- Max load/shelf: 29 lb
And costs $129 for the Black-Brown unit.
 The lowest cubes on the shelf would be for storing and breeding fruit flies, storing the used water drained from the tanks, and the water storage for misting the tanks all over again. For these areas I would place shelves or doors, depending on what was needed. But the whole bottom level would be for storage.
So that’s another $80 for doors. Let’s do $95 because we’ll stick a shelf where we can.
And now we have our framework. 4 areas for storage at the bottom. 12 cube tanks above. Light, air-circulation, water-circulation, misting, ventilation, and food dispersal will need to be considered.
This design was originally made to be a misting system. However the result was pretty loud and ended up being more like rain and less like mist. So I’ll call it the Thunderblot RainMaker since it’s loud and you probably don’t want to let it run for very long or your tank will get way soggy.
 At the center of they DIY system is the Touch Power Sprayer. Using six AA batteries, It’s a hard working and loud 7.2v motor. At the most basic level we can connect this to a gallon container and mist a terrarium manually. However for those with a mesh top of their tanks, it might be possible to mount it as-is, and lock the sprayer in spray mode. It’s already designed for this.
 The next step is making it rain only when you want, which means a minimum of 5 seconds. I recommend a digital timer and a 6 or 7.2 volt adapter. Don’t worry about the ends of the adapter. You’re going to end up cutting them off and hooking them to where the batteries would connect to the motor.
 This will still need to be hooked up to the digital programmable timer. You can’t get out of buying one of these. I like ones with more than just two places to connect plugs. But you really only need one since it’s only going to be for turning on and off the water.
Once you have thee three items, you already have all you need for automated misting. Just hook the sprayer to a gallon jug that sits next to a hole in your tank. Replace the batteries with the transformer hooked to the timer, and your set.
 Those that want to take it a step further may want more options on where to position the sprayer. I’d go with the flex-mist micro sprinkler. Depending on the size of your tank you’ll need more than one, and you’ll still need a way to mount it to the tank and connect all the hoses to the power sprayer. But if you can get it all working, you’ll end up with a nice little system.
In general this system cost me under $20 since I already had a digital timer I was using for lights around the house. And I also had a 6v adapter from a broken piece of electronics. The other two parts you may be able to find at a hardware store. Home Depot doesn’t carry them, but Orchard Hardware Supply or ACE hardware might have both the sprayer and the sprinkler. To all you DIY guys, good luck!
 In the beginning I had one 35-gallon tank with 7 juvie Leucs. I paid about $700 for the system (I could go back in this blog and get specifics, but I’m pretty sure it was $700) including the seven Leucs. It was four months later decided to try and do more. Thus the compulsion began.
I started by working with five 15-gallon tanks and tried to follow the directions I had seen others take to create a vivarium with a water feature for humidity and avoid misting. In the end I learned you need to at least mist partially for the plants, the water may cause a build up in bacteria that kills the frogs, and a euro vent in the front will probably leak. I tried a second test with three more 15-gallon tanks removing the euro vent and using a clay background and a misting system. What I got was a super heavy system that didn’t vent well, tended to overflow, and was unnecessarily heavy. Over time many of my issues with these tanks have disappeared as I have rebuilt my system.
 My next built was an attempt to make a 60-gallon vertical tank to store my juvie frogs until they reached an age to separate them. Something like this is very hard to mist and light. Keeping all the plants alive is almost impossible. In the future the whole system will be placed in the summer by a window so actual sunlight can get in and give it light. The largest issue was my mistake of not quarantining the plants before planting them. I ended up with centipedes and slugs. These try and kill everything. I still have not found a solution to get rid of them.
As a contrast I also tried a 2.5-gallon and 6.7-gallon small jar build. Easier to light, but impossible to keep anything in unless it’s a baby just morphing out. Actually I do use them as morph out containers. Full of sprintail colonies just waiting to be decimated.
Recent I tried a IKEA BILLY build. I took three bookcase shelves and added a total of six 12.5-gallon tanks to them. So far I have found the greatest issue with these tanks is venting and drainage. But some of my best work and creativity came from the design. In the future I’ll probably add more venting since I know an automated misting system will be used. When all these tanks were first being made I did not auto mist.
 At one point in all this mess I tried one EXO TERRA, two ZOO MED, and 8 10-gallon vert conversions. All these has problems with keeping fruit flies in the tank. This is one of the main reasons why I decided to move to making tanks myself.
Now it’s time to clear things out. I’m looking to sell all the tanks on the rack and work on a new system. And integrated cube that takes everything into consideration. The question is, should I try to sell off, or just toss out. It’s always hard to just toss out raw materials.
 As automated misting systems go, hands down I will recommend Mistking as the way to go. When all is said and done they’ve put together a great system and I don’t know anyone whose done better. That being said I, can’t promise a misting assembly from them is the best deal if you plan to buy in bulk (that is unless they give you a bulk discount, which is something not advertised). Let’s break it down part by part:
Here is their VALUE T MISTING ASSEMBLY. Sells for $14.25 off their website. These are the parts used from top to bottom and what mistking sells them for, minus a little 1/4″ hose in between some areas.
- Value 1/4 inch Plug In Tee – $2.49
- Value 1/4 inch Bulkhead – $3.49
- Value 1/4 inch Plug In Elbow – 2@$4.98
- Drip Reduced Nozzles – $3.29
The last piece, the elbow necessary to screw the nozzle into is not available on the website, But already you can see with that part included we’re looking at over $15 to make from the mistking site.
20 VALUE T MISTING ASSEMBLIES will cost me $285. Let’s see if since I’m doing this in bulk I can bring the numbers down.
We’ll start with the nozzle. It’s made by Tefen with the code 0.7-80-F. In my research I located cloudtops.com, where I got confused between the RED (Mistking says it’s he red) or the white (spray patterns suggest they are the white). I’ll by 20 @ $1.49 each making the total $29.80 excluding tax and shipping.
Oddly, which the nozzle was something harder to find, all the other parts can often be found together. They are simply under others name. I did searches for “stem tee,” “stem elbow,” “bulkhead union” and “female elbow fitting npt.”
This helped me find the parts, although it seems only Canada and the UK make them:
- 10 PCS One Touch Push In Fittings Bulkhead Union 1/4″ – Price: $18.90 so 20 for $37.80
- 5 Push In to Connect Female Elbows 1/4″ OD – 1/8″ NPT – Price: $10.30 so 20 for $41.20
- Push to Connect One Touch Plug In Elbow 1/4″ OD 10 Pcs – Price: $16.00 so 40 for $64.00
- Push In One Touch Fittings T Union 1/4 OD Tubing Pkg 10 – Price: $12.80 for 20 for $25.60
Add in the nozzles and we’re looking at around $200 total. Not much of a total I want. Gonna have to hunt more.
Looks like in the past year magnet prices have started to double. Magnets I bought for $0.24 are now selling for $0.42. I don’t like it. No one bit. I ended up getting 128 1/2×1/2×1/8 magnets with a pull force of 7.7 lbs. I’ve started to use these because 1) the tank front I’m using are of a better quality and thinner glass, so thus needs less magnetic force to keep in place, 2) using 8 on the front of a tank makes something really hard to open and 3) they are much cheaper compared to 1/2×1/2×1/4.
On the subjects of being hard to open, I mean really. You need to pull hard to open it when 8 magnets are in place. So the 1/8 inch magnets make things easier. I’ve heard many people get worried about using magnets. They worry the lid is going to fall off and break. Seriously? Do you also worry you’re going to fall off the planet? It’s not like the strength of your internet connection! It’s a magnet!
Also magnets give me a better seal for ensuring fruit flies don’t get out. Damn those fruit flies! Take my advice and get the wingless kind!
We’ve move to a new domain name! Well, I’ve moved to a new domain name. “Frog in a Jar” is now “Frog Cube!” Why? Well it’s partly because Frog in a Jar is hard for people to remember where Frog Cube is easier on the lips. But it’s also because Jar are not practical and Cubes are. I can make a cube for frogs out of glass. But a jar requires a machine to make it. At least a glass jar.
Cubes are a great concept because they are great not only for terrestrial frogs but for arboreal frogs as well. Same space vertically and horizontally. This gives more room for planting in terms of width on the back wall. Plus a lower height than a vertical tank. A few inches less from the light can make a difference for plants at the bottom of the tank.
I’m going to focus on 15″x15″x15″ tanks since they are nearly 15 gallons and thus should fit 3 imitator dart frogs just fine. Three of these tanks will also fit fine on a 48″ bakers rack with space to spare.
 I had this crazy idea a couple night ago while messed up on sleeping pills to build a mini mister rather than have a waterfall to keep the humidity up in a small vertical tank. Also waterfalls don’t really clean off what your thumbnail dart frogs leave behind on the leaves. So I took apart an electric bathroom toilet sprayer and attached a flexible drip water mister to it. In the middle of all this I had to get some 6 volts of juice from 4 AA batteries. Took me a while to find a solution to that while falling sleep. But I managed to do so and built a crazy system that is really really loud.
Okay, so the spray is more like rain and less like mist. But I can always try different nozzles. However it only covers a 10-inch width and really needs a 20″ height to do well. But it does pull water from the bottom of the tank and spray it back from the top of the tank. I figure get a 6v adapter and put this on a basic timer to go off for 15 minutes every four hours. Like a monsoon passing. Just an idea. It could just be the sleeping pills talking. But an idea for under $20 that would be perfect for the small 15 gallon individual tank where you don’t want a ton off stuff outside of the tank.
Oh, and here’s my waterfall idea from the beginning of the year.

 I’m told this jar is 20″ tall x 10″ diameter x 5″ opening. It also has feet on the sides when the jar is on the side. My guess is this will hold 6 gallons, but the guy claims 8 gallons. Either way it appears to be a mason jar from 1776 and works for my needs. With any luck I’ll get it in the next two weeks. I admit it doesn’t look at cool as the soda pop jar, but you gotta start somewhere.
I’m debating how the 5″ top will work. I have some test lights I might switch out. But I’d also like to add a vent with a built in fan. I really don’t want to crack the glass, so drilling in this case is not an option. It’s all about the lid.
I think once I have my jar, carboy, demijohn, whatever you want to call it, I’ll move on to a simpler and cleaner design for the tank,with less focus on it being a “jar” and more about a beautiful pieces of glass designed for containment. So I’m really psyched about hand blown glass terrariums. I think in the end, these will look the best in terms of naturalistic. Lighting, venting, and misting will be a pain.
 I would love a low maintenance terrarium. Or rather something that has uniform machinery to create the best living situation. I saw this BIOME and thought it was amazing. How about having a total environmental controls for an ecosystem run from your ipad? But in all honesty this one was just a mock up. Where are the lights, the fans for vents, or water filtration system? Yeah, this bio dome is just a dream. And all I want to find a way to build a micro mister that comes on for 5 seconds every 4 hours!
 Today I went to Ikea to buy my $39.99 cylinder vase. As it turns out it’s not a cylinder. 25-inches on the inside from top to bottom. But 10-inches in diameter on the top, and 7-inches in diameter at the bottom. I admit that I don’t know the geometry in my head, but it’s not the 10 gallons I hopped for. Such is life. But it does bring me back to think about what I was trying to do.
I wanted to build beautiful desktop vivariums where life was kept and controlled behind glass. But I also wanted to add into the equation one animal that would be active, and out side the insect kingdom. So what’s my focus to make all this happen.
 First is the poison dart frogs. Choosing beautiful vibrant yet small frogs that would remain visible and active to watch in nature. I thought those might be imitators. Overcome by my need to collect, I over did it right at the start. Now I need to think their size and arboreal nature. Other frogs will and can work for my needs.
Second was 10 gallon breeding tanks with misting systems built in and proper lighting as to be transparent to the tank itself, but also capable of keeping the plants alive. This was about function not form, but I started thinking a little too much about form, and function was less than perfect.
 Third was the frog in a jar. That’s one frog in a jar. Not many frogs in one jar or even a breeding pair. Frog. Singular. In a Jar. What’s a jar? A container? I think in my mind a apothecary jar if possible. But a jar none the less.
So back to the drawing board. My focus now is on the jar. 6 gallons for one frog and 10 gallons for 2. Being a jar means it’s a cylinder in nature. Most jars don’t have flat sides. If possible the jar needs to have a wide mouth so I can get in and plant the damn thing. Getting a frog in and out of the jar is not a priority.
 There are other considerations. Plants, light, venting, and condensation. And the fact that what I want to use is a jar! Not an aquarium, not a box, not a sphere, not a cylinder. A jar. A glass jar with a lid and everything. Jars have a wide mouth for putting things into and out of that’s not necessarily liquid. They are not made to drink out of. Jars have a top. So where do I get a 5-10 gallon jar?
 One of the only aquarium products out there which even comes close to my Frog In A Jar interests is the BiUbe Pure. State info from the manufacturer:
Dimensions
- Height: 18inches (46 cm)
- Width: 13inches (33 cm)
- Weight (empty): 7pounds (3 kg)
- Weight (full): 80 pounds (36Kg)
- Volume: 9 Gallons (35L)
Transformer
- 12v transformer (UK)
- Two connections (light and air pump)
- 12 month guarantee
For the record 18″ tall by 13″ diameter come to 10.34 gallons, so I’m assuming with acrylic thickness it would be 10 gallon and with out having the water reach the absolute top it’s 9 gallons. But since we’re dealing with frogs, not water, the actual total space available inside the container is actually 10 gallons. Perfect.
The costs from Amazon for the BiUbe Pure is $180.99. Not sure it it’s worth the price. The LED lighting for daylight would need to be increased. But adding new LEDs to the 12V Intelligent LED light might be an easy process. Plus the pump could be replaced with a air circulation system. Or maybe not. I’m looking at a video to see how these suckers are put together. Still learning.

It’s always been the understanding that this site is about creating jar to raise and breed frogs in. An enclosed environment where both the main plant and animal species can survive. While this was the case, locating a 10 gallon jar was not possible or even useful unless it had a wide mouth. So a cylinder seemed to be the second best option. Working with arboreal poison dart frogs the size of thumbnails, the expected space for two of them to live was 10 gallons. More space helped, but a well planted 10 gallon space was all that was really needed. So I began my journey looking for a glass cylinder that would meet that standard. And I found it.
From Ikea, BLADET Vase, clear glass – $39.99
Diameter: 10 ¾ ” Height: 25 ½ ”
Based on outside dimensions the tank can hold 10.02 gallons
Considering the numbers assume a space filed with material to make it inhabitable, I’d say this works pretty damn well.
Looks like I found the cylinder. Next stop, the best lighting system. CFL, or LED?
 Amazing what light does. When I look at this Melanistic Tarapoto he looks pitch black running around the tank. But add a little flash photography and you can see the spots he wields. At least I think this is the he. It could be the she. I haven’t gotten any breeding or eggs for that matter. Aaron at AAA Frogs told me they had eggs, but never tadpoles. However I have had neither this summer. Still the pair is hardy and does pretty well in their 12.5 gallon tank. I have a trio of 12.5 gallon tanks, all with different types of Tarapoto. I’d like to mix these with the normals pairs, but I don’t actually know which ones would be a proper breeding match. Plus my Copper Tarapoto from Phil Tan are not breeding. Oh well.
 I have gotten some flack about keeping my black Tarapoto as a pair. Some frown upon trying to breed certain traits. However these same people won’t send me any free frogs to place with these two. So while they like to complain about what they precieve to be a problem, they certainly don’t like to be part of the solution. I’m sorry to say most people in the world are like this.
I would note these frogs seem to be highly nocturnal. As such I’ve placed them in tanks which have blue LEDs to mimic moon light. They appear to appreciate this and will hunt mainly at night. Not sure what that means.
 ILOVEJADEN from dendroboard.com sent me this great message recently:
WOW, I cant believe this sh**!!! MAYBE ITS TIME TO STOP BUYING FROGS WHEN THEY JUST KEEP DYING BECAUSE YOUR OWN IDOITICY!!! GOD WTF IS WRONG WITH YOU!!!!!!!!!IF I KNEW YOU IN PERSON I WOULD SO PUNCH YOU IN THE FU**ING FACE.
Naturally I was slightly offended at first, but seeing from his previous posts about his interests in men, love for Varaderos, inability to buy one, let along breed any dart frogs successfully, I can understand the pain and torment the boy suffers from. Looking at his handle you can see he’s also love stricken and depressed by the rejection of another man.
So ILOVEJADEN, I want to thank you for reading my blog and sharing the pain I felt at the death of my dart frogs. I was pretty upset and ranted for quite a while to my wife. But knowing that my other frogs are breeding and not sharing your homosexual tendencies, I was able to calm down and say positive. Please understand I have no problem with your sexual orientation. But I do want my frogs to breed and so having homosexual frogs would be a concern for me. What you do in Utah is your own business.
 This pair was hatched 7.24.11 and was finally out of the water 9.22.11. They appear to follow each other around the tank ever since leaving the water. Do they know they are family? I have no idea. But it makes me wonder if the pairing up I have seen in frogs I have bough previously is actually a sign of coming from the same clutch. Either way, know that while some die young, other are born. That’s life. Not the happiest part, but life isn’t always a picnic. Or in your case the fun romp in a men’s bathroom you enjoy at a truck stop.
Wow, open letters are fun. Please private message ILOVEJADEN in his private places as much as you want. Or you can verbally spar with him in public in a public forum called the Thunderdome, the second place he frequents the most. Thanks for listening.
 My Tarapoto dad was chilling on his standard leaf against the glass when I noticed something on his pack. Looks like he pulled a tad from a clutch that from what I remember wasn’t quite ready. I checked on the other two tads, to find one had been crushed and the other slightly mangled. I dropped one in water, but since he didn’t seem quite ready for life outside the yolk, I doubt he’ll survive.
This seems to be a standard issue with my Tarapoto. Dad picks one of the clutch to survive and kills the rest. I’m not sure if this is an instinct to save the best, or just his own crazy ways. Either was it’s sad to see such a waste of life. At the moment I’ve decided to try and let them raise four tads on their own. So I’ve got three with legs, two of them ready to pop. Then a couple small ones in the tank with their parents. We’ll see what comes of it.
 Back in the day I bought this Yuri because I thought she was a female and I really liked the dotted patterns she had produced. I thought they would look well with a male who already had fairly hard lines. As it happened I had two Yuri males with hard black lines. So I put them all together and I hoped. Nothing. So I separated all of them. Nothing. Then I tried to together in different pairings and nothing. But while trading cages for another switch, for only a day I dropped in a female Varadero. She was only there one night, but as I was removing her I found two eggs in different parts of the tank. I can’t be sure where they came from. The Yuri or the Varadero? Now I’ll always wonder.
 So for about a month now I’ve been keeping this hopeful female and the most aggressive male in the same tank. They don’t seem to hang out much. And after a while I started to get worried. But tonight I found a nice clutch of two eggs in a black film container! Okay, so they are white and at this point there seems to be no changes taking place. But I’m excited. This is the start.
 This is my next focus group. They had possible two clutches which dropped a few days apart. The father was actually very good with the tads. But I got paranoid and had to pull a couple I worries were just sitting in their yolk. I just wasn’t sure how many tads the father would put on his back and all this not knowing just really bothers me.
 Well my tad dating what I believe to be 7/10 has almost completely lost his tale and has started running around the tank. Sneek around is more like it. I’m not sure what his plan is, but I’m guessing he’s slowly figuring out what’s going on. I think I’m going to have to name him since he’s my first morph ever. Still not sure what it will be, but I relate these other two as if they all were brothers.
 This tad I pulled myself and dropped him in a glass of water. When I saw him, I just thought he was dead and was going to pull him out to toss in the trash. Then he moved. The father already had his brother on his back, so I didn’t know what else to do with this tad. I figured by touching him I had messed him all up and he would die soon. but he lived and is now learning how to breath air and beginning to lose his tail.
 I’m pretty sure this guy here is breathing air. He just doesn’t want me to catch him. He and his brother just got legs something today, but he’s just peaking out of the water and his brother is jumping out in full force. I guess I’ll have to call them the twins. At least until I get a better look at their markings as they develop. I think by Saturday I can pull these cups of water away. I’m so glass I seeded the tank with a few more springtails. So far I have not caught the older one eating. But I’m watching.
 I don’t think the 2.2 Varadero have been doing well in a 67 gallon tank. In fact I’m pretty sure one ate the other’s tadpoles. Okay, they were still in the yolk, but they were totally ready to come out, and the other pair at them. Not the pair in the picture though. At least I think this is a pair in the picture. They keep following each other, so I’m guessing that I guessed right. The one in the back is a male. The one in front is the female. As long as I’m right about her being the female, this is a mated pair. They keep following each other around since I moved them tonight and they are not attacking each other, so I’m probably right. Maybe. Hmmm . . .
On a different subject the Yuri 1.1 is confirmed! finally a clutch of eggs. So now I have a proven:
- 1.1 Varadero (Breeding)
- 1.1 Varadero (Breeding)
- 1.1 Golden Tarapoto (Breeding)
- 1.1 Yurimaguensis (Eggs)
- 1.1 Banded Intermedius (Eggs)
- 1.1 Intermedius (Eggs)
- 1.1 Bajo Huallaga (Eggs)
 I don’t think the Bajo Huallaga or the Intermedius will ever breed. I’m starting to question the Banded. But I now have hope for the Yuri. So I’ll try to be happy. But I really like to have a complete collection, and that means 7 different types. So I really need to get all seven going. Oddly at the same time I seem to have collected three different types of Tarapoto. Only the golden ones are breeding, but since I care about them the most, I’m happy enough with just one breeding pair.
 Hey, I think this tadpole that is on the back of father here is this morphed out little dude! Maybe I’ll need to introduce the mother and the father to their new son. Although I’m not sure if they really care. Do frogs care about their froglets? No one tells me these things. I don’t think they do. Sure they feed the tadpoles, but once they morph out I’m pretty sure they need to go fend for themselves. Quasi sure. Okay, I’m sure of nothing. This is all a learning process.
 Here we are a week later and my little Varadero tadpole had now gotten both is front legs. He didn’t have both of them this morning. But when I got home, he was racing around his little dish with both legs in front. Plus as you can see in that short time his color really came in. I just can’t believe a few days ago he just had back legs and his coloring was only beginning to show. I’ve got two other born just a few weeks after him. But he’s the first and so he’s the one I pay closes attention to.
My Tarapoto which I have moved into a new tank about 20 days ago just had their first tadpole in the new tank. I pulled them out a little early since the dad has a bad tendency to step on them. And just today the mom decided this meant she needed to make a few more. So she dropped a new clutch. I think this time I’ll let them try to raise this clutch. I have a ton of Tarapoto tads in the water. What I need are more Varadero!
 As I was about to contemplate placement of some 12x12x18 tanks, it occurred to me to wonder how best to light them. I happen to have a couple different types of light around so I thought to try them all. The first was a standard 14W CFL @ 5000K. The second is a 13W florescent straight tube @ 6500K. The last are 3 concentric rings of 75 3528SMD LEDs @5000K.
Well obviously the florescent straight tube just looked bad and blue. Perhaps a different bulb might work, but my search was done. The LED’s good great, but produced a flatter light.
This came back to CFL’s vs. LED’s. CFL are easy enough to talk about. The are not many kinds. But for LED’s I only wanted to deal with 3528 or 5050 SMD. They say 5050 is 3x stronger than one 3528 and best to bright application. But 3528 dissipated heat better in the long run.
 My second test was on some recent rebuilds which were already planted and were 21.6″ tall. taller as compared to standard 18″ tanks. Regardless, side-by-side the light difference was barely noticeable while viewing the plants. Intensity of the light hitting the substrate below was different.
I don’t have a way to measure lumen. So I capture ambient light and use it to know the proper F-Stop needed for shoot a film at 24fps with 320ASA film. Some say this is a comparable to the human eye as you get. So I setup my light meter and her are the results:

 The first light meter registers the light from the 75 LEDS. It’s telling me I need an F-Stop of 2-8-2. The second meter says F-Stop of 2.8-5. Which means the 14W CFL is giving off more light. But not all that much more. And I think with a quarter more LEDS, I could create a light disc that had what’s needed to replace the CFL.
Quite frankly, I just want a flat board of light to place above my tank. I won’t want extra height if I can avoid it. And I see this happening.
From dinodirect.com I can order white ring lights of 3528 SMD LEDs.
- 60mm – 15leds – $6.18 x2
- 80mm – 24leds – $8.18 x2
- 100mm – 33leds – $7.99 x2
- 120mm – 39leds – $11.59 x2
This makes for a CD sized disc of 111 3528 SMD LEDs @ the cost of $33.94 for two such rings. The result would do slightly better than a 14W CFL.
At about $17 + extras to complete it, is the price right? Or are 5050 SMD LED a better option?
 So back in spring I decided to take three of the 15 Gallon tanks I purchased and build them into vertical vivariums with acrylic fronts. Took me forever to find the right glue and to make them leak proof. What a pain. Recently I decided to rebuild these tanks because frankly having the from opaque is annoying. I did it mainly because I wanted a 13 watt internal light and didn’t want to have to look at it. But I’ve come to conclude it’s a waste. Plus I want to use a mister inside the tank.
 So I rebuild the tanks replacing all the acrylics with glass. When I say rebuild I mean I ripped the acrylic fronts off the tanks and replace them with glass. All the internals as the same as before. Meaning this is a clay build with a LECA substrate, broms planted, and oak leaves covering the floor. Most of the algae is still on the sides of the tank. At the time, although these are 15 gallon tanks, each only holds one imitator. a Varadero, Intermedius, and Yuri.
 I’ve decided after all this time I like having a clear glass top on a vivarium. It’s great if you plan to use indirect sunlight. Plus it’s not as hard to drill as I thought. For these tanks I put three 1-inch holes at the front, with snap grommets holding misquote mesh and a misting nozzle in place. I really love these snap in grommets. However I’m considering getting a 2″ drill bit and grommets for better venting. I figure I can attach a fan into one of these.
 The top front of the tank I used 3/16″ glass with a beveled edge for the open bottom. I had to use painting tape to hold it in place while the silicone dried. I have to say that silicone and glass were made for each other. Also that GE Silicone II is really the best option since it dries in 3 hours and allows you to slightly mold the silicone is necessary. I kept the same 11×14 tempered glass front, but increased the strength of the magnets that hold them in place with a 1/2×1/2×1/4 magnet behind the glass, and 1/2×1/2×1/8 in front.
 The bottom of the tank I used a scrap of 1/8″ glass since it’s the same width as my tempered front. Big mistake. I say this because I used an aquarium hinge for the front and as a hinge it doesn’t really force the front glass against the side, leaving space for fruit flies to get out. Also there is a space where the bend occurs to let flies out. In previous tanks I resolved the problem by having an inset piece of glass. This caused a bend in the hinge which pressed the tempered front glass against the side edges. But since this is a rebuild, there was too much substrate in the way to make this happen. Something to consider in the future.
 Give or take 53 days, this tadpole was pulled out of his embryo and paraded around on the back of his father until a suitable rearing location was found. But now he’s grown. His back legs have come in and are starting to be getting useful. I see the numbs where the hands will be, and with a flashlight I can see the development under the skin. I hope by next we’ll the hands will rip out. I can even see his color is changing to add the metallic orange of a Varadero.
At this time I have 6 Varadero tads, 7 Tarapoto Tads, and one mistake crossbreed. Half Yuri / Half Varadero. I’m real curious what he’ll look like. When he morphs I have a tank just for him. The six Varadero tads will go in the tank with the other Varadero pairs. Still not sure where the Tarapoto are going. But it’s fun!
It’s been about a week and my Varadero seem to have settled into their new home rather nicely. In fact not only does it contain a 2.3 group, but it also contains two tads which are being hidden from me as we speak. Which actually I thought was a bit odd, because I was hoping the male would parade him around. But I’ve found they have been more apt these days to hide them away. With another six tads slowing growing legs, my hope is by next month this 67 gallon tank will house 5 adults and 6 morphs next month. I think I need to start recording again which is are the males and which are the females.They started the first two days being very terrestrial, but now they all like to chill in the middle of the tank. Beyond the frogs I’ve noticed all the broms are starting to grow new roots. So are the rest of the plants. So the tank is starting to settle in.
All the frogs seem happy these days except for my group of Nominal. Since the male is gone, the four females have gotten a bit depressed. I’ve broken their group up into separate tanks, but I really need to find a new male soon. Maybe a couple new males. I wish it were that easy.
In the process of moving my five Varadero to their new tank, I thought it best to see why one pair had stopped laying eggs. Easy answer: they had a mouth to feed. Hidden in a brom was what appeared to be a month old tadpole, just starting to get his legs. Around him were about 5 or so unfertilized eggs to keep him fed. This proved the point others have told me, which is that once imitators have the max amount of tadpoles to feed, that stop laying eggs. Good to know, although with all five now in a new tank, we’ll see if the fighting begins and the laying stops.
I’m debating the decision to put the five together in one tank. My favorite female Varadero was has not paired up was getting stressed and thin, and I worry with two male in a tank they will begin fighting. Plus I’m told once imitators get comfortable and start laying eggs, you should never move them, in case they don’t start up again. But this is a learning curve for me, and it’s a nice tank to show off proven pairs and their offspring once they morph out.
The deaths continued after removing my 10 gallon pre-made tanks from circulation. Many as I’ve mentioned I’ve never gotten to see. I can only assume the bodies dried up and rotted away. I think most of the deaths were caused by a third male or female being stressed to death. Teaches me a lesson. In the future I’ll need to be more careful on the subject.
At the moment I’ve got 0.4 Nominals, 1.2 Intermedius, 1.1 Banded Int., 1.1 Bajo Huallaga, 2.3 Varadero, 2.1 Yurimaguensis, 1.1 Melanistic Tarapoto, 1.1 Golden Tarapoto, 1.1 Copper Tarapoto. 5 deaths of 1.1 Interermedius, 1.o Nominal (you will be missed), 0.0.1 Banded Int., 0.0.1 Copper Taratoto. I’m hoping my hoping Varadero, Yuri, and Nominals will be okay. Some of them seem a but thin. But I’ve recently built this 48x18x18 tank to house froglets.I’ve got 13 Golden Tarapotos and Varadero tads in the water. So we’ll see what happens next. I’m still trying to order the tanks.
- DISPLAY – 2.3 Varadero + all froglets
- Wall A – 1.1 Golden Tarapoto
- Wall B – 1.1 Melanistic Tarapoto
- Wall C – 1.1 Copper Tarapoto
- Black Box A – 1.2 Intermedius
- Black Box B – 1.1 Banded Int.
- Black Box C – 0.4 Nominals
- Black Box D – 2.1 Yurimaguensis
- Black Box E – 1.1 Bajo Huallaga
In this video, you can see the father picking up a tad to carry around.
 Looks like one of my intermedius just got a severe case of hemorrhoids. My fault. I’ve never heard of Rectal Prolapse and didn’t even know frogs could get diseases like this. I thought it was a leech and tried to pull what looked like a worm off. When I saw there was veins from the frog, I stopped. Too late. The next day it looked like this. Reading up on it I did what anyone does with hemorrhoids. I put PreparationH on it. We’ll see if that fixes the problem. Until then it looks like I won’t be selling these guys any time soon.
It been a bad week for my frogs. Even if this little guy makes it, my population will be decimated. As in 10 percent killed. At least I assume they are dead because I can’t seem to find two of them. My only male Nominal and my male Intermedius. I assume they are dead and decomposed. I did some furniture re-arranging and there were no bodies in the house. So I assume they must have become worm food in the vivariums. I’ll never know.
As for the third, last week the Tarapoto was acting twitchy. A friend said he was just in shock from an hour car drive. But now I think he’s got some vitamin deficiencies. At the moment he’s in quarantine just like the intermedius. We’ll see if he get’s better.
All this and I’ve got a few more tadpole who have not made it out of the yolk. But the ones that have are doing pretty well. 8 so far. 4 Varadero, 3 Golden Tarapoto, and one Yuri/Varadero that should never have been. Oh well. As long as he’s kept out of the cycle.
So far my 2.3 group of Varadero have all proven themselves. Nice to know the males are ready to go and all three females can drop eggs the very night they are introduced to the male. This is all however predicated on the assumption that the male is calling. Both males of Varadero have brought one of their clutch to the tadpole stage, and I’m working now to see those tadpole come to morph out. The only other imitators I have that have come close to proving themselves are my golden Tarapoto. While they have yet to have tadpoles that have hatched (and few almost did, but died before hatching) they are working hard at reproducing.
My most uncertain are my Yuri. They seem to have all proven to be males. I know for certain who of them are, but I wasn’t even sure of that till I separated all of them. The two certain males not only have proven themselves by calling, they love to battle it out. While the third has not called, or battled, I had seen signs of a possible beat down from track in the tank.
Tonight I decided to put them all together to see again who is the third would prove to be a male. I didn’t get to witness a response, but I did get to see a the males wrestle and beat each other down. The actual beat down footage was poor, so here’s the call to arms.
This is the actual beat down in progress in a lower resolution outside the tank since they would fight with a lens 2 inches away

Usually lighting has always plagued me when it comes to building my tanks. But this is because I largely focus on individual tanks. When it comes to building one vertical ten gallon tank for a pair of imitator dart frogs I think about what the sides will be made of (glass thickness), how the opening will work (I like hinges and magnetic seals) for easy access, how to vent (snap-in grommets), and most importantly how to light everything (LED vs CFL). When it comes to the last two aspects, feeding and misting, I assume these things will be done manually (water features are still awesome, but I have come to realize while these keep the humidity up, they don’t clean of waste from the plant leaves). With almost two dozen tanks in the house, these have become concerns.
Feeding needs to be done manually. With a sturdy tank well seeded with springtails and enough wingless fruit fly cultures to ensure I can drop in some twice a week without escapes, feeding is not a problem. Misting is a problem. I could try and mist every day in the morning, then again in the evening. However it does get dry in-between, and time consuming when you really need to rush to work, or eat right when you get home. So to resolve the issue I decided for my own needs I would have to get a misting system.
 At the start I was going to try to build this system myself from scratch. But I soon realized that with shipping and all the different distributors, you might as well buy it all at once and get everything you need. The whole process is a bit tricky. This is mist, not rain, and the equipment requirements mean thinking about pressure, relieving pressure, connection between misting heads, how to mount them into tanks, and how to regulate everything. Better to leave these issues to someone who cares, buys all the parts in bulk, and then puts them together and sells them to you at a price less than it costs for you to get it all piece by piece. I ended up buying a system to mist about 20 tanks at the same time. Additionally, I purchased more “T” misting assemblies. Nine total.
 It occurred to me to wonder if rotatable misting head was necessary. This is not a 20 or 30 gallon tank. I’m not dealing with four feet or two feet of space. A misting head that points straight down would be about $4.00 cheaper and on 20 tanks that saves $80.00. But buying verses building is the question.
It looks like 4 parts. You’d need the misting nozzle, a bulkhead union, plug-in tee, and maybe a female connection to plus the misting nozzle into. Not sure on that last one. But adding up the costs, maybe just buying these for $10 each is the way to go. The whole process seem tedious unless you know one source for all the parts and buy them in bulk.
 This here is the first tadpole that I’ve had which has been alive and active for over two weeks. I’m pretty sure it’s been 2 week so I’ll call him my 7/10 Varadero. I’ve got two more just behind him which we’ll refer to as 7/17 Varadero. I say that because they were hatched from their clutch during the week of 7/17. Maybe even 7 days later. This week we may have two 7/24 golden tarapoto and a possible 7/24 banded intermedius. I’m pretty psyched.
 That makes:
- (1) 7/10 Varadero
- (2) 7/17 Varadero
- (2) 7/24 Goldren Tarapoto
- (1) 7/24 Banded Intermedius
With any luck this will be the generation 1 that makes it.
This doesn’t even include the two eggs you see in front of the tadpoles ready to hatch. That makes 4. So here’s the tally.
- *Nominals 1.1.3 – Several eggs made it to tad. Lost due to unpreparedness. Uncertain which duo made it happen or if it will happen again.
- Intermedius 2.3 – consistent egg failures. No tads.
- *Banded 1.1.1 – One egg hatching now.
- *Varadero 2.3 – all proven winners. Tads in the water.
- Yuri - 2.0.1 – Hoping for a pair, but still uncertain.
- *Golden Tarapoto 1.1 – Tads ready to hatch.
- Copper Tarapoto 1.0.2 – Nothing
- Melenistic Tarapoto 1.1 – Nothing
- Bajo Huallaga 1.1 – One nonviable egg
Getting some http://www.frogforum.net/care-articles/4397-raising-thumbnail-dartfrog-tadpoles-ranitomeya.html advice
 To start I added two 1″ holes to the top of the tank. I also placed no-see-um mosquito netting around snap-in grommets. They fit in the holes snugly, leaving a 3/4″ hole.
I then added a 2″ frame around the front opening the the vivarium. This was inset, making it harder to keep in place while the silicone hardened. It used a top 14″x2″ and the sides were 2″x12.75″.
The bottom of the vivarium was the hardest, since it will connect to the hinge and the cover, plus I wanted lower venting. So first I added a 14″x5″ piece of glass inside the tank 3/4″ from the edge. This would keep the substrate in place.
 For the outside of the tank, above the inset frame, I made a 14-1/4″x5-1/8″ bottom with three 1″ holes. I added the no-see-um mosquito netting and snap-in grommets here as well. I took the aquarium hinge, and cut 2″ inches off the top section on each side, then placed my 13-3/4″x12″ glass cover.
The cover uses eight magnets to keep it tightly closed and also to ensure no fruit flies escape the tanks. These are all 1/2″x1/2″x1/4″ magnets, except the top two on the cover, which are 1/2″x1/2″x1/8″. These needed to be weaker so I could open the cover. A glass 2″x1″ handle to the top of the cover. Extra silicone was added below the bottom magnets where there was space in the hinge the fruit flies could escape from. Now it’s escape proof.
A black plastic spine for papers was also added to cover the edge of the inset glass for substrate. Extra silicone was also added inside the tank to ensure it was leak proof at the bottom.

Once the tanks were complete, lighting was tested for daylight and night lighting. Day used two 33 white LED circles 110mm in diameter at about 6500k . They run on 12v and need over an amp to ensure the lights for all the tanks work.

Night used three 24 blue LED waterproof strips. These run at 12v, which is way too bright. So it’s been lowered down to 4.5v.
 After lighting was tested, lines of silicone were added to the back of the tanks to help adhere black expanding insulation foam. This was Touch ‘n Form for Landscaping.
 After it hardened, and additional later was added with some drift wood and cork bark. Also levels were made so they could be cut into ledges later. These were removed from three tanks I was cleaning out. I also added the substrate from those tanks. Hydroton was used as a false bottom.

Broms were taken out the tanks being decommissioned and tested for placement in the new tank. They actually looked good on a black background. However with the cut up foam, and no type of vertical substrate, I was concerned for both the plants and the imitators who would live in these tanks.
 At first coco fiber was to be glued onto the foam. But since the tanks being decommissioned had clay left in them, I decide to simply cover the foam with a thin layer of clay. This worked out great, as it filled cracks, helped for the roots of broms, and for sticking plants to the sides of the tank. Plants were re-added once all this was complete. With dirt getting into the front space for the vents, they were filled with river rocks.
I plan to let these tanks sit for the next month and settle before adding any frogs. I may decide in the future to move these to a lower level on the bookshelf and do an all black build above it. My zen build as it were.
 All the wring for the lighting still need to be drilled and placed behind the tanks. Not sure how I’m going to do that. But it looks like I’m finally done with this build for now. And I think they look damn good built into an ikea shelf rather than sitting on a lame metal rack. It’s all about aesthetics, and sometimes people don’t get that.
Yeah, I need to make the zen tanks next with the plain black backgrounds and the black pebbles in the front.
 Since the local glass store was giving away 20″x20″x1/8″ glass panes, I thought I might as well use them for something. Unfortunately I don’t have much space left in the house and I didn’t want another ugly wire rack. But I was giving some books to charity this weekend and decided I might as well keep the ikea bookselves and use them for something.
So as of today I’m building 14.25″x10.25″x20.25″ vivariums. That makes a nice 10 gallon for my thumbnails. I’m going to build one first, and then two more if it works out. Or maybe six total. Either way it makes more sense to build into something than to make tanks that are hard to place around the house.
I admit I’m bad with glass, but I figured the space on the shelf isn’t that big and I can use it as a template, so there isn’t that many ways to mess up. I got an L, glass cutter, and a glass seamer, and got to work.
 First I needed to cut the pieces. Cut, cleaned, and seamed:
- two 10×20 for the sides
- two 10.125×14.25 for the top and bottom
- a 20×14.25 for the back
I put blue painters tape around the corners of the shelving space, then dropped the bottom glass in. I used clear GE silicone II on the edges, then put the back in. Added more silicone, then put the sides in. Repeated again, then dropped on the top. I finished off with a nice layer inside the tank. I used some shelves to put pressure on the top and one inside the tank to keep the sides from falling inward.
After a couple hours of hardening, I pulled out the tank from the shelf to make sure it could be pulled in and out, then removed the painters tape and placed the shelves properly on their pegs.
 Now I wanted to test out some lighting. I used three 110mm angel eye LED lights to stick between the tank and the next shelf. I also added a 9.5″ waterproof blue LED strip for night lighting. So far they looked good, but I still need to drill holes in the shelving for hidden cables.
I also wanted to give the tanks a lip for glass on glass, so I added a 2″x14″ on the top and 2″x13″ on the sides. These were really hard to keep flat while the silicone dried.
After staring at the tank for a while I decided I wanted hidden vents at the top, and a euro style vent at the front. Since I’m bad with glass and cutting a shape is impossible for me, I’m opting for holes. I also plan for a hinged front. At the moment I just placed a recessed piece of glass at the bottom.
More as I progress.
I just opened the tank to toss in a few fruit flies and a light misting. I was taken back when I saw a tadpole on the back of the male! I knew they were laying eggs, but the last couple eggs I saw dissolved into nothing, and I figured it would take a couple till the pair figured how to reproduce. I didn’t even bother making areas for the tadpole to be deposited into. Now I’ve tossed a few small containers at the bottom of the tank for water sources. We’ll see how that works out. I honestly don’t even know how to replenish the water to make sure the tadpole survives.
The last tadpole from the nominals didn’t last a day. Although that might have been my fault for poking it. Anyway I guess this time I’ll just let nature happen and see if they breed in captivity.
At the moment I also happen to be making some custom Ikea bookshelf vivariums. More on that later.
 So I got myself a blue waterproof flexible light bar thinking each of the 24 leds were less bright than my white lights, so total it shouldn’t be so bight that it kept the frogs awake. Wrong. Even in a 35 gallon tank with 24 inches from the bottom of the tank there is enough light that the frogs can see the fruit flies and go hunting. How can this be? Maybe I just don’t know how to measure the intensity of light.
Is it because the light is blue? Would red be better? I thought blue was a better vegetative light as it was more similar to the light reflected from the moon. Maybe I just need to get one LED rather than 24. It’s a learning process.
At the very least the light strip meets my objective of being a great night lighting system. The tank looks damn good at night and really gives off the whole hunting by moonlight vibe. After doing some voltage testing I found 4.5 volts is a much dimmer setting. Enough not to wake the frogs up.
 I have to admit that aquarium hinges are not a bad option for those of you who plan to make many vivariums. Just be sure to add some silicone to the bend in the middle so flies don’t escape from there.
While you may pay $5.00 in the store per foot, you can get them online for $6.00 for three feet. Unfortunately there is also the cost of shipping, and the standard sizes they come in. For example, JMK Displays will sell you a 3-foot hinge for $6.00, but the shipping on that is $10.25. Since you can buy them in different lengths, choosing to buy shorter in bulk may be the best option. If we buy twelve 2-foot hinges you’ll pay $13.50 for shipping, which comes out to be $61.50 or 21.4 cents an inch.
Another things to consider is how you’re cutting these hinges. 2-feet loses some on the edges (and I never bought from them so I don’t know if it’s exactly 2-feet), and can come out shorter than 12-inches after all is done (the saw does take away a fraction). So adding inch for mistakes is always nice.
I ended up going with PetCareRx for my hinges. It says 30-inches, but it’s really 29-inches for $4.99. Except when you try to leave the site they always offer you a 20% discount, making it really $3.99. Plus if you spend over $35.00 they give you free shipping. So buying 9 of these hinges come to $35.93 or 13.8 cents an inch. That gives me about 14-inches for the width, which is great for 3 tanks on a baker’s rack. 9 hinges cut in half make 18 hinges that cost $2 each. Not bad. Bummer I won’t be making 18 tanks. But hey, always something to sell someone else.
 The diamond drills arrived today. One for an 1″ and one for 1/2″. I actually have a drill head for 1/2″ but the last time I used it I broke the glass. So this will give me a chance to learn if diamond drill heads are a better option. For those interested, I bought the 1″ diamond hole saw head to be used with my 1″ snap grommets that leave a 3/4″ inch opening, which I cover when inserting with no-see-um mosquito netting. The grommets were $12.95 plus free shipping for a pack of 100. The netting was a bit more, but still, will be used a little at a time. I’m sure I’ll have plenty of both lying around the house years from now.
None of this is reinventing the wheel. Tropical Ecos was where I got my first frogs and tank. They used 2.5″ holes at the top. For a 35 gallon tanks that looks fine. Not so much on a 12.5 gallon, which is what I’m building. For the record Tropical Ecos makes some great tanks and I’d buy more if I wasn’t trying to build them myself. I like the style of their tanks, but have a piece of glass for the front I have to take off and drop somewhere is a pain. And the euro venting I was implementing has a tendency to leak.
 It’s the perfect ratio for building anything. We use it as a measuring stick for perfection and we don’t even know it. So why not use it to build aquariums? We do! But we also take into consideration the economics of conservation. Which means when I look at a 20″ wide fish tank, this golden ratio expects from top to bottom, it is 12.36.” And it is. Or pretty damn close. But no one expected it to be used vertically for frogs. And on it’s side we look at 20″x10″ or something near to that. And it’s just not quite perfect. So when I look at these numbers, I try to aim for rimless perfection.
As a construct, putting form before function, it should be the same side on all sides with the height being the largest dimension. Think Roman columns. You could say 12.36″x12.36″x20.” Now here’s my first problem. The front and back are added last. Which means they will overlap the sides of the tank. Not really a problem, but this means for the best stability, the top and bottom need to be surrounded by the sides. I say this because when I put pressure on the sides of the tank, for movement, I was the sides pressing against the top and bottom at the very least.
This means the bottom and top of the tank need to be 12-1/8″x12-1/8″. I’m adding the 1/8″ because that comes to 0.125″ which is also the width of the glass. Multiple by 3 and you get 0.375. That’s pretty close to perfect. Now It could be argued that the sides being 0.25″ is enough. And the silicone will add the extra needed. Bur frankly, I just don’t believe it. So 12-1/8″x12-1/8″ it is.
So that leaves my 12-1/8″x20″ sides. And the back is obviously 12-3/8″x20″. But what about the front? Where do I put the hinge? Easy answer. Use the golden ratio. The top glass is 12.36″. So the bottom needs to be 7.64″. That a pretty tall bottom. Try using the golden rule and cut that down to. 4.72″ with 2.92″. This could mean simply a bottom of 4.72″ and a top of “15.28 with a 2.92″ overlap of glass at the top.
I guess I need to start with two perfect 12-1/8″x12-1/8″ and two perfect 12-1/8″x20″ and see how things progress after that. With total useful space in the tank being 12.125″x12.125″x19.75″, That makes it exactly a 12.57 gallon tank. I can live with this. Now the question is, if I’m cutting down full pieces of glass for this, I’m not consideration the economics of conservation. So I guess I’ll start with building the tri-fecta, and going from there.
 The local glass place had a million or so free 20″x20″x1/8″ glass panes I did a test a few weeks back of the glass. I have to say, an uncut pane that large 1/8″ thick seems a little flimsy. And when I think the only thing keeping it from bending inward is some silicone, well it freaks me out even more.
Oddly, the glass store also has free 9.5″x12″x1/8″ treated tinted glass. So it’s tougher to break and will shatter into a million pieces rather than let you drill a hole in it. So I made a 12″x12″x9.5″ box. At some point I got some other glass that is also treated by clear, which is near the same size. So with some aquarium hinge I made the front. I also cut a 12″x3″ for the front and a 12″x4″ for the back.
So what will I do with a 6 gallon black glass box? I have no idea. I still have not placed some type of hinge system for the top. But I’m working on it. Also, how is the light going to get in and what about vents?
 So I wanted to finish off my round top for a cylinder or globe tank. Originally I tried some opaque options, but it made more sense to stick a 10″ in diameter circular piece of acrylic. With something transparent like this I can still look inside of the tank and drop a light on top. After some hard thinking I ended up going with a 1/4″ thick circle from TAP Plastics for about $10.
The LED lighting was more of a pain. I needed something that ran on around 12VCD and decided circular lights that pointed in one direction would do the trick. I have planned to make them all different sizes so they were circles within each other. But that proved unnecessary. Three 100mm Angel Eye Accent Lights did the trick, running me $15, plus the a 12VCD transformer. I tossed out about a dozen of these transformers a few months ago, so I’m pretty bummed. As for the lights, I glued them all to a DVD to keep them hooked together. Looks good and reminds me of the bio-hazard symbol, which I think is great for a poison dart frog tank! If I can find one cheap, I want to get a blue internal LED for night lighting.
 Recently I ran into a new issue. The tank kept moisture well, but was overheating because there were not vents. So I got a 1″ drill bit and drilled a hole into the top. I haven’t decided about a second hole yet. I want to test just one first. But it worked well. I added a plastic 3/4″ grommet and some mosquito netting and it fit pretty snug. last on my list is to add a rocker switch in the middle of the DVD to turn on and off the lights.
Next stop is building in a fan to circulate the air, and a blue LED for night lighting. So let’s make it happen! I say I need a trinity of tanks. But first I need to figure how to make the tanks at least 20 gallons.
 I’m 80% sure this fat little Banded Intermedius is a female. One thing that make her pretty cool is rather than a band, she’s got a orange line going at an angle, and not quite running across her back. So rather than two black bands, it looks like she’s got a huge black back, with an orange slash across it. Pretty cool to me. She’s not happy with me since I woke her up and chased her around the tank with a macro lens. I really need to spend the $450 and use a used 105mm 2.8F Macro.
Looks like my female vent died from heat. The LED’s apparently do make enough heat to cause an issue. I need to drill holes for vents now, which means I need a new drill bit.
More news. Found a bad egg in the Bajo Huallaga tank. Which means the female and the male are starting to hook up and I’ve got my proven pair. I also found a good egg which is still good after four days in the Varadero tank. Which means I’ve got another proven pair. And while sitting and listening to the dark, I’m 70% positive I heard calling from the Copper Tarapoto tank. The next morning I made sure proof positive the the least Copper Tarapoto is a male These were the only frogs I didn’t think I had a male for. So with that let’s look at the proven pair list:
- Nominal 1.1 – Phil Tan Line (clutch confirmation)
- Intermedius 1.1 – Tarlton Line (clutch confirmation)
- Intermedius 1.1 – Tarlton Line (clutch confirmation)
- Bajo Huallaga 1.1 – Mark Pepper Line (clutch confirmation)
- Varadero 1.1 – Mark Pepper / Phil Tan (clutch confirmation)
- Melanistic Tarapoto 1.1 Patrick Nabors (reported by seller)
- Golden Tarapoto 1.1 – Mark Pepper Line – (reported by seller)
- Copper Tarapoto 1.1 – Phil Tan Line – (proven male)
- Varadero 1.1 – Mark Pepper / Phil Tan (proven male)
- Banded Intermedius 1.1 – Phil Tan Line (proven male)
- Yurimaguensis 1.1 – Phil Tan Line (proven male)
I’ll be pretty psyched when I find clutches in all the tanks. Which is probably the best time to sell off my extras. In review, this means 12 tanks total. While I hate the look of framed tanks, I’m reconsidering. Do I really want to spend money and start building all over again? This time, no drip walls. While I love them for general use to keep humidity high, frogs need misting for reproduction. Time to look into that. Finally.
I am not going to include the little tadpole that’s on the back on one of my nominal imitators. But it’s pretty sweet.
- Nominal 1.1 – Phil Tan Line (proven)
- Nominal 0.3 – Phil Tan Line (questionable)
- Intermedius 1.2 – Phil Tan / Tarlton Line (proven)
- Intermedius 1.1 – Tarlton Line (proven)
- Banded Intermedius 1.2 – Phil Tan Line (proven male)
- Bajo Huallaga 1.1 – Mark Pepper Line (proven male)
- Melanistic Tarapoto 1.1 Patrick Nabors (proven male)
- Copper Tarapoto 0.3 – Phil Tan Line – (questionable)
- Golden Tarapoto 1.1 – Mark Pepper Line – (proven male)
- Yurimaguensis 1.1 – Phil Tan Line (proven male)
- Yurimaguensis 1.0 – Phil Tan Line (proven male)
- Varadero 1.2 – Mark Pepper / Phil Tan (proven male)
- Varadero 1.1 – Mark Pepper / Phil Tan (proven male)
30 imitators. I still need 1 Female Yurimaguensis, 1 Male Varadero, 1 Male Banded Intermedius, 1 Male Intermedius, 3 Male Nominals, and 3 Male Tarapoto, Those 10 would make the total a nice 40 frogs.
 Not much new to report. The 3 eggs made it about a week and then dies. No new eggs. I separated the Varaderos according to what pairing they appear to have made with the male. As it turns out, I have two males. So that was good news. But on the down side for whatever reason one of my Vents died. The female. So now I’ve only got the male of a pair. I’d sell him if I knew where to start. So I may stick him back in the 6.5 gallon as soon as I find a better ventilation system. Oh and I’m starting to worry that some of my Leucs as starving. The big are getting big and the small are getting thin. I think I need to separate, but I need another 20 gallon or so for that, so I’m working on building one, or maybe picking up a 30 gallon for free online. Either that or 3 of them are going into the 12x12x18′s which really don’t have the floor space for these guys. Oh, plus they are not fly proof.
In the mean time I’ve taken some of the aquarium hinges I got online and cut them in 2. This makes then 14″-1/2 each, give of take 1/4. Cutting the glass 14″-1/2 will give me 43″-1/2 inches for three tanks, which is actually some good space for a 48″ bakers rack. That allots room for the poles on each corner of the rack. My problem is these racks are also only 18″ deep, and I don’t really want to cut the tanks down to 17.” So I’m still working out a solution. Well let’s assume those are the needed dimensions, based on the rack and the hinges. So the front glass is 14″-1/2. The back is 14″-1/2 wide x 20″ tall. So . . .
Back 14-1/2 x 20
Sides 17 x 20
Top and Bottom 14-1/2 x 17-1/8
I hate all this extra cutting. So much easier to make this 20 x 20. Bummer I can sand 1/8 off an edge.
 It’s been a weeks since I noticed the clutch of three eggs in my nominal vivarium and six days more since I moved them out into an empty vivarium and put a few drops of diluted Methylene Blue around them. I don’t know if any of this cause the eggs to continue to survive, but they are surviving, so I’m happy.
I’ve not bothered to do this for the last half dozen clutches I’ve found, and I’m sad to say all those clutches have molded over. I didn’t do this because I could never get around to locating some Methylene Blue. I don’t know why I just didn’t bother to buy it online. I guess I had hopped the eggs would survive on their own. But other factors, some of which could be humidity levels or lack or air movement, caused them all to mold. So in the future I’ll continue to do what seems to work for me, since I’ve also heard that different methods are required depending on where you live.
While I was taking these pictures with my horrible macro lens, I was shocked to see movement in the eggs. So shocked I had to record it! They’re alive for sure!
[amazon-product alink="#afa350" bgcolor="#000000" bordercolor="#000000"]B001EUJL2S[/amazon-product]So I hear much calling, but few are laying eggs. It’s my own fault since I don’t spray the tanks as often as I should to induce mating. Actually, I realize the best solution would be to have a spray system which does it as often as possible. But at the moment I’m not spending that kind of money for spraying that is out of the picture. Anyway, I am playing musical frog and moving them around the tanks to see if this has any effect. My intermedius continue to lay and my nominals have started to lay clutches. So it’s a start.
Unfortunately all the clutches so far seem to be molding. I’m not sure if this is because of the small tanks I keep them, the air flow, or that’s just the way it is. These are after all the first clutches for some of these little dudes. But just for my education I’ve decided this weekend to implement pulling the clutches when I can, putting them in an empty tank, and employing the use of Methylene Blue. This should help keep the eggs from molding. This is not guarantee they will become tadpoles, but it’s worth a shot.
The whole point of a cylinder terrarium is to have a way to showcase your frogs within a visually appealing container. A cylindrical vivarium has the advantage of appearing as one solid object, and giving the unsaid meaning of comfort, protection, and completion. This is something a square can never do, which has more meaning in terms of structure and control. Also a square has corners which usually are required to be held together in some manner. I’d prefer a globe as a container, but a cylinder makes more sense for a arboreal frog container, giving more height to work with. In my studies to find cheap acrylic cylinder solutions I’ve only found 10″ in diameter choices, with the optional heights of 20″, 24″ and 30.” Currently I’m investigating Modern Vase and Gift as a cheap wholesaler.
In my quest for lighting solutions I’ve found Angel Eye Accent Lights. My testing has involved the 60mm, 80mm and 100mm. However I’m hoping to change this by using 80mm, 100mm, and 120mm rings, giving me a total of 96 x Nature White 3528SMD LEDs. I’ll also use a 60mm that uses 15 Blue LEDs. These will both compensate for the loss of the blue spectrum of light, and be used as my night lighting.
Below is a video example comparing my 75 LEDs with a 9W CFL from a height of 17″. Based on my results I believe 96 White LEDs and 15 Blue LEDs will meet my lighting requirements. The cost for these is the larger issue.
 I was just checking the frog room and saw these two melanistic tarapoto happened to be out, so I tried to take a picture of both together. Unfortunately even without the macro adapter, the depth of field required to have both in focus in the shot was not wide enough. So I had to take two separate pictures. In the process one of them ran for it, so this is all I have. It’s till nice to see them out and about.
 I hope in the future when the tank is more filled out they will actually be out and about inside the tank. I’ve noticed my main six tanks you can generally see where the frogs are. But those tanks have had three months to grow in.
In recent news I realized my varaderos are F2 and about 9 months old. The seller had told me they were proven, but now I think he doesn’t understand what proven means. I think he understands the term to mean proven as male and female. However you can’t prove you are male and female, unless you have been breeding. Until then you are a probable sexed pair. These tarapoto are proven breeders, but not successful. Bummer.
It’s occurred to me now I have been successful buying frogs only with local sellers and reputable dealers. TropicalEcos (Leucs). AAAFrogs (My newly won Melenistic Tarapoto). ToxicFrogAddiction (Golden Tarapoto, Bajo Huallaga). Fantasticus (Copper Tarapoto, Banded Intermedius). And locally Intermedius, Varadero, Yuris and Nominals. I’m 1 for 2 with deals from amateur breeders in other cities. Lesson learned. When I sell, I plan to build a good reputation.
 My new proven breeding pair of Varaderos arrived today. They don’t have any of the marking of the photographs I was sent, so I’m contacting the seller to get further info. However they seem pretty happy and doing well in their new 15 gallon home. At least they were eating right away. Since I didn’t pick them up at work I was unable to put them in a 64 ounce container and listen to them for half the day for calling. So I don’t know who is a boy and who is a girl. But they buyer tells me they are proven breeders, so I’m hoping he’ll be able to tell me which is what sex and why they don’t look like the pictures he sent me last month. I assume it’s because they are pics from when they were juvies.
 So this ends my list of imitators that I hope to breed out. 5 nominal, 5 intermedius, 5 varadero, 3 yuris, 3 banded, 2 bajo huallaga, 2 gold tarapoto, 3 copper tarapoto, and 2 melanistic tarapoto. That’s 30. Stick a fork in me. I’m done. I can’t afford any more. Time to get them breeding, selling off the 3rd wheel, and listen to them call all day until the sun goes down. Plus I my wife and I have a baby due in a few weeks. I wanted to finish all my selling before my son arrived.
 On a different note, my intermedius had another clutch. Since the last one molded in the last week, I’m debating to pull the new one. However I can only assume it molded because the male didn’t fertilize the eggs, so I’m more apt at the moment to let them sit at least for the next couple days to ensure they were fertilized.
 So after forgetting who was who for a couple weeks, I finally found the male nominal out of my group of five. And the winner is this little dude. I’ve now memorized what he looks like from the front, but nothing beats a picture. I’ll remember how the dot on the top of his head is connected to the dot on the left of his nose.
I’ve moved him to a fifteen gallon tank with who I believe he’s chosen as a mate. Actually, I have no idea. But I found him sleeping with another in a film canister a couple days ago and assumed they were together. With any luck the other is a female. I have larger nominals I think are female, but I’d prefer to keep this one with his chosen.
 This is the one he was sleeping in the film canister with. I’ll remember her by the half dot over the left eye. Actually I probably won’t remember her, unless she starts calling. Then I’ll be bummed and have to do more research.
Either way I’ve won half the battle. Everyone seems to be calling. The Yurimaguensis, the Bajo Huallaga, the Banded Intermedius, the Golden Tarapoto, and now the Nominals. I’d complain about the Intermedius, but they have eggs (one pair does and the other I have gotten eggs from in the past), which makes them the only proven pairs. That only leaves the Varaderos.
 The one that got sick is doing much better. I was told he may have been bullied in his tank, but I’m looking at the other two, and I’m starting to think they are both female. Luckily I’ve got a proven pair of Varaderos on their way here soon, so it doesn’t really matter. I’ve heard to Melanistic Tarapoto calling, so all that’s left is to hear a Copper Tarapoto calling to let me know I have at least one male of each.
So here’s the scoop on the R. Intermedius Tanks based on what I believe from what I have seen:
- (3) 12x12x18 – Empty
- 15A – Varadero 0.2 – Phil Tan Line (questionable)
- 15B – Nominal 1.1 – Phil Tan Line (calling male)
- 15C – Empty
- 15D – Intermedius 1.1 – Tarlton Line (proven)
- 15E – Banded Intermedius 1.2 – Phil Tan Line (calling male)
- 15F – Bajo Huallaga 1.1 – Mark Pepper Line (calling male)
- 15G – Yurimaguensis 1.1 – Phil Tan Line (calling male)
- 15H -Intermedius 1.1 – Tarlton Line (proven)
- 15I – Varadero 1.1 – Mark Pepper Line (proven)
- 10A -R. ventrimaculatus ‘borja ridge’ 1.1 – Mark Pepper Line (proven)
- 10B – Melanistic Tarapoto 1.1 Patrick Nabors (proven)
- 10C – Copper Tarapoto 1.2 – Phil Tan Line – (questionable)
- 10D – Golden Tarapoto 1.1 – Mark Pepper Line – (proven)
- 10E – Yurimaguensis 0.1 – Phil Tan Line (questionable)
- 10F – Intermedius 0.1 – Phil Tan / Tarlton Line (questionable)
- 10G – Nominal 1.2 – Phil Tan Line (questionable)
- 10H – Empty
- 6.5A – Varadero 1.0 – Phil Tan Line (questionable)
On a side note I made contact about the Albino Tarapoto and they don’t seem to survive very long.
 In the future I really should consider getting just one of something when I want to do a compare and contrast. Anyway I happened to get these R. ventrimaculatus ‘borja ridge’ sexed pair for a good price. I wanted them because they look very similar to R. imitator ‘yurimaguensis.’ They say that Yurimaguensis imitate ventrimaculatus of their local area, and this was the best example of similar patterns I could find. So is it true? Well as a guy just looking at frogs, I don’t have a clue. Genetics might suggest otherwise, but I have no way to test this myself. So I’m just comparing a couple frogs that will let me take some pictures.
 I don’t think it’s best to compare total body mass because I’m pretty sure this is the Yurimaguensis male, and that is the Borja Ridge female. But you can make out similarities. Striped back pattern. Yellowish orange coloration. Reticulation on the arms and legs. Obviously there are differences. All frogs have differences. But we can see the vent legs are more blue and the imis legs are more green. Plus the patterns around the nose. I’d also go so far to say imitators look like they have a neck, where ventrimaculatus do not.
Okay, I think there is a calling contest behind be between my intermedius and my yurimaguensis. I wish I could tell who was who just by pitch. Gotta go.
 About two weeks ago I mentioned I was concerned because my little spotted runt of an intermedius wasn’t doing well in the tank with two females. I think he was in there for over a month and having no luck with either ladies. I said I’d give it another month, but I’m pretty sure within four days I switched him into a tank with a different female. I was busy making four new tanks and labeling them, which I’m pretty sure happened over the weekend. So yeah, about a week ago or maybe ten days. I still had my doubts about the little dude, but time passes and I can never remember what I did to change things. Did I add a new broom into that tank this weekend, or before I moved them? I have no idea. But whatever I did, it looks like adding the brom was a good move in the long run. That tank now has three broms, which I’m trying to do for all my tanks.
Over the weekend I finished moving frogs and tanks around. I wanted my Copper Tarapoto next to my other Golden Tarapoto. The next day I decided I also needed to move my Banded Intermedius into a new tank, and switch the location of a few tanks. That’s nine 15 gallon, eight 10 gallon, three 12x12x18, one 6.5 gallon cylinder, a 35 gallon, and a 8 gallon. I didn’t move them all. Just a couple. But I learned in the process that the Banded I thought was a girl, is actually a boy.
 This is my male. I can pick him out easily because he’s the only one that doesn’t look like he’s got a mask on. He was always on the other side of the tank sleeping, so I assumed he was the odd man out. I had even considered separating him. In fact I even pulled him out and was going to, but I had no where to put him. The next day I put him back in the tank and he started sleeping with the others. Maybe to be safe. Then yesterday when I moved them, he started very softly calling. It’s a boy! I was pretty happy.
 Finally more good news tonight. Yesterday after I moved the intermedius tank with the runt in it, I noticed he seemed to be trying to court the female. I didn’t hear any calling. I never do. But he was acting weird and trying to get her into a black film canister on a suction cup. He didn’t appear successful and I didn’t think about it since. Then tonight I got some oak leaf litter and was tossing it into all the tanks. I checked the film canisters. No eggs. Then I happened to glace at the edge of the new brom I put into the tank. Three eggs!
I don’t plan to move them out. I want to try and see if they will come full term on their own. But I’m psyched this pair is finally breeding. No more moving this tank or pair. They are good the way they are.
 My current frog jar is complete and in it’s testing phase. I’ve placed a male R. imitator ‘Varadero’ in the jar, who was ill in the past, and who I don’t wish to return back to the tank he was in before. This 20″x10″ cylinder I thought at first was glass, but I’m beginning to suspect it’s acrylic.
The circular LED lighting appears to be working glued to the rubber and cork top. I have found a better circular LED for future creations. The small light has 15 LEDs. The large one 24. The extra large one I’m looking to get has 33 LEDs and will allow me to put the small one inside with the surrounding safety plastic. I’m considering getting a blue small LED for the inside that will be used at night, allowing a rocker on the top to change from day to night, or a photosite to measure the lighting in the room to know if it’s day or night. In either case, I’m hoping to find a more secure lid and a way to allow ventilation.
This type of vivarium is for showcasing to be placed on a desk at work. It’s not for breeding, but for visual enjoyment in the office. I’m still working out some ideas on how to make this better, but this is a start.
 I started off a few months ago purchasing what I’ll call ‘copper’ Tarapoto from Phil Tan. I bought a trio. Here’s a picture of one of them. After two months she looks really really fat. I’m assuming this is a she, because she’s pretty big and also as I mentioned pretty fat. I’m still trying to determine how she got this fat. In real life she appears a little more orange. I think she’s only about 6 to 8 months old with most of the dots on her back now turning into lines. I just moved the trio to a new tank. Oddly, while they were fine in the other tank, they don’t seem to be able to crawl up the glass in the new one. Maybe they just ate. I don’t remember her being this fat yesterday when I moved them to the new tank. Seriously.
 These ‘golden’ Tarapoto proven breeders are from Toxic Frog Addiction. I believe this happens to be the female. Josh Lucas at Toxic Frog Addiction acquired this breeding pair from John Clare, who had gotten them their parents from Mark Pepper at Understory Enterprises. In person you can see they appear very similar to Cainarachi Valley, except they are yellow/gold rather than green. Mine are around 2 years old and definitely have spots, which I think is why they have been called Leopard frogs by some in the past.
 Oddities of all oddities is this genetic aberration, where all color is replaced by black. Called ‘Melanistic’ tarapoto, my breeding pair come from AAAfrogs. I won them for a tutorial video I created highlighting the vertical tanks sold by AAAfrogs. AAAfrogs got them from Patrick Nabors of Saurian Enterprises. I think they are around 2 years old. Actually I didn’t ask. I was too psyched about having them. My friend has two female ones, so I’m hoping if these are unable to breed properly, I can trade the female with my friend.
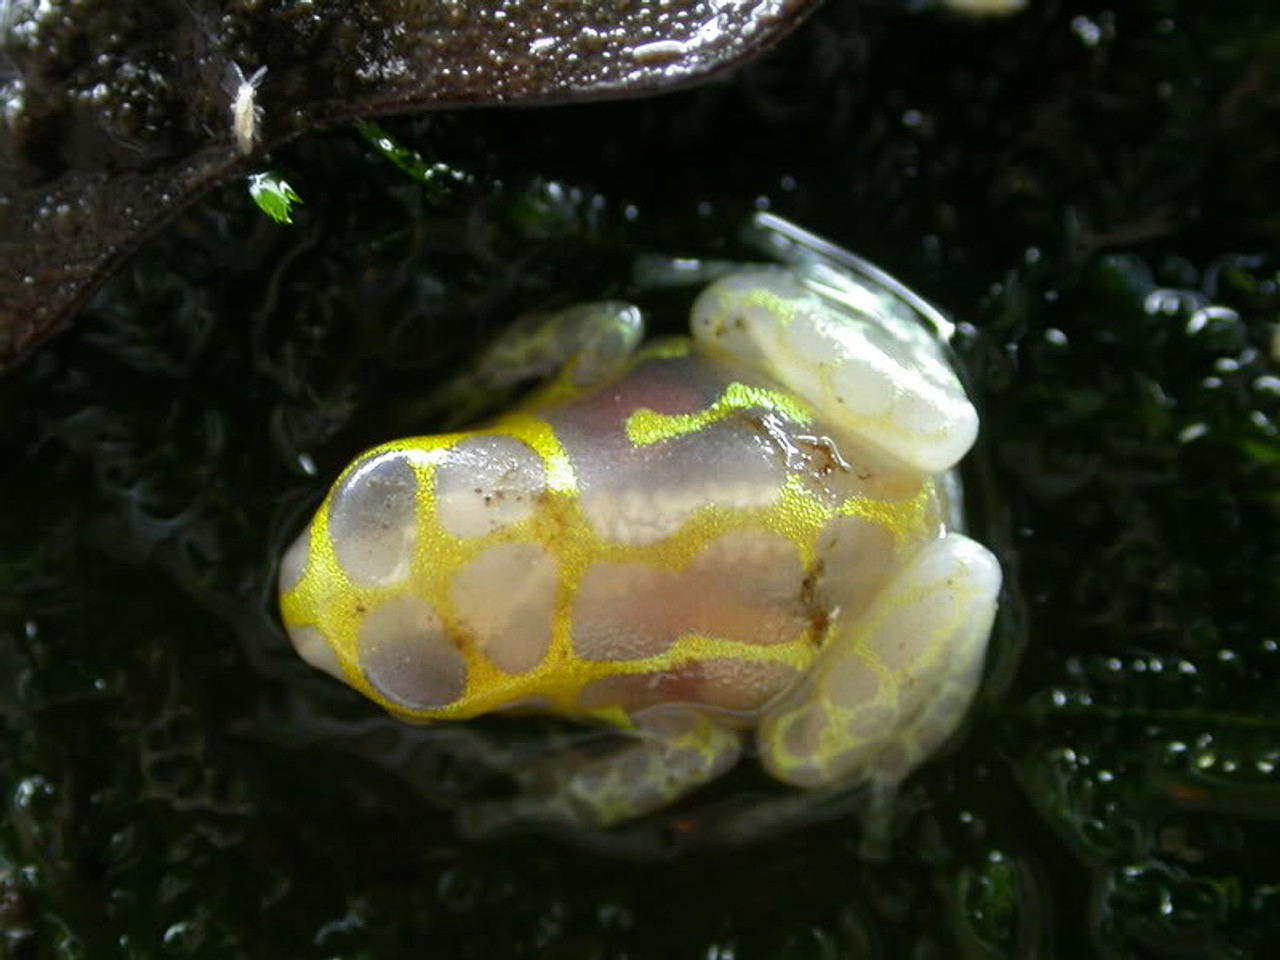 That about sums up my tarapoto collection. I’m hoping to have all of these breeding in the next year. However since I’ve never gotten anything to breed we’ll see. But I’m psyched. I was looking to see if I was missing any tarapoto as part of this collection, when I ran across these guys from Vivarium Concepts. Looks like an albino to me. The only reference I have for him was a post from 2008. So with any luck I’ll get more info. My guess is there was no success in breeding this, but it’s worth checking out.

Interesting story. So the first time I ever saw and purchased imitator dart frogs was at the norcal dentro society meeting in San Jose, California. I loved them at first sight and ended up purchasing some Nominals and Varaderos. I basically bought all the imitator frogs that were there, expect for a pair of Melanistic Tarapoto. It wasn’t that I didn’t want them. I just ran out of money. It happens to the best of us.
A few months later I’m driving with some buddies to the next meeting in Sacramento. I come to find out one of the guys in the car bought the pair from the last meeting after I left, and they both turned out to be female. It got me excited and got me thinking about Tarapoto and doing more research. I was hoping he would sell me a female so I could find a male for her. Also, Aaron had told me the winner of the contest by AAAFrogs would get a pair of Tarapoto, and I was hoping to win a yellow pair to contrast my orange pair. I thought if I was able to get all three types, I’d have a Tarapoto collection!
Now I come to find out I have won the contest! And not only are they Tarapoto, they are a pair of Melanistic Tarapoto! Thanks AAAFrogs! I’m totally psyched to be getting them. And it also means I need some yellow spotted ones. Luckily I happen to see someone selling them on Dendroboard, so it looks like I’ll have my Tarapoto color collection!
Sweet! Now if only there was an albino one.
It’s said that the R. imitator is an example of Müllerian mimicry. This means that imitators developed similar defenses of another local species of frog which have the same predators in the area. The colors and patterns of the imitator is a warning to other animals concerning it’s poisonous nature.
Since we don’t know every species of Ranitomeya frog that exists in Peru, it would be difficult to say if there is a local frog that every imitator morph mimics. But many agree on these four:
- Yurimaguensis imitate R. Ventrimaculata
- Nominal imitate R. Variabilis
- Varadero imitate R. Fantasticus
- Banded Intermedius imitate R. Summersi
Since images are strong than words, I wanted to visually show this. So I’ve gone and found the best direct examples of this mimicry. These are not perfect examples, but I’ll do my best to find better ones as time passes.
Yurimaguensis imitate R. Ventrimaculata


Nominal imitate R. Variabilis


Varadero imitate R. Fantasticus


Banded Intermedius imitate R. Summersi

 Tarapoto have never been my favorite of the R. imitator morph. But I am starting to notice there seem to be quite a number of type of this morph. And what I mean is a illegal, legal, and anomalous. The current have ones that are orange and gold with lines down their back that were more like dots when I first got them. While mine are still young, I can’t help but think they will be breeding soon. At least I hope this is true. This one I have shown in a previous post looks like a female to me. These are of the Phil Tan line. But from another website I was reading, it suggests the gold version is an illegal import, which means you don’t actually know the location it came from for sure.
 I was recently sent pictures of a possible breeding pair from Understory Enterprises. I think someone referred to these on their site as the little leopards, because they are gold with black spots. I get the impression these two types should not be mixed. But I also wonder what people expect when they want a Tarapoto. Do they want an orange frogs or a gold frog. Spots or lines? Are these really even the same morph? Should I be trying to breed my own line and see what happens? In 20 years will I be the person that sells their own line of this frog?
 And here is a genetic variation that occurs in nature and we’re actually trying to breed. Melanistic tarapoto. All dark, no color. I think one day some tarapoto frog out there made a couple of these type, and we’ve tried to breed them black ever since. It’s a cool idea and I want to try as well, since I’m more interested in visual variation that local specifics.
Hey, maybe if I win the AAAFrogs contest, I’ll have all three types. I think my video was pretty good. Let’s hope.
I was going to show on this site how to retrofit 15 gallon rimless tanks for vertical use. Most of my tanks were made this way. But frankly buying vertical kits and using 10 gallon aquariums is so much easier. And using a clay backgrounds makes it simple to tear down if I must. I purchased 8 kits from AAAFrogs. I’ll be buying 3 more vertical tanks this weekend and completing the second level of my rack with tanks. This time these tanks will sit for a month before I move any frogs into them.
In other news I got some female imitators in. One is very thin. I didn’t expect her to be so thin. We’ll she if she was worth the price of shipping. Damn shipping is expensive right now. The price to ship from one side of the country to the other is astounding. I didn’t expect it to be. This has me thinking this breeding business and where I fit into the mix. But I still would love to sell my vivarium jars complete with a pair of dart frogs.
 Some of the frogs were out and about. Okay, not all of them. But many of them were waiting to get fed today, and after a couple of hours I decided I needed to take pictures. It was mainly the nominals fault. One of them left track marks on the glass and it looked really cool, so I had to go and take a picture. And that started a long time of taking pictures. I really need to buy a smaller camera with a great zoom and macro for taking small photographs. You can’t really fit a T2i where it needs to go.
I realize I need to do a tally again on where I am in the frog business. So let’s take a step back and see what imitator frogs I have. Yes, I’m not including the lucs, who I think appreciate that.
Nomainal 1.0.4 – I see them hook up, but I have no idea of who is with who. I think there are two pairs that like to hang out and an odd guy out. But I don’t know who the odd one is. And it’s been a week since I heard him call, so I think he’s hiding. Total bummer. But if he calls from the Zoo Med I think there is a 50% change I have a 1.1 there. If not, then I’m not totally sure.
 Intermedius 2.3 – Yeah, I got boys and girls. And I learn more and more about them every day. Mister king of the hill there in his broom has been paired up with what started a long time ago as his significant other. They look the same. I’ll give them a month to see if anything happens. I had him with the one who was laying eggs, but he didn’t seem to fertilize them. Then I had him with both females. But soon I learned one of them was an egg eater. So now he’s back with just one.
 His spotted little buddy is in a different tank. He’s now got two females with him. Both have faded colors but interesting back designs. I’m hoping these two females will be okay with each other. However the runt never calls and I’m starting to doubt he will. But I’ll just have to wait and see. It’s a learning process. At worse I’ll have to switch a couple around again. But I’ll wait a month before I do that. It’s too early to tell at the moment. I just wish they were laying eggs right away.
Varadero 1.1.3 – I bought a F1 breeding pair from a guy in LA who has yet to ship. I’m starting to have my doubts. I hate giving someone money only to have problems like this. But such is life. He had good reviews on the boards. But I know he’s been in an accident and is slow and doesn’t seem to have posted much since. With any luck it will all work out in a month. In the mean time to sub-adults have been separated since one of them started getting thin. He since been put in the Mold Tank. That’s my tank that is scary moldy. It smells bad! But all the things that crawl love it in there. So I dropped him in and I think he’s getting fat on springtails now.
Tarapoto 0.0.3 – Now I don’t like to guess, but this little one looks fat. And I think she’s 8 months old by now, so my guess is she is a girl. I pulled her out before to look at her. I just don’t trust by eye. But I think she’s a girl. Either way I’ll leave this trio in the unknown category. Too young to tell. In the future I’ll only buy sexed pairs or breeding pairs. I’m slowly learning my lesson. These guys are shy, but very cool looking. And all of them seem to be healthy in a group of three.
Banded 0.0.3 – These guys are total ninjas. This one in particular with the mask on top of his head I thought was the odd man out since he slept on the opposite side of the tank.  But he eats with the others, feeds just fine, and is super fat. They all are. Which is why I just can’t tell what works and what doesn’t. I think however this band of bandeds are all around 45 months old because they look really young compared to all the others. So maybe it’s just too early to tell.
 Whatever the case they were all climbing up the side of the tank together after a good feeding. They all like to sleep at the top. This guy is one of the two masked ones who sleep on the right side of the tank. He wasn’t happy that I opened the front door and tried to take a picture.
I really hope these guys grow up soon. But to be honest I am starting to like their look less as I’m learning how varied imitator patterns can be. I now want to focus on breeding or finding patterns so the frogs in the jar look as amazing the the jar itself. Oh yeah, I’m loving the 6.5 gallon jar to put these guys in. I’m starting to think I’ll drop possible sub-adult pair in to see the results. Should I but the bandeds in?
 Yurimaguensis 1.2 – These are possible numbers. The possible female arrives tomorrow and has some nice dots I’d like to try to breed into the lines of these two, which also contain a possible female. I hate possible. I want certain. I want to know for a fact I have one male and two possible females. But only time will tell.
These guys were amazing. I have never seen such straight exact lines before on any of my frogs until I got these. It made me really see the possibilities in breeding specifics within a morph. Not that I will be able to do any of that. I haven’t been able to get one viable egg. But I dream. Plus the male calls like crazy. I think they just do that when they move into the tank. All the frogs seem to do that the first day.
 Bajo Huallaga 1.1 -I got this guy last week and he is still not happy about being here. I have never seen any of my frogs as skittish as this one. But he’s had a run of back luck in the last two months. He was a good breeder and then the female and his babies died. Then he got shipped to a new place, and then to me. So with any luck the tank I have for him will be his forever.
In the mean time I am waiting this week for his mate to arrive. A female who has never had a mate. I’m told she’s on the thin side, but I’ve also seem to get fat when there is a male around. So with any luck these two will mate and then breed and I’ll get some morphs from them. I think the bright yellow is just amazing with heavily varied lines.
So that’s a total of 6.7.13, right? Man my count is off.
 A week ago I snuck into my nominal imitator tank and pulled out a pair of frogs and a straggler sleeping on a leaf. I know I nabbed a male, cause the calling moved that day from the one tank to the new 12x12x18. However after a couple days I could see one frog slept away from the group. So I took him out and put him back in the other tank to see if I could still hear calling. Sadly, I have not heard the male calling since. But I do know while these frogs have plenty of broms to choose to sleep in, they always sleep against the glass, pressed on by a brom leaf. I have no idea why.
My hope is that what I have here is a male and a female. But they are young. Probably 6-8 months old. So it’s hard to tell. I’m trying to decide if I want to sell them. I’d replace some with a pair of breeding Caynarachi Valley. Assuming I can find some. That’s me. Not even able to breed, but still trying to upgrade.
 Here is my 20″ x 10″ glass cylinder tonight. I got some river stones for the bottom, a little bit of clay on top of that, and my own mix of soil above it. I put clay on the background covered in coco fiber, then dropped in some leaves and a couple plants. I’ll add more rabbits foot ferns and maybe some cork bark to finish it off when I have time to shop. I’m still working on a top but I got a cover from cork and rubber cover that’s used to set plant vases on the ground, and am working on some LED lighting ideas. I have to say a CFL is still brighter than any LED. But if I come up with any new LED ideas I’m be sure and post them.
I have to say it’s not looking too bad. You know a regular 10 gallon tank is about 20″ x 10″. Only that is 12″ deep and has edges. This totals about 6.5 gallons. I’m not sure how much difference it makes to the frogs. I’d ask on the boards, but honestly they don’t know either. It’s up to me to decide one frog or two. Two would totally be the limit in my mind. You know I think one more Brom would make it more manageable for imitators.
 So I think I found a suitable desk jar for my Frog in a Jar / Desktop Vivarium website from the Floral Supply Syndicate. First, it’s much easier making a Desktop Vivarium than finding a jar. I think a rectangular rimless aquarium works fine. But when it comes to something nice at work it’s all about the details. And I hate bad unpolished edges on glass. And let’s face it, that’s what most people give you. They are fine for breeding. Not so fine for showing off in the office. And point of fact, a jar is for water which generally means drinking out of, so I can’t find a jar that is large with a wide mouth that is not made of plastic. I want glass! Rounded glass just look clean.
So after much hunting I found this 20″ tall by 10″ wide glass cylinder. That comes out to be 6 gallons, but I don’t think gallons really matters to my imitators. The point is to give them at least 15 inches of climbing space with room to get around. I think they will love the curved glass and at least three broms on top of each other to jump into. Either way 20″ seems the right height. 12″ wide might be a little nicer, but I’m not going to hold my breath. But I’d love t know a play to buy a 20″ x 12″ or even 24″ by 12″ vase or chemical cylinder.
I don’t mention my Leucs much, because I’m so focused on my imitators. But I have still have my magnificent seven. My wife still thinks that are pretty magnificent. Anyway they were my first frogs which I got them I first moved to San Jose and what got me into dart frogs. They are said to be the best beginner frog, and I have to agree. Plus they are totally sweet looking.
This is the first time any of them have left the tank since they were put in. But they are getting bigger and I need to separate them into different tanks. I just got a free 20 gallon online so I need to head over and pick it up so I can prep it for three of the frogs to inhabit. Which three? Well it depends on which are male and which are female. Can you guess? They are about 14 months old with no calling, so I can only assume the larger fat ones are the females. But you be the judge.
 So the Nor Cal Dendro Society meet up in Sacremento today. I don’t think we ever met up there before, but one of the guys really wanted to have a meeting out of the Bay area and so we did. There was a pretty good turn out. Less people, but way more frogs! I mean a huge amount of frogs. More frogs than I’m used to seeing.
What’s cool about the meetings is you get to meet the people selling the frogs, talk to them about the little guys and their history. I met Jeremy from JL-exotics who used to own my Bajo. He told me how it was an excellent breeder, but unfortunately the female died. So he sold it to Josh at ToxicAddiction who was unable to find a female for it. And that’s how it came to me. This all happened in the last year.
 I wish I knew about all the frogs that these guys do. So it’s good to talk about the frogs and breeding and selling and trading with them. I ended up buying some yuris from a guy named John who was pretty sure he had a sexed pair with him. He wan’t totally sure, but Jeremy agreed that they looked like a sex pair. Then the one marked Male started calling. He was the only imitator calling at the meeting. So I had to have the pair. John also had an amazing Intermedius female and I’m still considering running back and picking her up from him.
 Now I’m really bad at remembering who is who and we’re still not sure if they are sexed properly, which is why I wanna get a couple more if I can. But I know the one with the line to the right is the male. He’s the one that’s calling. It’s weird how when you move them they all get excited and start calling. Then the calling goes away. At least that’s what I’ve experienced so far. Except for my nominal. He calls all the time.
Here is the female. At least we think she is. I really really hope she is. But I’ll remember which one she is because she has the line on the left. She not a whole lot fatter or anything, and she is just a hair larger than the male. So I’ll just have to wait and see if they breed. I hope they do, but I still want the other frogs I saw with some other dots on their back that I find more interesting. Basically the same I want the female I saw before of the intermedius. Oh, this is going to bug me now.
 So it’s day five on frogwatch. The Varadero seems to be doing better although he still doesn’t seem to be eating all his flies. I only say that because I see flies in his little box, but there are flies in every tank I have. So maybe there is nothing to worry about. Still to be safe I’ll leave him in till the end of the week. He’s got many big springtails which I have seen him eat now and then when I wake him up in the middle of the night to make sure he’s breathing.
 I have noticed that depending on the angle you check him out he looks a little thin. I think it’s just because he’s dark to begin with. I think when you are dark on the sides that’s just what happens. But I have yet to see him stretching, and it’s then he looks the most thin. I think for sure he look more thin in the first picture than the second. Either way I think he’s doing better. I just wish I saw him eating a fruit fly.
 In other news the male Bajo Huallaga arrives tomorrow, and if I’m lucky the proven Varadero breeders will arrive Friday. I’m betting he won’t get here till next week at this time. The guy seems slow to ship, but I’m in no hurry.
I am worried about setting up new tanks. I’ve decided to add rabbit’s foot fern, and I worry that unlike broms and vines, it’s won’t be so easy. I’ll pulled them out of the pot rather poorly, so I can test moving only a quarter of the fern to see how to properly move it to the tanks.
Caynarachi Valley, Chazuta and Yumbatos are on a short list of frogs I will get once I prove my abilities to breed. Nominals, Intermedius, and Yurimaguensis, are exactly the same frogs, but without the breeding papers so to speak, that state the geographic location that come from. That being said, my favorites are still Varadero, which is why when I had a chance to buy some F1′s from those who got them from Understory Enterprises, I did. I’m still worried about my favorite Varadero, who is skinny in quarantine, but seems to be looking better. I worry that quarantine is stressing him out.
 As luck would have it, I may be able to get a sexed pair of Bajo Huallaga. They are from two different breeders, but they both bought these guys from Understory Enterprises. I’m waiting for pictures of the female, who I am told is skinny, but healthy. Here is a picture of the male due to arrive Thursday. Since Bajo Huallaga seem very hard to get, I just thought I’d go for it.
I fell into the female by accident. I was talking with a breeder about some Yurimaguensis of the Jon Werner line. And I figured as long as I’m paying for shipping for this female Bajo Huallaga, I might as well get some young Yurimaguensis.  They were a little more pricey than Phil Tan, but I really like the lines and dots on this guy. So we’ll see if this deal goes through once I get a pic of the female. I am a bit worried about this skinny issue, since my problem with the Varadero. As for the Yuris, I’d like to wait for a breeding pair, but you never know when something like that will fall into your lap. Like the F1′s. You might as well try and raise some juvies and hope they breed, or trade them.
 The 12 x 12 x 18 tanks are now complete. I used a clay background and took a bromelaid plant from next door that was $24.95 and cut it up into 13 pieces. Three each for these tanks. I replaced the mesh with acrylic, which I broke a bit, while drilling air holes covered my no-see-um mosquito mesh. I went with egg crate and plastic pipes for a drainage layer and, coco fiber and jungle bedding for the substrate. I still need plant and more leaf little. Above I have a T8 40w light that seems to be working out. I’m still worried about fruit flies, but I am less concerned since I switched over to wingless fruit flies.
 So now I have five 15 gallon tanks with lower vents (Alphas). One 15 gallon tank mashup with heavy mold issues (Charlie). Three 15 gallon tanks with acrylic fronts (Betas). And three 10 gallon tanks with swinging door fronts (Deltas). I probably shouldn’t forget the 35 gallon (Omega). So once they are full planted, what goes in them?
Right now I’m getting a little worried about keeping more than a pair in one tank. This means removing whoever makes the third wheel of a trio. Right now I’m assuming pair sleep next to each other of close to each other. So I’m letting those frogs who like to sleep near each other continue to share a tank. In the mean time this is the breakdown:
- A-1: Nominal 1.0.1 Ptan Line
- A-2: Tarapoto 0.0.2 Ptan Line
- A-3: Varadero 0.0.2 Ptan Line
- A-4: Intermedius 1.2 Tarlton Line
- A-5: Banded 0.0.2 Ptan Line
- B-1: Intermedius 1.1 Ptan/Tarlton Line
- B-2: Varadero 1.1 Understory Enterprises Line
- B-3: Nominal 0.0.3 Ptan Line
- C-1: N/A until tanks settles.
- D-1: Tarapoto 0.0.1 Ptan Line
- D-2: Banded 0.0.1 Ptan Line
- D-3: Varadero 0.0.1 Ptan Line
- O-1: Leucs 0.0.7 Tropical Ecos Line
My pulling is simply going to be based on sleeping proximity. I guess I better start on the eight 10 gallon tanks before the Yuris get here!
 So I had to move my frog tanks downstairs over the weekend. I took my 8 completed tanks and put them against the wall. I think they look better when they have space between them. It also makes it easier to see what happens on the sides of the tanks.
So far the tanks with the lower vents seem to have less condensation than the ones with small top vents. This could be because they are a little more settled. I worry about chemicals in the new tanks so I am letting them grow in for a month or so before adding anything. At least that’s the plan. I keep thinking I can smell the glue I had to use to connect the acrylic to the glass.
On the rack I took my two zoo meds and the one exo terra and have almost finished setting them up. I’ll be taking the bottom two spaces and adding 8 ten gallon tanks. I’ll probably use vertical kits for these, but we’ll see.
 So I’ve been having problems spotting all my frogs in the tanks. I generally have 3 in a 15 gallon tank. I’ve now noticed that for some, two is company and three’s a crowd, since the 3rd tends to live in a different part of the tank, or I just never see him. If the 3rd never hangs out with the other two, my guess is I have a male, female pair, with an extra male. So far I have not seen an issue with multiple females. But I’ve only been at this game for two months.
Today I was feeding when I saw one Varadero was really thin. I didn’t remember him being this thin before, but I also couldn’t find him in the tank for the last two weeks. Now I’m pretty freaked so I’ve quarantined him in a 5 gallon tank with some little fruit flies and a bunch of springtails. I’ve also added more vitamins in the dusting process, but I don’t know what difference that will make since he doesn’t seem to be able to catch the fruit flies. My hope is that he’ll absorb some of the vitamins from the water. I really want him to be better tomorrow!
On a side note I got a hold of Adam Hess who told me the Varaderos I’m waiting on are F1′s from Understory Enterprises. That’s pretty sweet.
 Emmanuel, the dude in LA who I purchased the Varaderos from, sent me pics of the 2.2, half of which I should get next week. The first two picks are the girls. I don’t really have a preference over which I get.
They both look nice, but colors are hard to tell from pics when you don’t know if the white balance was working or what type of light they were working with to take the pictures to begin with.  Plus shots are at different angles. Quite frankly they both look good and I’m totally psyched to get them.
Again, I’m told they are from the Adam Hess line, but all legal Varaderos in the United States all come from the same place. That kinda bugs me since I would think that would also means one company has control of the import market. But then again they are endangered species to some degree, and this makes it easier to the government to watch over.
 Now these second two are the males. I have to say this first pic of the two males is bad ass and I hope Emmanuel gives me this guy. Except I know I was the second to buy the two of two so my chances are low. Still, I’ll ask him again and maybe toss a few extra bucks his way to make it happen. Then again these lines don’t mean the babies will have the same lines, so does it matter?
 Plus this second guy is pretty cool with flames running down his back and what looks to me like a little less black on the nose. Either either way I’m happy to have one of these males. Varadero are totally sweet looking and I’m psyched to be getting these in. The hot red and dark black are just amazing and you can see why so many people love the look of them.
Now I have found some breeding Yurimaguensis. I hope. And also a line on some Bajo Huallagas. I’m not sure about the Bajo Huallagas. I really really wanted them before. But now they open up my thoughts on collecting beyond the six morphs I have planned. Still, over time I’ll sell what I have and trade them out. But first I need to move them down to the basement.
So I picked up a sole Female R. imitator ‘Intermedius’ that was about a year and a half old from a guy in San Francisco. The girls parents were from Phil Tan and Tarlton. Since the other four frogs are all from Phil Tan, I thought it was a good idea to add a little genetic variation into the mix. Now most of my Intermedius including the new girl are more lined on their back, except for the little runt in the picture. He’s smaller with dots and I still don’t think I have ever heard him call. The bigger male always stomps on his head when they are in the same tank. Now I hooked him up with the new girl, and they seems to be sleeping at night in the same area, which I think is a good thing. I believe the girl he used to be with and other other male also are now sleeping in the same area of the tank. The third female is sleeping in a broom, but I know for a fact she is laying eggs, because all the eggs have been hers. But I’m starting to think the male is not fertilizing them. Hey, I’m learning as I go. The guy who owed this group before has tads, so I assume I will eventually get that far. Soon I hope.
So I bit the bullet and decided to get some proven breeders from a guy in Los Angeles. They of the Adam Hess Line only nine months old, which gives me hope that my Nominals will be breeding soon. I wish I knew who Adam Hess was. Anyway they were $300 plus shipping which should be around $35. They don’t ship till next week which is fine for me since I just started working on the tanks last night. I need to start learning the whole shipping process for reptiles. Soon I hope to make it part of my own business.
That’s 1.0.4 nominals, 2.3.0 intermedius, 0.0.3 intermedius banded, 0.0.3 tarapoto, and soon 1.1.3 varaderos. That’s not even mentioning the Leucs. Now if I can just get my hands on some breeding yuris I’m set . . . . so whose got some Yuris for me?
 I admit that I know nothing about trees. Or shrubs for that matter. And honestly not knowing makes me which I had a backyard so I could just plants the tress or shrubs I needed. Not that I would even know where to buy them. Home Depot? Orchard Hardware Supply? Where do people buy trees anyone? Oh, wait, there is an outdoor plant store right next to me. I’ll have to ask them about sand live oak.
Substrate is something quite annoying to talk about. Because while it’s not talked about much, it’s good to have a supply of it. I’m talking about leaf litter. When the frogs are on the ground they love to hide in it. It’s part of their natural habitat. And while live plants on the ground would be nice as well, the little critters like springtails which dart frogs love to eat prefer hiding in the leaf litter.
I hear live oak is best. But most people know can’t find live oak so they use magnolia leaves. Those leaves are freaking huge! I’d prefer to take it down a notch and use sand live oak. Either way I have no way to find them. I’m too dense to know what a sand live oak tree or bush looks like. But either way I need to be sure the tree isn’t poisonous. For the most part I don’t think the leaves of most trees are. But either way I know you need to boil the leave to get out any bacteria and other things that might make the frogs sick. Then you need to bake them just in case.
Yeah, I need to check out that plant store and get me some sand live oak. I don’t wanna have to buy leaves online. I spent enough time racking them as a kid!
 Near to my house happens to be Clay Planet, a ceramic and pottery supply company. They close by five, and after I managed to get out of the house on Saturday, so with any luck I’ll make it there tomorrow morning before work. After quite a bit of thought I have relented to the idea of clay backgrounds.
I’ve been thinking my first six tanks were a bit of an overkill. Internal lighting systems, air circulation, and drip walls to keep the humidity as high as possible. For the last three, time to try something different. Something that doesn’t require drilling holes in glass. And something that will allow me to pull everything out of the tank and reuse it if I need to. So why not clay? Well yeah, it’s heavy, and I’m not psyched about the weight. But there will also be no drip wall and so no weight of water at the bottom of the tank.
Another thing I’ve learned along the way. Frogs don’t like ledges. They live on the canopy of the leaves, or plants with crevices to hide in. But they don’t tend to want to hang out on a ledge unless it’s a little hole in the wall. Given the options I think they prefer the side of the glass. So all that to consider I really think your better off with a thin layer of clay that can be layered to the back and sides like a valley or a ravine for the frogs. Then you can just sick in the plants, and maybe some cork bark for texture.
Now I already have way too many bricks of coco fiber around the house, and I need to get me a bunch of sphagnum moss, which I have taken for granted until now. These are used not only to give texture to the clay, but some thickness and structure, so the clay has something to stick to and doesn’t simply crumble apart. I’m not going to say how much to add of either, since consistency is a matter of preference. Plus I have no idea if you plan to spread it on the back of the tank, or around some PCV pipe, or even on chicken wire.
 As for the clay, I hear Bentonite 325 is the main substance you want. Add a little Redart clay to make it darker, and maybe some Calcium Carbonate just because the frogs can never get enough calcium. Clay Planet has these for $2.50 a pound, so it doesn’t seem to expensive. But since I have not tested how much I can make out of a pound, I won’t know.
On a side note, why am I paying so much for a glass aquarium if only the front and maybe the top is transparent? Okay, $13 isn’t bad for a 12 gallon container, but $50 seems kinda steep for a 20 gallon. And I think it’s only that much more because it needs to hold the weight of 20 gallons of water. Yeah, I’m just complaining.
I come home after being gone a week at a film convention in Las Vegas. Very few imitators or dart frogs out there. I check on the clutch. It looks mushy. Hard to tell what is happening. It on an active brom leaf and I have no intention of cutting off. So I’ll just have to wait and see what happens next.
 I came down later to get my sleeping pills, and fix the water that sometimes drips from my tanks. And in a white film canister near the back of the vivarium, I find an unexpected clutch of two eggs. One was dark, and the other was light. I don’t know what that means, but I do know what since they are in a canister they would be easier to move, so what is the best next move to see these eggs make it to the next level.
Really, what does one dark and one light mean?
 For the most part I learn from the mistakes and successes of others on Dendroboard. That’s what make the internet so great as a community and source of information. And until someone else comes up with a worthwhile way to allow hobbyists to communicate with each other and sell their frog offspring, or their breeders because they are getting out of the hobby, this will also be a great forum for buying a selling. I would elect to create a forum connect to my blog. But really, why take any thunder from this place when they already have a following. Maybe I just need a small club.
So my tanks have all proven waterproof and ready to go. I think they look good separated with space rather than be a solid wall of tanks. It allows me to look at each of them from the side. But I still have a problem. I don’t have a way to both humidify and circulate air in the three bottom tanks. Since I don’t have any frogs ready for those tanks I’m not overly worried at the moment, but the thought does bother me.
In the first six tanks the tops were replaced with ABS Plastic and drilled to install lighting and a hole for electricity to go to the water pump and air-circulation system. The three new tanks have a hole in the front to implement the lighting, but the top is glass, and I’m not sure I want to bother drilling any holes if I don’t need to.
My gut instinct is to build backgrounds as before with foam covered in something to sick the coco fiber to them. Then try misting. But I hate misting. My second choice is to get more water pumps and fans, then find a new way for them to enter the tanks. I’m leaning towards doing that. I wish I lived close to china town. They always had cheap replacement water pumps. Without the lighting wire I have no idea how to get a second electrical lead inside the tank to the fan. Do I even need a fan? It’s the loudest part of the tank!
Until I know what I want, the system sits as it is. I won’t be able to work on it till next weekend anyway.
Also plans are in the works for a new tank rack of 12. Remember the last rack was for me to learn how to build visually appealing tanks that were self-contained. I think I’ve achieved this goal. This time I want to try 12 standard 10 gallon tanks as a cheap imitator breeder rack. That’s 4 tanks on a rack. The fronts will be build with ABS plastic, and cemented to the rim of the tanks with ABS cement. I’ll still use a 1/8″ aquarium hinge and glass fronts, but I’ll add my acrylic back touch and magnets to keep the doors in place. For this breeder rack I’ll use a misting system, rather than focus on separate tanks. Let’s price this out.
IMITATOR BREEDER RACK (does not include tax, shipping costs, or glue and cement supplies)
- Walmart 10 Gallon Aquariums – $12.97 x 12 = $155.64
- Home Depot 4 Tier Wire Shelving – $62.99 (Does each shelf hold 350lbs?)
- I assume I’ll be able to get 12 pieces of tempered glass at Ken’s Glass and Mirrors – $12.00
- (48) 1/2 x 1/2 x 1/8 Magnets at magnetsforless.com – $0.22 x 48 = $10.56
- (3) 48″ Aquarium Hinges at JMK Displays – $8.00 x 3 = $24.00
- 1/8″ ABS Plastic is really cheap at Tap Plastics, so we’ll guess – $1.00 x 24 = $24.00
- 1/6″ Acrylic Plastic is also cheap so we’ll guess – $1.00 x 12 = $12.00
- 3′ Light fixtures (because 4′ won’t fit) will run at least $100 with lights.
- Ultimate Value Misting System from the MistKing.com – $189.00
- (9) Value T Misting Assembly – $14.99 x 9 = $134.91
- (3) Rock wall shelf background – $204 x 3 = $612 . . . forget this!
- (12) Rock Formation background – $18 x 12 = $216
- TOTAL = $887.01
Wow, and that’s not including all the junk that goes into the tanks beyond the background. I think I’ll get back to contemplating this after Vegas . . .
 The LED lights showed up today from www.superbrightleds.com. I was pretty excited when they arrived. I opened the packages, setup the lights and was ready to be amazed at the amount of lumens I could get from some LEDs. However, the brighter of the two light was the wrong white. Rather than Natural Light, they sent me Warm Light. As we all know, plants will not grow in natural light. I need at least 5000K in order for the plant to grow, and warm light falls around 3000K.
I contacted the company about the problem and they sent me a standard response that had very little thought or consideration put into it. I’m not saying I wanted Shakesphere, but you can’t expect me to ship back a $10 item when the shipping costs they stated for the items are $5. Yet they told me:
On 2/17/11 1:25 PM, order_status@superbrightleds.com wrote:
Hello,
We will be more than happy to replace the AE80.
Please view the link below or the Return/Exchange form under “info & policies” on our web site for further instructions.
Thank You,
Sondra
www.superbrightleds.com
What great help. Needless to say I was not happy about the standard response or the info & policies that state such things as “We will Reimburse UPS or USPS ground shipping at our discretion“and “a 15% restocking fee may apply.” Basically I’m at their mercy for a mistake they made.
I was expecting more from Super Bright LEDs. I looked them up on the Better Business Bureau and I can see they already had a few complaints about them. In the end I’ll probably try to ship the item back to them USPS however I can. But this kind of customer service totally annoys me. And it’s not just because I have worked in customer service and support for over a decade.
In my interest of building the perfect tank for sale to others I looked at my options:
1/8″ – 15 Gallon Acrylic Construction:
- (2) 21-3/4 x 14 LEFT/RIGHT SIDES = $17.11
- (2) 10-3/4 x 14 TOP/BOTTOM = $8.55
- (2) 10-3/4 x 5 BACK DAMS = $3.06
- (1) 21-3/4 x 11 BACK = $6.72
- (2) 3 x 11 FRONT LIPS = $2.00
- (1) 11-1/2 x 11 FRONT = $3.66
- Excelon™ Hinge = $1.25
- Acrylic Handle = $0.95
- TOTAL WITH TAX = $47.41
This was a recreation of my current 15 gallons in Acrylic. And the fact it would probably bend in the wind.
10 Gallon Acrylic Construction:
- Sides – (2) Clear 3/16 = 11-1/8″ x 18″ —– $19.05
- Top – Black 3/6 = 11-1/8″ x 10-3/4″ —– $8.71
- Bottom – Clear 3/16 = 11-1/8″ x 10-3/4″ —– $5.82
- Back – (1) Black 1/8 = 17-5/8″ x 10-3/4″ —– $8.94
- Front Top – Black 1/8 = 3-7/16″ x 10-3/4″ —– $1.98
- Front Bottom – Clear 1/8 = 3-7/16″ x 10-3/4″ —– $1.32
- TOTAL WITH TAX = $50.17
A smaller tank with thicker walls, but still expensive. Cheaper would be better. And that meant working with what was already out there, not building from scratch.
 So let’s go with what I know and build with parts we can find in bulk. The 15 gallon tank I have been testing with all these months. The rimless E18. 21.6″ x 11.6″ x 13.8″. I think they are wrong on some of those issues, but I won’t argue. The E8 and E12 will not do because they have rims and lights to go with them. Great for fish, not so great for my frogs that need vertical tanks. And while I live the 21.6″ vertical mobility, I have to wonder how necessary it is. Wouldn’t a cube work as well?
 As luck would have it, the company also makes a 20 gallon cube perfect for my needs. The small which is – 16.9″ x 16.2″ x 16.5″. I actually would not mine trying to modify and sell all three options. I think they are have great potential depending on the customer. Plus I need to see the full design.
Once I know what my options are directly from the vendor, then come the modifications that need to be done. Let’s assume we’re looking at the E18. We need to start modifying it to a vertical vivarium.
To create the front door I’ll need some glass, a latch, and a hinge:
- 1/8″ tempered front glass 11-3/8″ (29cm) x 13-3/4″ (35cm) from Ken’s Glass and Mirrors @ $1.00 each
- Taking a cue from TropicalEcos, I’m getting magnets from www.magnet4less.com by only 1/8″ thick @ $0.22 each (we’ll need 2)
- From Tap Plastics you can get a Excelon™ Hinge that’s 12″ long @ $1.25 (needs a good adhesive)
Now we also need a system to vent air from the outside. While the system is not airtight, it should still have a way for air to easily enter and exit the system.
- EQUINOX No-See-Um / Mosquito Netting from [amazon_link id="B001TA7PI0" target="_blank" locale="US" ]Amazon.com[/amazon_link] @ $6.99
- And taking another TropicalEcos cue, I’ll use a Levition Grommet only 1″ in diameter @ $0.57
 Lastly the E18 comes with a long piece of glass that is 8-3/4″ wide. It could be cut to meet our needs for the bottom and top of the vivarium, including a place to add an air vent. If so $5.00, a glass cutter, glass drill bit, and some silicone would all that is needed to turn this into a perfect tank for dart frogs.
After I have perfected this, it will be time time to find a good background supplier for the tanks. Because using foam just isn’t all that find, and a sweet background you could stick plants in would really resolve some issues.
 So I got a little depressed today since I can never find any eggs or tadpoles, and decided the problem was the flowers of my brooms were in the way. I’m bad. Rather than buying a dozen brooms online cheap, I went and bought the expensive ones at Home Depot. I’m just not very good at waiting for things to show up in the mail. Plus I’m just not sure about plants by mail.
Anyway I trimmed off all the flowers, and then got a little worried because I couldn’t see all the frogs in the tank and feared I crushed one to jelly. So I had to root around each tank to make sure they were still alive. I’m not quite totally sure they all are yet. But while I was in the last tank I came across this single egg!
I was pretty shocked I found it, and I’m still a little shocked now. But there it is. I’m headed out of town, but I’m psyched to see if there’s a tadpole when I get back.
 Someone was telling me that knowing what breeder your frogs originated from was pretty important. While I bought my intermedius from a guy named Michael in Sunnyvale, they are of the Tarlton Line. My varadero and nominals come from a dude named Travis in Reno, but they are of the Phil Tan line. And my youngest froglets were directly purchased from Phil Tan and shipped a few weeks ago. These are my Tarapoto and Banded. And I guess that sums my current inventory. These tarapoto and banded are still only a couple months old and look it!
 After having these frogs for a while now do I see the differences in how they look. I thought for a time that my intermedius look the same as my tarapoto. But I can really see their differences now. Banded don’t look like anything but bandeds for obvious reasons. Anyway I’ll have to keep this all in my for my next purchases. I never thought about the need to ask someone to guarantee live arrival or from what line their frogs came from. Good information for future purchases.
[amazon-product alink="#13f40a" bgcolor="#000000" bordercolor="#000000" region="us"]B004C1UMN8[/amazon-product]Finally, a video on the new vivarium build.
I have to admit, I really like my new 15 Gallon vivarium design. But I’ll only know for sure when I put it to the test. I was glad this time I didn’t have to take apart the aquarium to make the build, or cut any glass. The Professional Welders Adhesive works, which I was pretty happy about after all the testing I had done with different epoxies. The acrylic was pretty cheap since it was only 1/8″ thick. And the air ports worked out better than expected. I also really liked using a clamp light as an internal light. It saved me tons of hassle.
I admit I’m a little back and for on the magnetic doors. On the plus side I trust them to keep the tank closed. They are strong and I have no doubt the frogs will never be able to get out. Also when my hands are full they make it easy to close the door before any fruit flies escape. One the down side, I fear I might accidentally close the front when there is a frog too close to an edge. However I think that could have even without the magnets. I suppose the worry comes from not having a hinge before at the bottom. The hinge is great. I now never have to worry about dropping the door which was my previous fear, having it happen once before, and breaking the glass when knocking it against the edge of the tank. No, these hinged magnetic doors are going to be pretty sweet.
On another note, the reason I used acrylic and not glass for the front of the tanks, was because I hate the look of sanded down glass edges. I would rather have them polished, but that’s expensive. To polish acrylic, I just need a small torch. And with glass, I’d still need to drill air vents in them. I’d rather do this through acrylic. It’s just safer. Plus the black acrylic looks totally sweet. And the awesomeness of the magnetic doors just perfect the look. Now I need to get some contact paper for the sides and top. But for now I’ll use duct tape.
 As the evening comes to an end everyone heads to the bromeliads for the night. For I thought I’d recap for the evening with a few pictures of my Nominals and Intermedius heading to bed, and my concerns and . . . well . . . whatever.
1. Epoxies are not working. Professional Welder Adhesive next. It takes a couple days to harden, but it seems to work the best for far. I’m covering it with a heavy layer of silicon. But the stuff is waterproof, unlike the last stuff I tried, which disconnected to the glass as soon as water touches it. I think the main problem there was between non-porous material. Either way I hope to have the new tanks ready to go soon. Not sure yet what I’ll put in them.
 2. There are two types of fruit flies. To make it easy we’ll just call them wingless and flightless. I’ve been culturing flightless. I’m sorry to say they take long to culture, and good at hoping and gliding, and sometimes find the ability to fly. I’m going to try wingless next. Already in my cultures I can see the large is already large, proving that wingless do culture faster.
3. Two of my Nonimals seems to have learned how to make the mating call. Is it time for separation? They didn’t make these calls until they were housed next to Intermedius who call quite a bit. Did they learn it from the Intermedius? When should the group of five Nominals be separated anyway? Since they all still appear to be getting along and sitting in the same area of the bromeliads at night, my guess is not quite yet.
 4. No luck with any glass jars larger than 2.5 gallons, which don’t require modification. I’d still consider carboys with the tops cut off. But for now it’s just too much work. Until then I’ll work on designing the Montana Jars, which means trying to build in an LED lighting system. If it works, I may try to add blue night lighting as well.
5. Building the 2.5 gallon jars with the lighting will costs about as much as my 15 gallon rimless vivariums. So is it worth it? They both look pretty sweet.
 You’ll often hear the term proven pair or sexed pair. Sexed Pair refers to a male and female pair of dart frogs that appear to be a couple. You’ll notice they like to hang out with each other in the vivarium more often than not. And you can tell which sex they are by the fatter and slightly larger shape of the female and the call of the male. However, you know they are a monogamous couple when they have been separated and you find a tadpole in the tank. In the top picture I was very hopeful this male was in the water of the plastic dish to deposit a tadpole. But I think he just saw a fly that fell in. When you know they are breeding, you can call them a Proven Pair.
 I managed getting two proven pairs of R. imitator ‘Intermedius’ from a local breeder who was having trouble morphing out the tadpoles. Which means he was getting eggs and raising the tadpoles, but they never managed to become froglets. On the right you can see the female that is with the male in the other picture.
So far I have yet to see any eggs or tadpoles, but they have only been alone in their tank for about a week. Previously I kept both pairs together, which made the male quite unhappy, as he was not the dominant one. I’m a little concerned about the pair in my other vivarium, because it was the reconstruct I did of spare parts and used a different type of glue than I normally would. I’m hoping there are not chemicals left over in the tank making them sick. But I just can’t be sure.
On a different note I didn’t put enough silicon over my VersaChem Plastic Weld in my new three thanks, so I got a leak on two of them. I worry this leak may have caused a larger problem, since the connection between my acrylic joint and tempered glass ended in separation caused by water. I’m going to test silicone on it next to see if it has the same problems.
I have avoided working with acrylic and glass because I have seen warnings against it. After coming up with a new venting solution I thought for my last three tanks I would try it.
Parts:
- (3) 15 gal. rimless glass tank 21-5/8″ x 14″ x 11-3/8″ x 3/16″ thick glass $35.00 each
- (3) tempered glass 14″ x 11-3/8″ x 1/8″ $1.00 each
- (3) 1/8″ black acrylic cut – 3″ x 11-3/8″ $1.63 each
- (3) 1/8″ black acrylic cut – 4-5/8″ x 11-3/8 $2.71
- (3) 1/16″ thick clear acrylic cut – 3-1/3″ x 10-15/16″ $1.00 each
- (3) 12″ Excelon Hinges $1.25 each
- No-see-um Misquito Mesh $12.00
- (3) Clamp Light $6.00 each
- (12) 1/2″ x 1/2″ x 1/8″ magnets $0.50 each
- Black Pipe Tape $6.00
- GE Black Silicone II $3.00
- VersaChem Plastic Welding $5.00 (This did not work and I was required to switch to Pro Welder Adhesive)
- Liquid Nails $6.00 (Ended up using Pro Welder Adhesive)
- Weld-on #16 $6.00
- Plastic Packing Rings and Washers
 To start with I had these plastic packing rings from my Office Max wire rack I had just bought. Using some Liquid Nails and some plastic washers lying around the house, I glued pieces of no-see-um mosquito mesh tightly inside the plastic packing rings. These would be my vent ports for the vivarium. Weld-on #16 may also work for this task, but it really doesn’t connect well to ABS plastic.
 Next I took the clear acrylic and used the Weld-on #16 to cement it to the 3″ piece of black acrylic. This would give me a clear lip to press against the glass front. Then I drew lines to cut 1-1/4″ holes into the acrylic. Then I drilled the holes.
I drilled three holes. Two for vent port and one to screw the clamp light into. When I was done it looked pretty good.
 Here you can see the process to drill a hole into acrylic. I did this in the middle of my living room with a couple pieces of cardboard under the acrylic to make sure I didn’t drill into my carpet. You’ll need to be slow to make sure you don’t crack the acrylic. By slow I mean take your time. The drill was fast enough to actually melt the acrylic a little while it was drilling. But I avoided putting too much pressure on the acrylic because the plastic can crack easily.

 Now when I started this project I had planned to use a different Epoxy that was clear. But the VersaChem Plastic Welding actually stated it was good for both Acrylic and Glass. So using it, I cemented the top and bottom plastic. I also took the Excelon Hinge cementing it to the acrylic first with Weld-on #16, then to the front glass with VersaChem Plastic Welding.
 When I was finished I shoved the clamp light into the middle holes and taped the electric plug down to the top of the tank. I also covered the entire top of the tank with black pipe tape. Using the silicone I added a nice line to the inside edges where the acrylic and glass met, to help keep it from leaking. All that’s left is to silicon the magnets to the doors so they stay shut.
 In the Poison Dart Frog hobby, it is generally understood that you don’t mix frogs from different locations. Even more so, you should never allow frogs from different locations to breed and produce hybrids. I think these are pretty standard rules for breeders of any animal. Otherwise you end up with too many mutts on the street.
So what does that mean for imitators? Sure, the species has been defined, but there are many morphs, and some of those may be mutts, even if we know where in Peru they come from. Nominals and Intermedius are the cheapest imitator morphs in the hobby because the fact is no one knows where they come from (similar in looks to Cainarachi Valley and Chazuta). Yurimaguensis (similar in looks to Yumbatos) are also from an unknown location, making it on the questionable list. Most are probably hybrids to one degree or another. But if we look at them we can have an idea because they look like the type of frog they imitate.
So let’s talk about imitation. Which frogs are getting imitated?
- Yumbatos imitate R. Ventrimaculata
- Caynarachi Valley imitate R. Variabilis
- Varadero imitate R. Fantasticus
- Banded imitate R. Summersi
This leaves Bajo Huallaga, Chazuta, and Tarapoto as hybrid morphs from the wild. Cool and distinctly different from the main four, but still hybrids.
 This is a Montana Jar. The largest size it comes in is 2.5 gallons. That is the smallest sized container recommended for keeping a Arboreal Thumbnail Dart Frog.
If you ask most Posion Dart Frog breeders, they’ll tell you the container standard is 5 gallons per frog, and never to use this as a rule. You can’t use this as a rule because dart frogs come in different sizes. Some enjoy life on the ground under leaf litter, while others stay up on the limb of whatever plant they can. In a vivarium, you may notice frogs like to hang out on the glass itself. Also generally speaking you want more room than less. Most creatures prefer to have more space then less.
My focus up till now has been building breeding tanks specifically for R. imitator dart frogs. A breeding pair might be good in 5 gallons, but most double that number to 10 gallons, and make sure the height is the longest measurement. We call that a vertical tank. Plus 10 gallon tanks generally run about $12.50, so they are the least expensive with the most space for the price. Many custom dart frog companies sell vertical conversion kits. Those will run at least $20.00 plus shipping. They allow you to access the tank from the front, which is good when you are breeding frogs and hunting for tadpoles.
When I created frogcube.com, I had a simple concept. I wanted to have a jar on my desk that was a self-contained rainforest. And inside there would be a brightly colored frog enjoying life. When I envisioned this I happened to be in the kitchen where my wife keeps rice on the counter in a Montana Jar. I thought it was a great size for a desktop vivarium. And it is! But it’s a little small for 2 frogs. Maybe it’s okay for temporary quarantine of multiple frogs. Anyway, until I think so something better, I’ll be working to build out the premiere frogcube container.
 It’s hard to take a picture of these guys when they’re hunting. These two nominals were just sitting on the vent, waiting for the fly to make a move. I couldn’t open the door or I’d risk scaring them. Macro lenses have a very shallow depth of field, but I still managed to get a snap shot of the situation. I’m sorry to say I’m a little impatient and did move the glass just enough to blow a little air into the tank. Unfortunately it cause the frogs to run away. The fly didn’t move a millimeter.
The 6th 15 gallon tank is complete. For some reason it smells weird. Also the wood glue didn’t work like I’d hoped. Maybe it’s the wood glue that smells bad? Anyway, I’m going to wait a day before I separate the intermedius and put them in their new home. I hope they like the bamboo stalks for climbing.
Next up is the build of 6 more thanks that are smaller than 11 inches. I am very much considering using 10 gallon tanks and trying to do this as simply as possible.
 Most of the posts you read about my vivarium constructions start with my first vivarium build. It ended badly with my first and last attempt to drill a hole in glass. While I still completed the build, I later scrapped the entire vivarium and cannibalized the pieces to make the next five. The plan was to continue to cannibalize parts for the next four vivariums. But as luck would have it, the aquarium store where I bought my tanks screwed me over, and so I was left with no choice, but to try to rebuild this vivariums with the parts I had left.
So with a 11″ x 14″ piece and 11″ x 21-1/4″ piece of 3/16″ ABS Plastic, I took my silicon gun and tried to rebuild a new vivarium using what was left of my glass. I couldn’t cut any glass because the none of my pieces were wide enough. The result was some odd levels, but a possibly functional vivarium. Assuming I keep the weight of things inside as low as possible.
Tomorrow I’ll test it out and probably add a little more silicon around the edges. But so far it’s better than I’d hoped. ABS plastic and glass don’t really work that well together. And I’m not sure if trying to use silicon to keep them together is the best way to go. But I guess only time will tell. Maybe on this one I’ll use the fogger I got for Christmas. Just to continue to try something different.
 While I have five 15 gallon vivariums finished and four more to be complete, I decided to try some of the more standard terrariums used by hobbyists today. These are the 12x12x18 Zoo Med NT-2 Naturalist Terrariums, and the 12x12x18 Exo-Terra Glass Terrarium PT2602. I bought two Zoo Meds and managed to locate a used Exo-Terra on craigslist.
 As front opening glass terrariums go these both are pretty sweet. The Zoom Med is hinged on the left while the Exo Terra has two doors that open on both sides. Both have a screen tops that can be removed and use 1/8 inch glass with a 1/2 of vent space below the front door. The Exo-Terra is a little more expensive, but has the extra feature of a fake Styrofoam background that looks like rock. However, for the price difference, you could get a fitted cork bark background for your Zoo Med.
For dart frogs I find these both a bit of a nightmare. The screen top will easily let fruit flies though, as will the vents below the doors, and all the edges around the doors. Fruit fly proof these systems are not. The solution is to block the top screen with a plastic liner, silicone the edges of the glass (hard to do with Exo-Terra double doors), and block the plastic vent.
 At the moment I’ve decided not to worry about all of this, focusing on these tanks for temporary housing and perhaps future housing for some of my Lecus, which are starting to grow too large for their tank (18″x18″x24″). But while I’m working on way to block the top, silicon the sides, and test the misting options to keep humidity up, I also decided to test clay background.
 Clay backgrounds are kinda heavy. Granted they could heavier. But add clay to glass and rocks, and things get pretty heavy. My friend Michael came over with some clay he’d gotten from the local clay store. We mixed it with some other clay for a brown tone, and added a little coco fiber. Once we got a thick consistency I flattened it to the back of the tank, then make some shelves for my imitators to hang out on. I then covered the shelves with coco fiber. They still need some plants added but it looked pretty good.
Michael pointed out that clay backgrounds were nice because the vivariums could easily be cleaned out and re-used. I suppose so. But I like the lightness of foam. Anyway some of my intermedius imitators are testing it out for me at the moment. We’ll see how well they handle it for the next couple days.

Most of the information I am using to learn about the care and breeding of imitator dart frogs comes from:
Imitating Dart Frog – Ranitomeya imitator – Care and Breeding
I have not bought any books on the subject. From this information and a few references to other sites, I have divined a list of R. imitator dart frogs that are available to hobbyists interested in breeding. I based this list on the way the frogs looked. I know that some frogs differ because although they look the same, only one line is known to be of a specific region. But they still look like all the others (just don’t breed them with the others to be safe). So with all that, these are all the R. imitator morphs and there different names:
- Nomainal (Cainarachi Valley)
- Intermedius (Chazuta)
- Intermedius Banded
- Tarapoto
- Varadero
- Bajo Huallaga
- Yumbatos (Rayada)
- Yurimaguensis
I’m working to collect all 8 of the cheaper types, meaning without the specific regional data. While I think I’ll eventually be able to get some Yuri, I think the Yumbatos and Bajo Huallaga will be the most difficult.
 Well this morning I checked FedEx with my tracking number and sure enough the order had arrived in the morning and was ready to be picked up. I’m sorry to say I was not ready to get it. That worried me since I wanted to get those dudes back to my house and safe in their new vivarium. But such is life. I got there at lunch and opened the package. Phil Tan had backed it well with foam on the sides and heat bags to make sure everything stayed warm. Inside of that was a thick foam container filled with bags for humidity, some wet towels, and six little containers with a froglet and moss.
  I was psyched to open each one, check out the little dude was doing, and help him into his new home.
About their new homes. After some calculations I decided the modified rimless aquariums I make were the best homes for my imitators after all. They are 15 gallons and after modification about the same price as a Zoo Med or modded 10 Gallon rimmed aquarium from PetCo. So with that in mind I went out to OfficeMax and got me a 72″ x 48″ x 18″ black metal wire rack to put them all on. I discovered after a bit of work that my plan of 4 on each level was doomed to failure because of about 1mm. That’s right. 1 little millimeter.  Because of that 1mm the side doors can’t open on my tanks! It was a sad moment. But I have since come to accept the problem and move on. Now the plan is to have 9 vivariums with space between. The space is nice because I can get to the sides of the tanks and see how the froglets are doing. I’m still not sure what I’ll do about the other two Zoo Meds. At the moment I’m thinking they will be quarantine containers. But who knows. Whatever they are, I don’t plan to put as much effort into them as into these 9 tanks.
Since my first plans things have changed for my R. imitators. I now have nominals, intermedius, banded intermedius, tarapoto, and varadero. The nominals and varadero appear to be around 6 months old. The banded intermedius and tarapoto only three months. The intermedius are around two years old and proven breeders. By the end of the week they will have their own vivariums. Which means there will be three left for other frogs. You know, I think I’ll put my leucs into the Zoo Meds. The 7 in the 39 gallon are getting a little claustrophobic.
 So these are my frogs.
The Nominal. 5 froglets around 6 months. But tanks will be ready for them once they get older and needs more space. Well that or I’ll sell them. I love their spotted green and blue look. I didn’t think I would but they really grew on me. Plus they are very bold. They are always on the glass and I’m pretty sure there are at least two pair. But I can’t be totally sure.
 The Varadero. 3 froglets around 6 months. These guys have been less bold than I expected. Amazing to look at. Dark blue legs with a metallic copper orange that really stands out with the black dots. I wish they were more outgoing, but they are starting to be. I’m not sure if there is a pair in this trio. But I am hoping.
 The Intermedius. 4 of them. 2 pair of proven beeders around 2 years old. I’m told so far their young have never morphed, so I got a good deal. Some have spots, some have lines. I can really see now based on them what an adult should look like and how to compare froglets to adults. They are not nearly as colorful, and they are a bit timid from the move.
 The Banded Intermedius. 3 froglets around 3 months. I was told these little dudes might be shy. But they are totally not shy. And they are totally awesome looking. I love the look of the black bands over the orange. Or is it the other way around? Well they are adjusting well to their new habitat today. They are so light they can pretty much run on every leaf they find.
 The Tarapoto. 3 froglets around 3 months. I have to say they look very similar to the Intermedius. But they are also very shy, so I haven’t been able to take a real good look at them. It’s my own fault. For their tank I was trying something different and frankly all the plants keep the bottom dark and make it hard to see anything.
To keep the front glass of my vivariums in place I use four 1/2″ x 1/2″ x 1/8″ magnets. These are excellent magnets to hold a thin piece of glass against another thin piece of glass. However, these magnets are thin, which makes them brittle. A good number of the magnets I purchased broken into pieces from the sheer magnetic force from just two of these combined. 1/4″ magnets are much more sturdy. But they will be too strong for a 1/8″ door.
As I work towards getting a rack of 12 tanks, I’d still like to use magnets to hold the glass door in place, combined with a living hinge so I can just let the door fall. And as much as a rimless vivarium looks great. Cause it does look great. The rim actually helps to keep the fruit flies in the tanks.
 So I was minding my own business on the Dendroboard.com when I ran into Michael, a forensic accountant who is part of the Northern California Dendrobatid Society. One thing leads to another and before I know it I’m buying two proven pairs of R. imitator ‘intermedius.’
So the intermedius are ready to breed, and have done so already. Which means it’s time for me to learn how to breed dart frogs! I’m so excited. These intermedius are a couple years old. I wanted to test them in the same vivarium and they are already fighting. I’ll be separating them next week once I learn a little about the behavior patterns. Already I have heard the mating call and have seen the males stop on each other for dominance. It’s amazing to watch, and a little scary. I mean I just bought the little dude and I’m worried for his life. But I guess that’s just life for you in the jar.
As my education comes to a close with my design of showcase rimless vivariums, I’m now back to designing a breeder shelf. Unlike my showcase, the design is all about function and no form. It’s made to be cheap and to the purpose. I don’t plan to implement this anytime soon, but I want to be ready if my little juvenile imitators ever lay eggs.
 First my understanding is that since thumbnail frogs are only about the size of a thumbnail, a 10 gallon tank is fine for a pair for breeding, or a small group of juveniles. For breeding, small tanks make it easier to find eggs. For young, small tanks make it easier for the juveniles to find food. I was back and forth on 10 gallon or 20 gallon verticals. But I asked a bunch of guy who breed thumbnails and my answer was a resounding agreement on 10 gallon verticals. So done deal. Let’s make a rack.
So how big would a vertical 10 gallon tank be? The best measurements I found online in inches were 12 9/6 deep x 10 1/2 wide x 20 1/4 high. This included the space the rim took up. Assuming the 10 1/2 wide is correct with the rim, I imagine 4 next to each other, taking up 42 inches. And for easy access to all, I’d say three rows.
14 inch chrome wire shelves seem like the best deal, and lucky for me, they can be found a total of 48 inches wide. Since the poles take up a couple inches, I think this means the size is just perfect for 4 tanks. With the lights we need at least 24 inches between shelves, and 1 inch for the shelf itself. So I’m guessing a 75 in rack. I found a 74 x 14 x 48 inch rack online, so I know it exists. With any luck I’ll find it somewhere else at a lower price.[amazon-product]B001BQN5S6[/amazon-product]
beyond this I’ll need three fluorescent light fixtures, and 10 gallon vertical conversion kits just to get me started. But getting the rack and 12 tanks will be a good start. I’ll get back to this in the summer.
Educational notes. You need to wash off all plants bought from Lowe’s, Home Depot, or Orchard Hardware Supply in order to remove any fertilizer or pesticide contaminates. I think fertilizer is the key issue. Not actually sure if any of them have pesticides since they are indoor plants kept indoors. But I also need to remove as much of those little white pellets from around the roots as I can. All are not good for the frogs since the frogs just soak up all the water in the tank, and these could contaminate the water. I did not wash the plants for the last tank and this is a concern since I’m introducing expensive frogs. But everything has been misted in high humidity, so with any luck, I’ll mist and replace the water to clean out all contaminants out before Tuesday.
 So on the 8th of January at a meeting of the Northern California Dendrobatid Society in San Jose, California. I met a guy name Travis who sold me my first imitator morphs. I purchased five ‘nominals’ and three ‘varadero’ for a total of $300. These were all that he brought to the meeting. I got a very good deal and didn’t need to worry about the process of shipping. The ‘nominals’ cost me $30 each and the ‘varadero’ were $60 each. I got one extra ‘nominal’ tossed in for free. Pretty sweet deal. Other members had brought some plant clippings so I was able to finish off my two 15 gallon tanks and drop in the morphs that day.
Yesterday I fixed the tank with the molding Grapewood, replacing it with Malaysian Driftwood, and adding a fern. I finished the foam for the other two tanks, and they should be complete by this weekend. Now it’s time to get my new shipment of imitators.
 For my first shipment I contacted Philip Tan of Fantasticus.net who lives up around Seattle, Washington. He’s closer than most people I could buy from, which is pretty much why I chose him. Plus I have contacted him before, he has a web presence, and the guy I bought my other imitators from also bought from Tan. Phil gave me the deal of ‘banded’ for $90 each, ‘tarapoto’ for $70 with $60 for FedEx shipping. He sent me some pictures so I could get a good idea of what he had. The pics looked good, so I agreed to get a trio of each. I’m doing odd numbers since all my frogs are current in odd numbered groups. Let’s just hope odd is a lucky number and I manage to get a breeding pair out of these.
If all goes well they’ll show up Monday. I’m praying they all show up healthy.
 The building process for vivariums is expensive. I’m starting to think it’s just best to know what you want, and then have it shipped all from one place. Actually, would would be way cool is to have already made backgrounds that were designed to be heavily three dimensional so you could just buy them and stick them to the back. Working with waterfall form takes forever.
Oh yeah, so about what foam to use. Touch n’ Foam is fine, but it takes a while to harden, and shrinks after a couple of days. Great Stuff is better, does shrink a little, but not nearly as much as Touch n’ Foam. So far the best and most expensive is Total Pond Waterfall Foam and Sealant from Home Depot. It expands much more, doesn’t shrink, hardens faster, and is a darker color so it looks more like rock and fade into the background better. I’ve using it for my last two tanks where I have made a tile drip wall with surrounding brides for the dart frogs. For these tanks I have removed the use of attached Malaysian Driftwood.
So I was thinking about trying a vivarium with a clay background. But I have to say they are heavy and frankly I’d rather keep a small tank as light as I can while still having form and function. Foam does that. So do hydroton over actual rock. Now Malaysian Driftwood is a tough one. Because it is heavy, yet it’s good looking wood and doesn’t mold. So I’m stuck with that and glass. Glass Vivariums are difficult for me only because they are heavy, not as solid when siliconed together without a rim. But they look good and they are cheaper than acrylic. Once again it comes back to form verses function.
 So the third tank is done and I’ll finish the last two over the weekend. I hope next week to get either a proven breeding pair, or group of juveniles. I know with the juveniles it’s more risky and it may be a while before I actually see any tadpoles. But I’d rather made sure I have the kind I want.
The Varaderos and Nominals are doing pretty well. They have adjusted to their tanks and now can be seen out and about, usually on the glass. Why they love to hang out on the glass I have no idea. But at least it makes it easier to use a macro lens and get a good picture.
So I’ve decided to focus on energies on the monogamous Ranitomeya imitator. These are bold, yet very small frogs less than 3/4th of an inch. From what I read they will do just fine in 10 gallon vivariums as a pair. So far the ones I have just like to hang out sitting on the glass all day. Since I’ve built five tanks, I’d like to focus on five different morphs of the species. These are:
- R. imitator ‘Nominal’

- R. imitator ‘Varadero’

- R. imitator ‘Intermedius Banded’

- R. imitator ‘Tarapoto’

- R. imitator ‘Yurimagunesis’

Some of these morphs look almost the same, but I’ll know better as I actually go about finding someone to purchase them from. I don’t plan to go as full out on multiple species like this dude.
Other things I have learned recently: Grapewood should never be put in a humid vivarium because it molds like crazy. Imitators don’t like coconut huts for breeding or pools of water. They prefer black or white film canisters.
Somewhere in all my SD cards are the pics that show the build process for my tanks. I know I have them. I just don’t know where. Until I find them I thought I’d show off the results of the first three tanks. The last two still need a little more foam, then to cut off a little extra foam, and then to be glued over with coco fiber. My guess is I’ll finish them in a month or so. Until then I’m also trying to fix the problem in the third tank. I used grapewood and it seems to be constantly molding. I’ve not seeded the tank with springtails, so with any luck, they will eat up all that mold until it’s in a condition to introduce a dart frog. The main two tanks don’t seem to have these type of issues and the new dart frogs are doing well. Except they also seem to have paired up, and I’m not sure now what to do with the third wheel. I plan to break the tanks up into breeding pairs, but where do I put all the third wheels?
Oh, well I guess I should have mentioned it at the start of this post. So it seems that Ranitomeya imitator dart frogs are the only amphibian species known to be monogamous. I guess out in the wild life for these little dudes works out better when there is a mother and a father helping to rear the young. Dad protects. Mom feeds. So what’s Uncle Bob going to do?
Ah yes, it seem that life as a third wheel is never good for anyone. And since I have no idea which is male and which is female, I can’t go try and sell Bob off for someone else to worry about. Well, they’re only a few months old, so why worry now?
 Last weekend I met with the Northern California Dendrobatid Society in San Jose, California. There were more than twenty people from all over the bay area who had brought plant cuttings, feeder insects, and a few dart frogs to share and sell with each other. It was a good meet and greet. I met this dude from Reno who drove all the way there because there are no poison dart frog enthusiasts in Nevada except Las Vegas. From him I picked up my first two species of dart frog.
The Ranitomeya imitator ‘nominant,’ and the Ranitomeya imitator ‘varadero.’
 These little dudes are less than an inch long and are very brightly colored. They are called imitators because their colors come from imitating a poisonous species of frog in the area of Peru. They fall into the Thumbnail category for collectors since they are about the size of the thumbnail. Anyway I got five of the nominant, or standard of the imitator hobby, and three of the varadero. They were not that expensive, but still expensive. The next trio I buy will probably cost more than a hundred each.
I finished a couple of my tanks that day and tossed these guys in. Okay, so the next thing I learned about R. imitators is that they are a very arboreal, which is a big word for the fact they light to spend more of there time crawling anywhere but on the ground. I expected this, but I didn’t expect so much crawling on the glass of the vivarium where they seem to prefer to hang out.  Yep, they made it to the light and made the mistake of jumping on it. I freaked out a little since they are expensive and I imagined they would burn themselves to deal. But the light is a 9w CFL. It doesn’t get nearly as hot as even the standard 13w CFL. So they jump on and quickly jumped off. I hope they learned their lesson, but they did it one more time afterward, which told me they were not all that hurt from the experience.
Well my main 5 tanks are almost complete. Which means my plan is to have a total of 5 thumbnail species to breed. I’d prefer imitators. I’d prefer not to leave the Thumbnail group and move into something like pumilios if I don’t have to. Although those are pretty sweet frogs. My current R. Imitator list includes the ‘Banded Intermedius,’ but at the moment with only 3 tanks complete and 2 on the way, I might just separate the tanks for breeding pairs.
 So I’ve been wanting a way to monitor the humidity and temperature of my vivariums. I’d prefer something for each tank, but for now I just want one digital gauge to measure with. I was really set on getting something externally that used remote probes, so the gauge wouldn’t break due to humidity. But I wasn’t sure how I was going to stick the probes into the vivarium when they were made to be fruit-fly proof. So I ended up getting a [amazon_link id="B0009YJWW4" target="_blank" ]Fluker’s Digital Thermometer / Hygrometer[/amazon_link].
One of the issues with getting a thermo-hygrometer for me was how to mount it. Suction cups always seem to get lose, and anything with sticky tape and velcro on the back either never adheres properly, or you eventually end up wanting to move it to a new location, which you can’t do, since you just taped the thing in place. I planned to move this between vivariums, and on the top and bottom of each vivarium to measure the difference.
I recently bought a bunch of magnets and found they’re quite useful in positioning things inside glass tanks. Looking around my storage I found the front of a cassette tape case, which the Digital Thermometer / Hygrometer fits perfectly in. This worked great in placing the gauge in the tank. It also allows me to flip the gauge around, so I can see it from the inside and outside of the tank. Not bad for a old case from the 80′s. Yet another case I still have a use for beyond film canister’s.
 So my Rare Earth Magnets arrived today. I purchased forty N45 1/2 in x 1/2 in x 1/8 in Neodymium Blocks and forty N42 1/2 in x 1/2 in X 1/4 in Neodymium Block N42. Four of the N42′s broke while I tried to take the magnets apart from each other. Actually they broke when they flew back together. That’s a waste of $2.00. These suckers are strong! My finger hurt and I have cuts after trying to pry them apart.
And they are stronger when pulling each other, which means two of the N42 blocks should be fine to place between 5/16ths of glass. Now the 1/2 inch of glass really needs the N45, which is why I got 40 of them to test out. Total over kill. When used with 1/8th inch glass, I’m pretty sure the glass would break if you were not careful. I need to adhere them with silicon tonight, so we’ll see how it all works. Maybe a N42 on the door with a N45 behind the glass of the terrarium would be best. We’ll see.
While I am taking pictures of the construction, most of my focus is finding the right parts for the job. Namely to keep the temperature in the high 70′s while my house is around 65 degree, the humidity at 70% to 90%, and allow for circulation of both air and water.
For lighting at first I was going to try and use those special 27W CFL’s which were four pronged. They seemed perfect, except the ballast system would need to be mounted somewhere outside the enclosure. Plus you never know how much those bulbs will cost in the future since they are so specialized. I finally settled on a [amazon_link id="B000HJ97US" target="_blank" ]Westinghouse Lighting 2-Lamp Socket[/amazon_link] which I hope to adapt to control the light separately. In the mean time I’m just using them with [amazon_link id="B00303FNRO" target="_blank" ]T2 13-Watt 5000K Compact Fluorescent Lights[/amazon_link]. At least until I know how much two will effect the temperature. Either way they are much more adaptable to screw into the top of the vivarium.
From previous posts you’ll see I build an air-circulation system. This may cool the temp, or at least even the temp out all over the enclosure in the high 70′s, and provide the air circulation I need so the vivarium doesn’t become so stagnant and a breeding ground for bacteria. I might replace one of those lights with a [amazon_link id="B001AARCUK" target="_blank" ]black light[/amazon_link] to help in this matter. I’m not sure how well it really does in killing microorganisms, but it does make a great night light. I’m still not clear if the dart frogs can see UV light.
The water pump was a big issues. I tried the [amazon_link id="B003JVCYHY" target="_blank" ]Eco-Plus 66 Pump[/amazon_link] but it was just too loud, and I had to cut the end off the plug to get it into the tank, then buy a new plug to replace the old one. Next I tried the [amazon_link id="sunterra pump" target="_blank" ]Sunterra Table Top 30GPH pump[/amazon_link]. It’s quieter, but not by much. But it is much smaller and it means I requires less water at the bottom of the tank. In desperation I pulled the pump off a water fountain I have on my desk at work. It’s a Jeabo 40GPH pump that has a light attached. It was amazingly quiet. However the water pressure topped out at 18 inches which is about the height I wanted the water to go.
After doing some research I have decided to go with a Jebao PP-333LV 65GPH pump. These were the reasons. The PP-300LV I tested was quiet but topped out at 18″. The PP-333LV will top out at 25″ giving mean some safety space. I’m hoping it will be just a quiet. The pump uses only 2.5w of electricity, so it’s energy efficient. I elected to get the 12V version, and not the 115V version. This means you must plug it into a transformer, making it easier to pull the cord into the tank though a small hole and attach it to the transformer after it’s connected. It also makes it easier to remove from the tank. Since there is a small light connected by a 7″ cord, I’ll either use the light to place in the water, or cut off the light, and attach the 12v fan internally. We’ll see how it works once they show up next week.
I finished off my version of the air circulation system and installed it on a 3/16 piece of ABS plastic. I also added in a dual lighting system. The parts for the final version of the air circulation system is as follows:
From Fry’s Electronics:
- Vantec HDC-502A Hard Drive Cooler $6.99 on the site, but I paid $9.99 in the store. For store prices, I paid about $5.00 for one of the fans.
From Home Depot:
- Orbit 1/2 in. Male x Female NPT Swing Joint Elbow $0.39
- Hunter Pro-Spray Shrub Adapter without Nozzle $0.68
- Orbit 3/4 In. x 6 In. Cut-Off Riser $0.67 on the site, but I paid $0.15 in the store. For store prices, I paid about $0.03 for one.
From Orchard Supply Hardware:
- Servalite Rubber Washer 7/8×3/8 $0.49
- Westinghouse Steel Nipples Zinc-Plated 1/8-IP Thread 1″ Length $2.19 for 4 = $0.55 for 1
- Westinghouse Hex Nuts $2.19 for 12 = $0.37 for 2
So that’s running about $5.00 for the actual fan and $2.50 for the mount. You still need to cut the cut-off riser and the shrub adapter, but the fan when modified fits right into the riser with little glue necessary. I’m still going back and forth about adding the mesh around the fan. I realize it’s safety precaution and may be a good idea just to be safe.
For $20.00 today I also bought some really nicely etched 1/4″ thick glass. But now I’m realizing it’s a waste, simply because of how difficult it is to make these vivariums from scratch, let alone modifying an aquarium.

I decided to take a trip to Fry’s Electronics, Home Depot, and Orchard Hardware Supply to see if I could make this air circulation system myself. I was surprised about some of the mistaken parts I listed and what other parts I found that would work just a well. Rather than change my list, I’ll create this new one.
From Fry’s Electronics:
From Home Depot:
- Nibco 2 x 1-1/2 in. ABS Reducer/Increaser $2.25
- Orbit 1/2 in. Male x Female NPT Swing Joint Elbow $0.39
- Toro Funny Pipe 1/2 in. Male Adapter $0.59
- Hunter Pro-Spray Shrub Adapter without Nozzle $0.68
From Orchard Supply Hardware:
- Servalite Rubber Washer 7/8×3/8 $98 for 2
- Westinghouse Steel Nipples Zinc-Plated 1/8-IP Thread 1″ Length $2.19 for 4 = $0.55 for 1
- Westinghouse Hex Nuts $2.19 for 12 = $0.55 for 3
- 30 x 12 in. Cut of Charcoal Mesh $0.79
Total Cost for 1 Air Circulator = $12.77 + tax (excluding the cost for extra parts to build more systems)
 Conceptually everything fit together well. The reducer/increaser works pretty well to hold the fan. I connected it to a sawed off 1/2 male adapter and it all connects well to the swing joint elbow. And using the shrub adapter with a steel nipple held in place by hex nuts worked perfectly. Even adding in the fan and surrounding it with some mesh wasn’t hard.
The down side was connecting it to an electrical current. You do the polarity wrong and the fan motor will overheat and break. So test it at a lower voltage until you have it the way you want it. I blew mine out playing around.
The fan runs at 30db which is loud when there is nothing to bring the sound down. After this tests I may be looking to a quieter fan should the plan to be to run this all the time.
 Well everything started dying in the fruit fly culture with mold, and in two of the old cultures. So now I only have two cultures left. I made an extra today with extra 1/4 cup of water. We’ll see if that one does better.
In the mean time I’m back to working on the internals of a vivarium. Specifically trying to build an internal circulation system, which is a fancy way of talking about a fan for the inside of the tank. There is a great article by Glass Tropics: DIY Air Cicrulation. I won’t repeat the article. You can go there yourself and read it. What I was interested in is pricing out all the parts online from the two stores mentioned. Fry’s Electronics and Home Depot. A few things had to be changed, but in general this is what I’m finding.
- 40mm PC Box Fan (8.5cfm, 12 volt) – $9.99 – This 5 cfm was the best I could find online at Fry’s Electronics.
- NIBCO 3 in. x 2 in. ABS DWV Hub x Hub Reducing Coupling – $5.97 – Not exactly what I was looking for, but close.
- Phifer Screen Repair Kit – Charcoal Aluminum – $2.79 – Probably cheaper to cut your own piece from a bolt of insect screen.
- Orbit 1/2 in. x 3/4 in. Male Pipe Thread Poly Riser Adapter – $0.30 – You only need the 1/2 in side.
- MUELLER STREAMLINE 1/2 in. PVC Threaded Cap – $0.60 – This is white, but I’m sure you can find it in black.
- Orbit 1/2 in. Male x Female NPT Swing Joint Elbow – $0.39 – One of the few exact parts from the instructions.
- Watts 1/8 in. Lead-Free Brass Pipe Nipple – $1.64 – I’d love to find this in nylon black.
- Crown Bolt 3/8 In. Nut Hex Coarse Thread, Zinc Plated – $0.11 – I’d love to find this in nylon black.
- 3/8 In. Washer, Nylon – $0.63 for 2. – This is white, but I’m sure you can find it in black.
TOTAL = $22.42 + Tax
Certainly this could be done cheaper, even at store prices. But it starts with the fan. I agree that a 40mm is probably the best option. But the covering for the fan might be an overkill. I’d just get a fan filter.
 So it seems to take around 10 to 14 days for a culture to grow. Today I’ve start culture number two based on my own mix. This mix is as follows:
1/4 cup dry media – 4 parts instant potatoes. 1 part brewers yeast. This was mixed a while back.
1/2 cup wet media – 2 parts water, 1 part vinegar. This is boiled together in a coffee maker.
I let it sit for half an hour and then sprinkled bakers yeast on top. Best to let it sit a while since the fruit flies will die instantly if the food media is still steaming. I also tossed in a few coffee filters. They don’t degrade as fast, the flies love to sit on them, and they make an excellent place for larva to cocoon. I put a good amount of newly hatched fruit flies in. After about 5 days the cup will be teaming with larva. After that I’ll use the flies as food for my dart frogs.
Sadly, the wet media was not fully absorbed by the dry media as I had hoped. This may be due to the vinegar I added in to avoid the mold problem. However the mold occurred in the last culture only in the area that was left dry. This concerns me. In the future I’ll try a 1/5 cup of dry media to see if that works out better.
So the Fruit Fly cultures from 11/27 hatched in two weeks. One of the cultures from 11/3 got mold around the same time. I’m letting the mold grow while I start new cultures. The one with mold happened to have too much food media, so maybe that will teach me something. The next culture I plan to try 1/4 cup of the dry mix I made with 1/4 vinegar and 1/4 water. We’ll see what that does.I’ve started rotating 2 cultures every week as I learn what works and what doesn’t.
 In starting a new vivarium I made a silly mistake of not actually gluing the glass, but rather only adding silicon to keep the water in. The silicon appears to hold, but will not stand up to the heavy pressures of moving the vivarium. I’m not sure if I want to clean all the silicon off and try again on these first two vivariums. One of the glass pieces fell due to bad placement and now I have broken edges. I’m trying to decide if I could continue to try and make a vivarium with the broken edges, or accept the loss and move forward.
The video was shot on November 14. I’m not sure why I said it was October.
 I admit to being a little frustrated when I cleaned the excess coir off the foam background, only to find the silicon I was suggested to use, didn’t really keep much sticking to it. So I cleaned as much excess as I could away, and then searched for a new alternative. I was surprised to find the suggestion of using polyurethane glue to stick the coir to the polyurethane foam. How toxic is polyurethane and how will it effect my dart frogs?
Generally speaking some polyurethane is more toxic than others. But if you keep the additives and solvents away, it’s usually won’t hurt anyone once it’s cured. That being said, it’s pretty toxic before it’s cured. So where does that leave me? I keep reading things like “non-toxic,” “environmentally friendly,” and “safe for fish and plants.” But more often than not, either the words are tossed around by companies trying to sell you something with little meaning behind it, or they don’t bother to make such a statement, because the general public isn’t using their product to make a vivarium for dart frogs.
I’ve got not problem with polyurethane expanding foam. I am currently testing out [amazon_link id="B003AZ49E0" target="_blank" ]Waterfall Foam Sealant[/amazon_link] because it’s black and said it was basically non-toxic. Black is good because at least when the coir falls off, it looks like rock. But it appears that I could use the eco-friendly [amazon_link id="B0012UP804" target="_blank" ]Touch ‘n Foam[/amazon_link] or the general purpose [amazon_link id="B0002YW0W0" target="_blank" ]Great Stuff[/amazon_link] if I wanted. They are both much cheaper, with the only negative being they are not black.
 As far as polyurethane glue goes to keep the coir on the background, I was deciding between [amazon_link id="B000MVOX3C" target="_blank" ]Elmer’s Ultimate[/amazon_link] and [amazon_link id="B0000223UV" target="_blank" ]Gorilla Glue Adhesive[/amazon_link]. I’ve heard that Gorilla Glue is good stuff, but the company likes to talk big, so I wonder how safe it is compared to Elmer’s. After a bit of research, my guess is they are about the same. So I’m going with Elmer’s since it’s cheaper, and it doesn’t bubble up as much while curing. Time will tell if I made the right choice.
My objective is to build desktop vivariums for thumbnail poison dart frogs.
I chose the desktop vivarium concept because I love the idea of keeping a small enclosed rainforest at your desk at work or at home. I wanted it to be something soothing you could both view and listen to.
I chose thumbnail poison dart frogs because I also wanted something living to inhabit the ecosystem. These creatures are small enough to live and breed in them comfortably, they are active during the day, and they are brightly colored to standout again all the foliage.
The components listed are what I think are necessary to build these enclosures yourself. I always suggest people purchase what they can from local suppliers. Small business owners need your support and sometimes have sell the things no one else can since they cater to a niche market. And the franchise owner is still someone who is investing in your community. Give them a reason to do so.
If you need to buy over the internet because you can’t find it locally, I understand. Therefor all my recommended components, if possible, will be available from amazon.com though attached links. I hope this helps those who can’t find what they need at the local plant nursery, hydroponics store, pet shop, hardware, glass, or pond shop.
Enclosure
[amazon-product alink="FFFFFF" bgcolor="#000000" bordercolor="#000000" height="240"]B000QFR638[/amazon-product]Aquarium, Terrarium, Vivarium, Paludarium, Riparium. You can call it what you want, but what you want is an enclosure for your dart frogs. Those who raise or breed dart frogs generally call it a vivarium, full of plant life. Dart frogs generally require a temperature around 70 – 80 degrees and a humidity of 80 – 100 percent. They also tend to eat small animals they fly. As such you generally want an enclosure that will keep the humidity and food from escaping, while offering and easy way to open the vivarium to feed the frogs, trim plants, mist the area, etc.
While there are few enclosure out that meet these specific needs, The [amazon_link id="B000QFR638" target="_blank" ]Zoo Med Naturalistic Terrarium[/amazon_link] may be as close as you can come. It’s a good size for two dart frogs and still small enough to put on a desk against the wall or cubical divider. I have not tried this system, but I like it better than the two doors on the [amazon_link id="B000OAVN0W" target="_blank" ]Exo-Terra Glass Terrarium[/amazon_link]. I keep thinking there is no way to make sure fruit flies don’t get out between the doors.
[amazon-product alink="#ffffff" bgcolor="#000000" bordercolor="#000000" height="240"]B0006JLU9U[/amazon-product]Aquarium Sealant is non-toxic and when you have a crack in the glass or between plastic, this is very useful. I can’t say any one sealant is better than another. You’ll probably want clear sealant, although I personally tend to use black sealant.
Use this not only to fix the cracks, but around the glass opening for your vivarium. Let the sealant harden, then use a razor blade to slice away the glass from the edge of the vivarium. That way to have a tight seal on the vivarium when the door is closed. You might also want to seal a new glass or acrylic top on the vivarium to keep the humidity level high.
One ounce should be enough. So I suggest [amazon_link id="B0006JLU9U" target="_blank" ]Perfecto Silicone Aquarium Sealant[/amazon_link] since you can buy only one ounce. But again, I think any aquarium sealant will do. Black might be nice if you want the sealant to blend in with your frame.
[amazon-product alink="#ffffff" bgcolor="#000000" bordercolor="000000" height="240"]B000FPC3BY[/amazon-product]Glass and Acrylic are basically the two options you have when it comes to a transparent enclosure you can make yourself. My personal choice is glass, since it doesn’t scratch as easily. In the process of putting a vivarium together and building a background, you’ll be using a razor to scrape things off the sides of the vivarium. And for all that, you want glass. I would never buy glass online since it would be so easy to break a pane of glass during shipping.
Having said that, I am referencing this [amazon_link id="B000FPC3BY" target="_blank" ]12″x12″ Acrylic Sheet[/amazon_link] to replace the top of a [amazon_link id="B000QFR638" target="_blank" ]Zoo Med Naturalistic Terrarium[/amazon_link] so you can keep all the heat and humidity fro escaping. You may want to keep the ventilated top on, and place this above it, so you can keep a little vent space open. You might also want to choose a small acrylic sheet for the same reason. You can always get some cutting tools to easily cut the acrylic yourself. You’ll want this clear so your light can shine through.
Background
[amazon-product alink="FFFFFF" bgcolor="#000000" bordercolor="#000000" height="240"]B001AQ0FVC[/amazon-product]Polyurethane Expanding Foam can be used to design the background of the vivarium. The background is fairly important since most thumbnail poison dart frogs tend to stay off the ground.
While there are a number of types of expanding foam on the market available, you’ll most likely want your foam to be black and non-toxic. This way it will blend into the background and will not harm anything living in the vivarium. I would highly recommend any form that is used for landscaping in the creation of ponds or waterfalls.
[amazon_link id="B001AQ0FVC" target="_blank" ]Great Stuff Pond And Stone Foam[/amazon_link] works well and should be enough for a 10 or 15 gallon vivarium. Be sure to wear gloves. After it hardens, cut out ledges and hideouts. Non-toxic is a very relative term, as many expanding foams are non-toxic but not listed as such. If you don’t care about the color, you may also want to try [amazon_link id="B0012UP804" target="_blank" ]Touch ‘n Foam[/amazon_link] for 1/4th the price. You’ll have yellow foam, but it will be covered by your coco fiber.
[amazon-product alink="FFFFFF" bgcolor="#000000" bordercolor="#000000" height="240"]B0002AQDZ4[/amazon-product]Coco Fiber, otherwise known as coconut fiber, or coco coir, is used to cover the background since it looks good and is a safe medium for dart frogs to cling to and jump around on. It also holds up well in water and absorbs water, which helpful for any plants that will be added to the background who need a way to bring water to their roots. As it’s all-natural, it’s also non-toxic.
Often sold in compressed bricks, you’ll need to soak them in water to uncompress. After half an hour, you’ll have quite a bit of coco fiber to both add to the background, and use on the floor of your vivarium.
[amazon_link id="B0002AQDZ4" target="_blank" ]Zoo Med Eco Earth 1 Block[/amazon_link] produces more than enough for a 10 or 15 gallon vivarium. I think having more is better, since you can layer it on your background as your glue hardens. You might as well get the [amazon_link id="B00025YVEE" target="_blank" ]Zoo Med Eco Earth Three Block Pack[/amazon_link] since they are pretty cheap and you can always use more.
[amazon-product alink="FFFFFF" bgcolor="#000000" bordercolor="#000000" height="240"]B0001GAYRC[/amazon-product]Polyurethane Glue is the best option for attaching the coco fiber to the expanding foam background. I’ve tried silicon, but it doesn’t harden to the fiber as well as this glue will. The polyurethane glue you choose should be transparent, waterproof, and environmentally friendly.
While there are many types of polyurethane glue that will work, [amazon_link id="B0001GAYRC" target="_blank" ]Gorilla Glue[/amazon_link] tends to be the most used.
My advice would be to spray the expanding foam with water first. Than lather the glue over the form with a brush and drop some moist coco fiber on top. Press the fiber down against the foam while it hardens.
Another suggested glue is [amazon_link id="B000MVOX3C" target="_blank" ]Elmer’s Ultimate[/amazon_link]. It’s cheaper than Gorilla Glue and will not bubble up while curing. I’m not certain how environmentally friendly it is compared to Gorilla Glue, or how environmentally friendly translate into non-toxic. But I’ve read they are pretty much the same thing.
 So after getting the aquarium I decided it was time to start the build. This is my first vivarium of eight I am planning to make. I plan to document each one as I learn what to do and what not to do.
I began the build by drilling a hole for the plug from the submersible pump. In my attempt to speed up the drilling process on the aquarium I cracked the damn glass while applying more pressure than necessary. Drilling apparently needs to be a slow process, as you sand or chip away at the glass. Apply a little even pressure and it’s okay. Too much and you get a big crack.
After looking at the crack for a while I decided it was not as bad as I thought and put a little silicon on it. Since it was part of the process, I decided it was time to drop in the submersible pump. I cut off the plug, pulled it though the 1/2″ hole, and added a new rubber plug at the end. Then I set it into position and sealed the hole with silicon. After three hours the hardened up and looked pretty good. I did not silicon the outside of the tank, but will probably do so at the end of the build.
 I am a person who tends to do it trial by fire style. I don’t test. I just do it. Since I had a couple more hours to kill I decided to build the background. I took my compressed brick of coconut fiber for the background and added water to expand it. I took my Malaysian driftwood and boiled it for fifteen minutes to clean out the tannins that turns the water brown. Then I grabbed the Waterfall Foam Sealant and went crazy. That last part was probably a bad idea.
Okay so I choose the Waterfall Foam Sealant since it was black and was normally used for situations where there was water and plants and animals involved. I’ve never used it before, and now the tips of my fingers are black and covered in polyurethane because of it. First, if you are going to use it, set the tank on it’s back. Let gravity be your friend. If you don’t everything will ooze down to the bottom of your tank. Second, don’t worry about the sides of the tank if you are using glass.  You can always take a razor blade to it when it hardens and it will come right off. Third, it will take about fifteen minutes before it expands and another five before the outside shell hardens. So take your time thinking about where you need the foam to go, and both drop your driftwood and the coconut fiber in place about 10 minutes in. Use something to keep the driftwood where you want it while the foam hardens, and make sure the coconut fiber is dry. Last, you only have 12 ounces and it goes fast. So make sure you know where you want it. You may even want to use some styrofoam to make ledges to be cover with the form when it’s ready to go.
I know these things now. But it was a good learning experience. Everything hardened too soon for me and I didn’t know what to do next. I added silicon on the top of the foam to hold the fiber in place and put a heavy topping of fiber. We’ll see how well it hold tomorrow.
 Pulling the frame off the 10 gallon aquarium didn’t work out as well as I’d hoped. The Top Fin Aquarium from PetSmart was only around $14.25 after tax, but the after ripping the frame off I found the layering of silicon a little too heavy on all the edges, the glass itself was only 1/8th inch thick with sharp rugged edges, and the bottom was glued on about a quarter of an inch away from where it should be. I was not happy. I won’t say it was a waste of money. I can always use it for other things. But I don’t think the experience it worth teaching others about. I considered getting a 20 gallon aquarium for the thicker glass, but that would be at least around $35 after tax and I’d probably end up with the same issue and no thick glass.
 I looked into other options. I could build from scratch, but that would be expensive unless I cut corners. I could buy something nice online, but on any glass the shipping would be costly and probably get cracked. The Exo Terra and Zoo Med systems looked nice, but they still would need to be modified to fruit fly proof them. I even went over to Easy Bay Vivarium hoping they might have a solution for me. They had some great reptiles and great accessories, but nothing I wanted when it came to tanks.
 On the way home I happened by Blue Lagoon Aquarium, in San Jose. Amazingly, they had 15 Gallon frameless aquariums for about $33 after tax. These were 21.5″ Long x 11.5″ Width x 14″ High. They were oddly kept together with black silicon, but the glass edges were smooth with a slight tint and 3/16ths of an inch. I was told my the owner the glass was not tempered as he has drilled into it before. Knowing that a frameless 17.4 gallon online would cost me around $85 with shipping, it seemed worth it.
 So now I’m ready to go. Once I build the inside structures the way I like them, including the waterfall, I’ll need to build a way to enter the vivarium from the front. I’ll try and use glass for this. Ken’s Glass & Mirror Company turned out to be a little strange, but well worth knowing about. Ken doesn’t sell much glass. He pretty much just gives it away, or offers it at a super low price. That is unless you want the good stuff. That’s expensive. But if you don’t want the good stuff, you can get a 20″x20″x1/8th” piece of glass for free. Actually, you can get about 50 pieces for free. After 50, it’s gonna cost you $1.
  He’s got quite a collection of tempered glass in different sizes for free, but since you can’t cut it, I’m not sure what he does with it. Maybe in the future I’ll try making smaller vivariums with all of that.
Anyway for a couple bucks Ken will cut the glass and sand smooth the edges for you. So I figure I’ll have Ken cut me the glass I need next Saturday. I hope by then I have the inside of the vivarium ready to go. Wish me luck on cutting the hole for the waterfall pump. I’m going to need it.
 Around 10 or 11pm my dart frogs head for bed. Unfortunately they don’t have enough beds. Or maybe the other beds are either out of reach or not clean enough. I’m not sure. While some of the guys get their own bed, others needs to bunk up with each other for the night. I’d like to try and make it easier for them, but I’m still not sure how they choose one leaf over another. Since they are all still juveniles, I don’t think they are hiding any little tadpoles from me or something like that.
The bromeliad plants seem to be the only place they want to sleep.  Once in a while one will sleep on his own near the top of the tank or under a rotting leaf at the bottom. But general if I do a count in the middle of the night, it’s in the bromeliad. One of the lucky ones sleeps on the highest bromeliad on his own. While trying to take a picture with my new macro lens, I found this is the most humid of all places in the tank. Lucky guy.
Today I decided perhaps it’s a cleaning issue. So I went out and got a mister to try and clean the tank a little. I have never misted the tank, since I thought the waterfall gave enough humidity on it’s own.  But I see now that it’s necessary to help the breakdown of waste.
As I work on building the breeding tanks, I’m starting to wonder where I’ll put the lights. My fear with placing it inside the tank is that it would be hot enough to keep the place warm, but also end up burning off all the humidity. Now I’m beginning to think with a waterfall and only a small vent at the bottom of the tank, there is not way you can remove the humidity. So the next task is getting an enclosed circulation system going.
 It’s been 8 days since I started a new fruit fly culture. A couple days ago I could see the little maggots on the plastic. But now you totally can see them big and huge, looking for a place to cocoon and transform into their adult form. This time I was more careful in making sure the food media didn’t get contaminated. I realize now that coffee filters need to be twisted into flowers poking out of the food media so they have enough edges for all the fruit flies to sit on. Otherwise the fruit flies will crush each other to death.
I made that mistake with the last batch. Plus I used brawny paper towels and not coffee filters. The towels soaked up all the food media and hardened up pretty fast.  And with very little perching for the fruit flies, most were dead in the first two days. I don’t think the remaining flies will make enough food for the next week, but the new cultures should be ready by them.
Yesterday I decided to try making my own food media. I mixed 8 parts instant potato mix with 1 part brewer’s yeast. I dropped half a cup onto a 32 ounce container and poured another half cup of boiling water over it. Big mistake. only half the mix was saturated, and pouring another half cup of water didn’t help. In the future I’ll probably use 1/4 cup of mix and 1/2 cup of boiling water. Then a sprinkle of baker’s yeast. Anyway, we’ll see how things go in 8 days.
 Since I am worried all the other flies will starve to death, I decided to put them into the container with the frogs. Unfortunately that’s too many flies for the frogs to finish off. And the vivarium by Tropical Ecos is not as fly proof as they state. So in a few hours there were flies all over the house. Luckily I managed to plug the holes I could find. Still, it’s really annoying. The next enclosures I’ll be making myself.
 So today before the all the kids came down the block for Halloween, I went out to buy some supplies for the new vivarium. A mile down the street at Southbay Hydroponics and Organics I got an ECO66 submersible pump and 2 feet of black tubing for $9.50. The dude was cool enough to toss me some Hydroton in a plastic bag. I will totally go there to buy more of those once I’m ready. I also forgot to get some biodegradable pots for plants. I wonder how much are those. Then I headed over to King Aquarium to buy some Malaysian wood. They totally overcharged me $12 for each piece. I was bummed, but the pieces are really nice, and at least I got to pick them out. Not forgetting my friends at Petsmart, I picked up a 11 liter bag of T-Rex Jungle Bed to cover the back of the tank, not to mention a big round piece bark, all for $26.50. Finally I stopped off at The Home Depot, and was going to get the same foam sealant that I see everyone get for like $4 a bottle. But then I decided I rather pay more for something that expands larger, is black, and is safe for fish and plants so it doesn’t require me to cover it in silicon when I’m done. So I picked me up some Waterfall Foam Sealant for $13.00. You all know I’m rounding and haven’t added tax, right? I was going to put it all together tonight, but then I realized I don’t have the glass drill bit, or the replacement plug for when I cut the end off the pump.
Some of these things I don’t worry about. Box cutters, glass cutter, tube of silicon, glass drill bit. Tools you always need. But for each tank I’m going to need a pump and a lighting system. I want them all as independent as possible. And while the foam, forest substrate, and bark might last me a couple vivariums, I’ll always need more Malaysian wood. Things are getting expensive. I’m still trying to figure out how much all the plants will cost.
It all makes me think that perhaps I could spend a little extra building my own enclosure from scratch. Yes the glass is cheaper, and I’ll finish this test one. But Ken’s Glass & Mirror Company charges $50 for a 48×60 piece of 1/8 inch glass. TAP Plastics changes $93 for a 50×98 piece of 1/8 inch standard acrylic. They both will charge you by the square foot if you don’t want a full sheet. I’m thinking I may go over to Taps and build me a enclosure with the top, bottom, and back made from some textured black ABS Sheets. I’ll have the sides and front made using the acrylic sheets with the green edge. This should make the system a little lighter.
That’s what I’m toying with now, until I make this to Home Depot again this week. Oh, 5 days and no larva if anyone is curious about the fruit flies. Later I’ll be testing using only Brewer’s Yeast and the Instant Potato mix for the dry mix, and adding water with a little vinegar, then sprinkled with baker’s yeast when it all done.
 One of things I have been wanting to do to fix up my vivarium is get some duckweed (lemnaoideae). I was meaning to do it right when I got the tank, but it just never happened. Duckweed is pretty much the main water treatment plant if you have an enclosed water system in your vivarium. I obviously have a waterfall which helps to keep the humidity up, but the water is still brown. If you need to fix the pH balance from the waste that trickles into the water and then builds up in your tank, you may need duckweed. The duckweed grows like crazy, so you’ll need to clean it out from time to time. Also, make sure it’s just located in the little shallow pond and far away from the water pump. Duckweed gets into everything and it will toast your pump. I also wanted duckweed so when my fruit flies fell into the water, which they always do, they would have sometime to climb onto, rather than drown and be wasted.
I went over to Bay Area Water Plants to get mine. The company is really just this dude and he was late showing up for me to buy a dollar worth of duckweed.  He convinced me while I was there to also get some fairy moss (azolla). I thought since this stuff was native to the same area as dart frogs, it would be fine. But as I’m not sure how much it helps as compared to duckweed, I have not added into my vivarium yet. I know it somehow has a relationship with a bacteria that allows it to pull nitrogen from the air. Anyway maybe I do need to help with nitrates in the soil as well. I’m getting some mushrooms growing in the tank now. I’m told they will not harm the frogs. But I think this means I need the duckweed.
 So I was looking for a glass aquarium with no frame online. I haven’t had luck seeing them around San Jose, and I didn’t really want to get one custom made. Last night as I was contemplating my options on making a breeding tank, it occurred to me that I could just remove the frame from a cheap glass tank. So with that in mind I went out today and got two 10 gallon glass tanks to try to setup for breeding thumbnail poison dart frogs. I’m sure it will be a while before I end up getting the frog. Right now, I’m focusing on building a nice tank that someone might want sitting in their house to show people.
This is what I purchased. Two Top Fin 10 Gallon Aquariums at Petsmart for $12.95 each. I also picked up a box cutter with four extra blades for $2.95 and some rubbing alcohol for $1.05. Using the box cutter I was able to score the rims of the frame near the corners or middle, then cut some of the silicon away from the rim. After all that I basically bent and broke the frame into little pieces. Actually, that took a pretty long time with a pair of pliers. You need to be careful not to push the pliers against the glass as leverage, or you’ll chip the glass. But the plastic frame will bend where it has an edge and where you score it. As long as the silicon was cut away, should break off easy, although it may not bend that easy. The tedious part after all that work is using the extra blades to scrap away the extra silicon. The rubbing alcohol is great for cleaning the glass and seeing where the silicon still needs to be scraped. For me I wanted to make the back a little nice and scrape the outside.
 My wife noticed I also happened to buy some glass cutters and extra silicon for when I finish the front. She wanted to know why I didn’t get go and buy some glass or acrylic, rather than buy a tank already made. Well I could have gotten some sheets of acrylic at TAP Plastics. But the fact is, acrylic costs more than glass, and there is something nice about glass that I just don’t get from plastic. I would rather have glass. Tomorrow I’ll check out a local place called Ken’s Glass & Mirror Company. My guess is that for him to cut the pieces to make a 20x10x12 tank will cost me more than the Top Fin 20x10x12. But it’s worth getting the intel. I could try buying the glass and cutting it myself. I need to do that regardless just to finish the front of the tanks. In the mean time the frameless or rather rimless vivarium looks nice. I’ll try and make a video over the weekend as I rip apart the other one.
 So it looks like I was wrong about how much fruit fly food media I had left. There was just enough to make three cultures. And since my other cultures just hatched, I figured I might as well make the ones for two weeks from now. They always take about two weeks until I have some flies.
This weekend I’m headed back to the Cash and Carry to see if they have Brewer’s Yeast to make my own fruit fly food media. Otherwise I’ll check a nutritional store. But I think for the mold inhibitors I will try using vinegar. It’s just easier to find and is supposed to achieve the same effect. I just need to determine how much I need to use.
On the down side, as I planned to make my own vivariums to breed some thumbnail poison dart frogs I fell into some bad luck. Petco had a one dollar a gallon sale on tanks, and it ended on October 23rd! I just missed it at the start of this week! Oh well. Sometimes it seems you’re always a day late and a dollar short for just about everything. I guess I’ll just have to wait till the next sale, or move on some different ideas for vivariums. There are some amazing tanks out there, but none of them are designed to keep these fruit flies or springtails from sneaking out, or are really for vertical vivariums that require high humidity. I guess that’s why you need to design them yourself!
 So after three months the little bag of fruit fly food media is almost gone. I think I have enough for 6 more setups. Rather than going out and buying more, I’m going to try and mix up some myself. I’ve been doing some hunting online, trying to come up with a dry culture recipe that I can store for as long as I need. It appears that this is an ongoing issue, as fruit flies, or Drosophila as they are called, are used heavily in lab and science experiments. So culturing them in necessary in many colleges around the world. There are a bunch of recipes online, some of them instant, some of them dry which can be stored for a while. There are the general ingredients:
8 cups – Instant Potato Flakes. The bulk of the fruit fly media is going to be made up of this. Those larva need their protein and simple carbohydrates. I was over at the Cash and Carry and happened to pick up a 6 gallon can of True Recipe Instant Mashed Potatoes Complete. No idea if this is what I’ll need, but it was only around $6.50.
3/4 cup – Brewer’s Yeast. a source of B-complex vitamins, chromium, and selenium. These help break down carbohydrates, fats, and proteins. While you want enough to encourage health growth of larva, too much as you’ll also encourage bacteria growth. I still need to find this. As this is one of the main ingredients, I’ll need about half a pound.
4 teaspoons – (Methylparaben) Mold Inhibitor. Yes, you need to stop mold from growing on the food media while it sits. Tegosept is referenced often. Methylparaben is commonly used as a fungicide for fruit fly cultures. For wet cultures Vinegar is referenced. I have heard mention of Methylene Blue or Calcium Propanoate being used. As for me, I’m still undecided on what is best to use, but I’m going to hunt for Methylparaben first, Calcium Propanoate second. After all the running around I may just got to a fish store and get the Methylene Blue.
I just happened to read that Rainforest Station Pets sells 5 pound of Brewer’s Yeast for $8.99 and 1 pound of Methylparaben for$8.99. I may have to check them out if I don’t buy local. They are located in the evil Grand Rapids, Michigan.
Once I’m done, I’m going to take a cup of the above mix and drop it in a 32 ounce container. The I’ll add a cup of boiling water. Who knows, I could end up with mashed potatoes.
When the mix is cool, I’ll sprinkle Baker’s Yeast on the top. My wife got me a 4 ounce jar of Fleischmann’s Bread Machine Yeast from Walmart for around $8.00 back when I needed it for the fruit fly media. This is to ferment the food media. Some people seem to add sugar into the mix, but I don’t plan to since it actually slows the fermentation process.

As a child I loved to hunt for frogs. Near my house there where I grew up there were steams and ponds where I would spend hours sitting patiently, waiting to cross paths with a big frog. Growing up in Michigan, there was not a wide selection of frog species. Most of the frogs I caught were your average bull frog. But I would catch the ones I could, toss them in an old aquarium I kept for those occasions, watch them for a few hours, then let them go in the stream so I could catch them again the next day. Sometimes I was able to find a turtle. But usually all I could find were frogs. I had other pets as time went on, but when I went hunting, I went hunting for frogs.
The aquarium I kept them in was only about 10 gallons, and usually half filled with water, and half with rocks in an attempt to make an island or some type of land mass for the frogs to sit on. I had always planned to make something more permanent, using whatever I could find in the forest or the garden. But I never did. It was on my to-do list, and as I got older I would dream of the little tropical paradise I would build behind glass.
Twenty years later I decided I needed frogs in my life again. It’s been a long time since I was that little kid hunting for frogs, and I missed those little dudes. So on the day after I moved into my new home in San Jose, California, divine providence decided the Herp World Expo should be in full swing only a few miles from the house. After a bit of unpacking, I headed to the convention center with a wad of cash in my pocket.
It was there I met the couple who run Tropical Ecos. They were selling these excellent vivariums 18x18x24 inches in size, not to mention a nice selection of dart frogs. At first my plan was to buy one empty and build it up from scratch. But then I realized that would take months and I wanted to learn with one already setup.  So after a little negotiating, I bought a system ready to go, and seven dart frogs to put in it.
Now I admit, I don’t know a thing about dart frogs. And as a novice, I picked the species that I though could handle someone new to their care. The guy who sold them to me didn’t tell me much about them, except they were babies, and would get maybe an inch bigger as adults. I looked them up online, and they are known as Dendrobates Leucomelas. I just call them the magnificent seven.
So that’s my story. It’s been three months since I setup the system in the house. The frogs are doing well, and I’m learning as I go about culturing fruit flies for their food. I nicked the edge of the vivarium, one the door magnets is falling off, and as much as they claim for there two be no gaps, there are two small ones on the edges of the metal that hold the glass front in place. Plus one the lights Tropical Ecos sold me was broken so the bulb can’t come off. Otherwise the plants are holding up well, the dart frogs are enjoying life, and the pump for the waterfall has been running constantly with no issues.  I also added a blacklight for night viewing, and a little fish. Not sure if the fish is making things better or worse.
On this site, I plan on documenting my interest in making desktop vivariums for thumbnail dart frogs. I’m hoping for vertical vivariums that use 5 gallon or 10 gallon glass jars, or plastic containers that may work better to meet my needs. The general goal to make something that someone could put on a desk or coffee table, where the vivarium could be viewed from all sides. This is an ambitious task, but I think it’s worth the efforts. Who knows, if all goes well, I could have a vivarium at work in the next few months.